

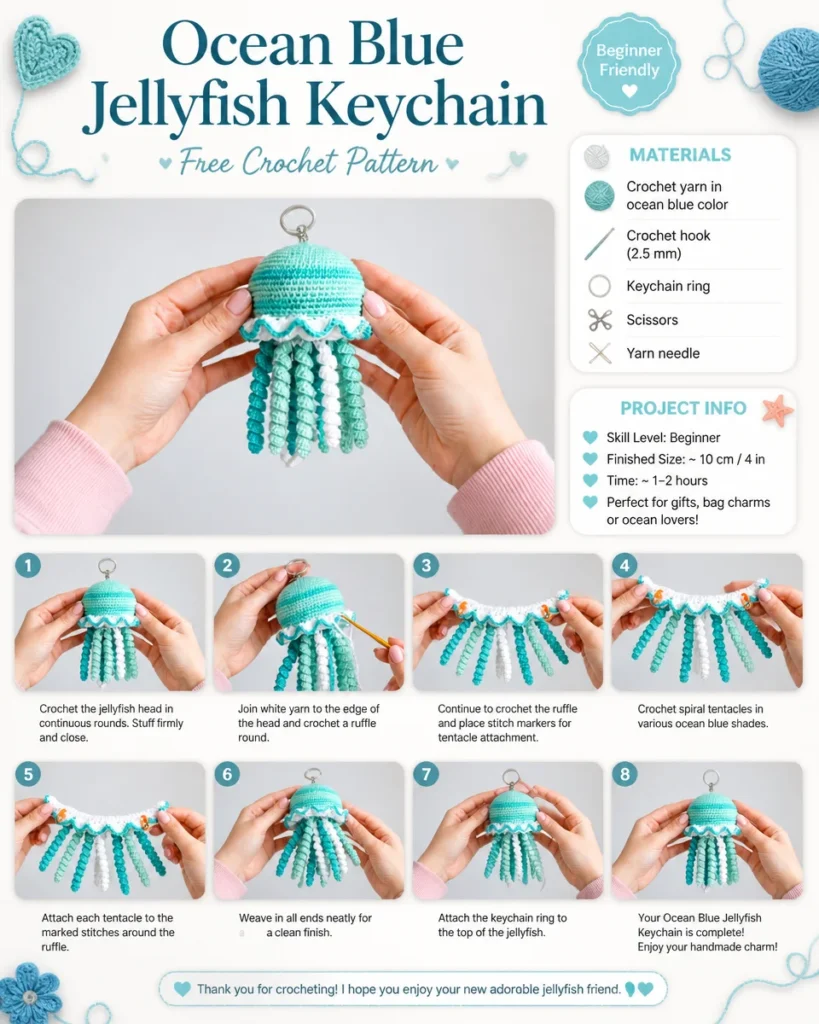
Dive Into Crochet: Create Your Own Ocean Blue Jellyfish Keychain
Unleash your inner artist with the delightful art of crochet as you embark on a journey to create your very own Ocean Blue Jellyfish Keychain. This charming project not only brings a splash of creativity into your daily life but also serves as a fantastic way to unwind and relax. Whether you’re a seasoned crocheter or a total beginner, this free crochet pattern is designed with simplicity and clarity to guide you through the process of crafting your own unique accessory.
The Charm of Crochet
Crochet is more than just a craft; it’s a way to express yourself, engage your creativity, and make something beautiful with your hands. The rhythmic motion of stitching can be incredibly therapeutic, transforming your thoughts and stress into a piece of art. This Ocean Blue Jellyfish Keychain is the perfect project to immerse yourself in this wonderful world.
Why Choose This Pattern?
- Beginner-Friendly: This pattern is specifically designed for those who are new to crochet. Each step is broken down to ensure clarity and ease of understanding.
- Personalization: The ocean blue color scheme allows you to infuse your project with a personal touch. Feel free to experiment with different shades or even create a multicolored jellyfish!
- Functional and Fun: A keychain is not only a fun accessory but also a practical way to keep your keys organized. Your handmade jellyfish will be a unique addition to your everyday items.
Project Supplies
Before you dive in, gather the following materials to get started on your Ocean Blue Jellyfish Keychain:
- Yarn: Choose a medium weight yarn in an ocean blue hue of your preference.
- Crochet Hook: A size G or H crochet hook is typically ideal for medium weight yarn.
- Scissors: To cut your yarn at the ends.
- Tapestry Needle: For weaving in ends and assembling parts.
Steps to Create Your Jellyfish Keychain
- Start with the Body: Follow the pattern instructions closely, making sure to create the jellyfish body in rounds. This will serve as the foundation of your keychain.
- Add the Tentacles: Once the body is complete, it’s time to give your jellyfish some personality with whimsical tentacles. The pattern will guide you on how many to make and their lengths.
- Assembly: After crocheting the body and the tentacles, it’s time to assemble them. Use your tapestry needle to sew everything together securely.
- Attach to Keychain: Finally, fasten your completed jellyfish to your keychain ring, making sure it’s secure and ready for use.
Enhance Your Crochet Skills
By working on this project, you’ll not only create a lovely keychain but also enhance your crochet skills. As you follow the tutorial, you’ll improve your stitching techniques, learn about shaping with different stitches, and ultimately gain confidence in your crochet abilities.
Let Your Creativity Shine
This Ocean Blue Jellyfish Keychain is more than just a simple crochet project; it’s an opportunity to let your creativity blossom. Share your finished jellyfish with family and friends, or keep it as a special reminder of your crochet journey. Whether you decide to gift it or use it yourself, this charming jellyfish accessory will surely bring a smile to anyone who sees it.
Conclusion
Now that you have the tools and inspiration, it’s time to grab your yarn and hook. Try your hand at this free crochet pattern and enjoy the soothing experience of crafting a unique Ocean Blue Jellyfish Keychain. Embrace the joy of DIY crochet and let your creativity flourish as you bring this adorable creation to life! Happy crocheting!
