

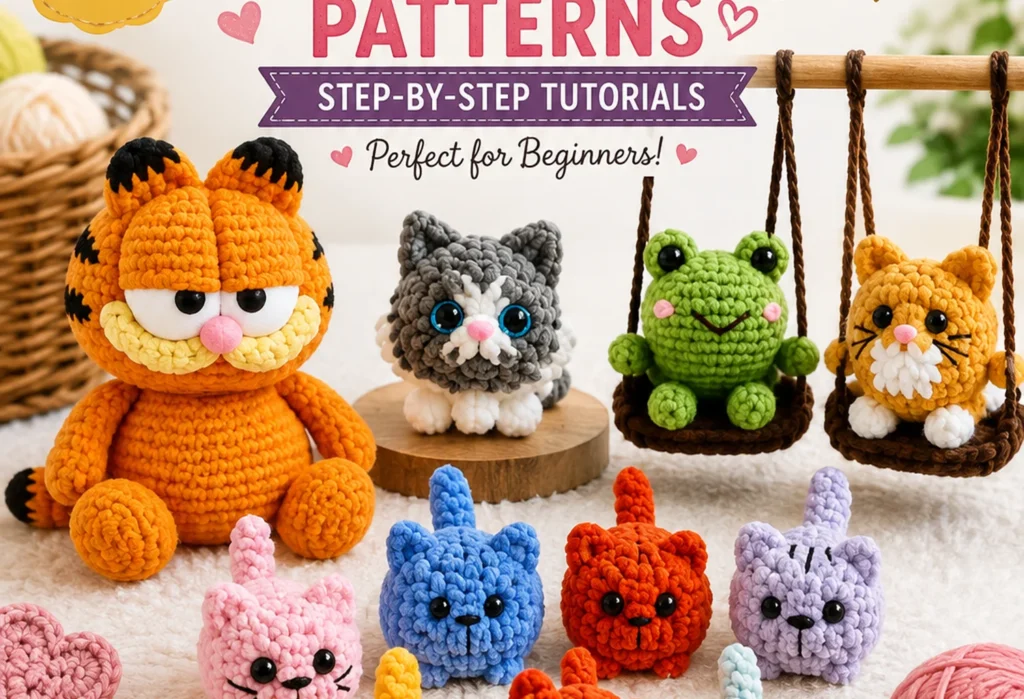
If you love cute crochet animals, these easy crochet cat patterns are perfect for beginners. From a classic Garfield-inspired amigurumi to tiny mini cats and a playful cat-and-frog swing, these projects are fun to make and great for gifts, home décor, or handmade collections.
Each project includes simple materials and a clear step-by-step crochet tutorial so you can follow along at your own pace.
1. Easy Beginner Garfield Crochet Patterns
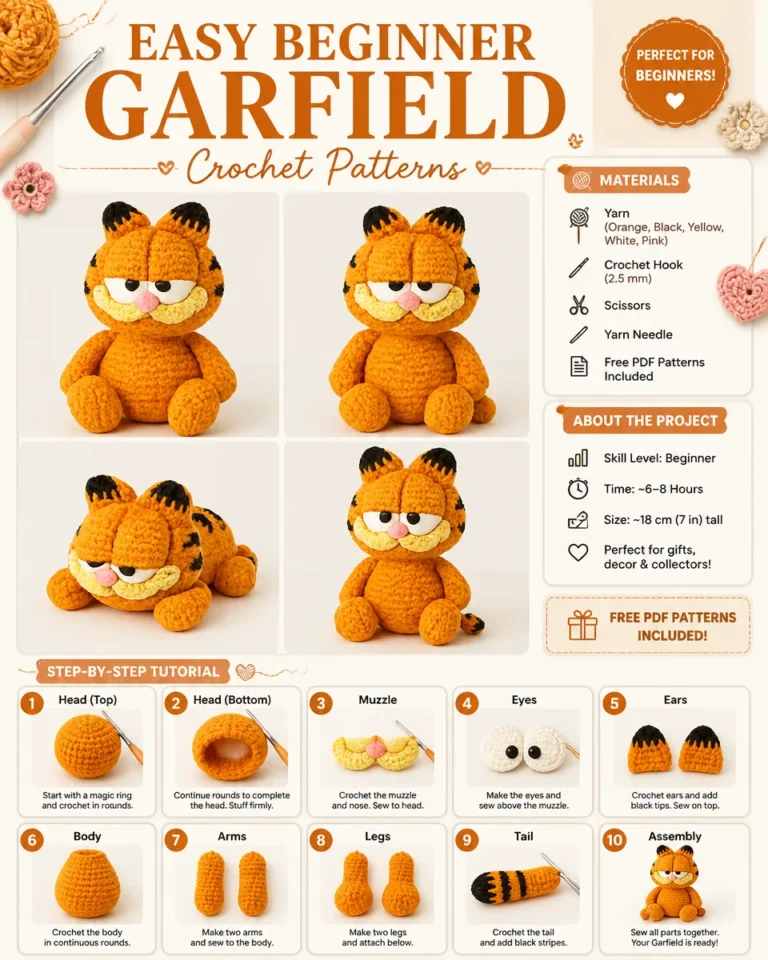
This adorable Easy Beginner Garfield Crochet Pattern is a fun amigurumi project inspired by the classic orange cat. The finished cat features a round body, expressive eyes, a cute muzzle, small ears, arms, legs, and a striped tail.
It is a great project for crocheters who want to make a larger character-style cat.
Materials
- Orange yarn
- Black yarn
- Yellow yarn
- White yarn
- Pink yarn
- 2.5 mm crochet hook
- Scissors
- Yarn needle
Step-by-Step Instructions
Step 1: Make the Head – Top
Start crocheting the top portion of the head using orange yarn. Work in rounds to create a rounded shape.
Step 2: Complete the Head – Bottom
Continue crocheting the lower portion of the head. Add stuffing as needed to create a firm, rounded shape.
Step 3: Crochet the Muzzle
Make the muzzle using yellow yarn. Add the pink nose and attach the muzzle securely to the front of the head.
Step 4: Add the Eyes
Create the eyes and sew them above the muzzle. Position them evenly to give the cat its characteristic expression.
Step 5: Make the Ears
Crochet two orange ears and add the black tips. Sew the ears securely onto the top of the head.
Step 6: Crochet the Body
Work the body in orange yarn using continuous rounds. Stuff the body firmly as you crochet.
Step 7: Make the Arms
Crochet two small arms. Sew them onto each side of the body.
Step 8: Make the Legs
Crochet the two legs and attach them to the lower part of the body.
Step 9: Crochet the Tail
Make the tail using orange yarn and add black stripes to create the classic Garfield-inspired look.
Step 10: Assemble the Garfield Cat
Sew all the finished pieces together carefully. Once the head, body, arms, legs, ears, and tail are attached, your Garfield crochet cat is ready!
2. Crochet Cat Pattern – Mini Amigurumi Cats
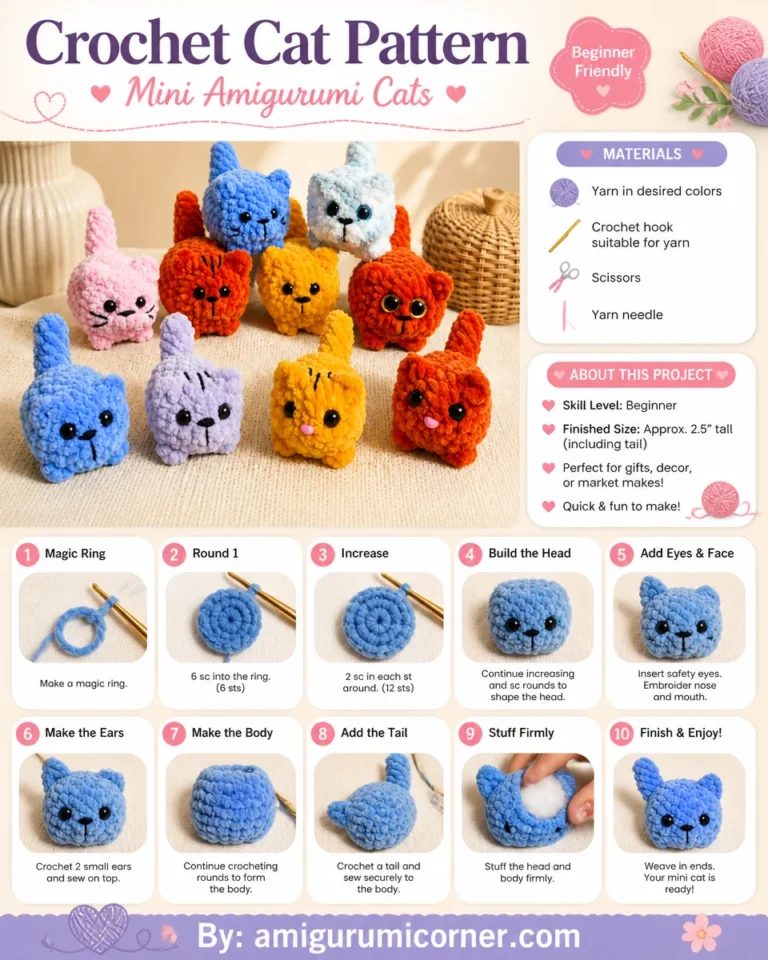
The Crochet Cat Pattern – Mini Amigurumi Cats is a cute beginner-friendly project that can be made in different yarn colors. These tiny cats are perfect for gifts, decorations, small collections, or even handmade market items.
Materials
- Yarn in your desired colors
- Crochet hook suitable for the yarn
- Safety eyes
- Scissors
- Yarn needle
Step-by-Step Instructions
Step 1: Make a Magic Ring
Begin with a magic ring to create the center of the cat.
Step 2: Crochet Round 1
Work 6 single crochet stitches into the magic ring.
Step 3: Increase the Circle
Work increases around the round to enlarge the crocheted piece.
Step 4: Build the Head
Continue crocheting rounds and shaping the piece until you have a small rounded cat head.
Step 5: Add the Eyes and Face
Insert the safety eyes and embroider the nose and mouth to create the cat’s face.
Step 6: Make the Ears
Crochet two small ears and sew them securely onto the top of the head.
Step 7: Make the Body
Continue crocheting rounds to form the small body of the cat.
Step 8: Add the Tail
Crochet a small tail and sew it securely onto the back of the cat.
Step 9: Stuff the Cat
Add stuffing carefully and make sure the head and body are filled firmly.
Step 10: Finish the Cat
Weave in the yarn ends and make any final adjustments. Your mini amigurumi cat is ready!
3. Amigurumi Frog and Cat on Swings
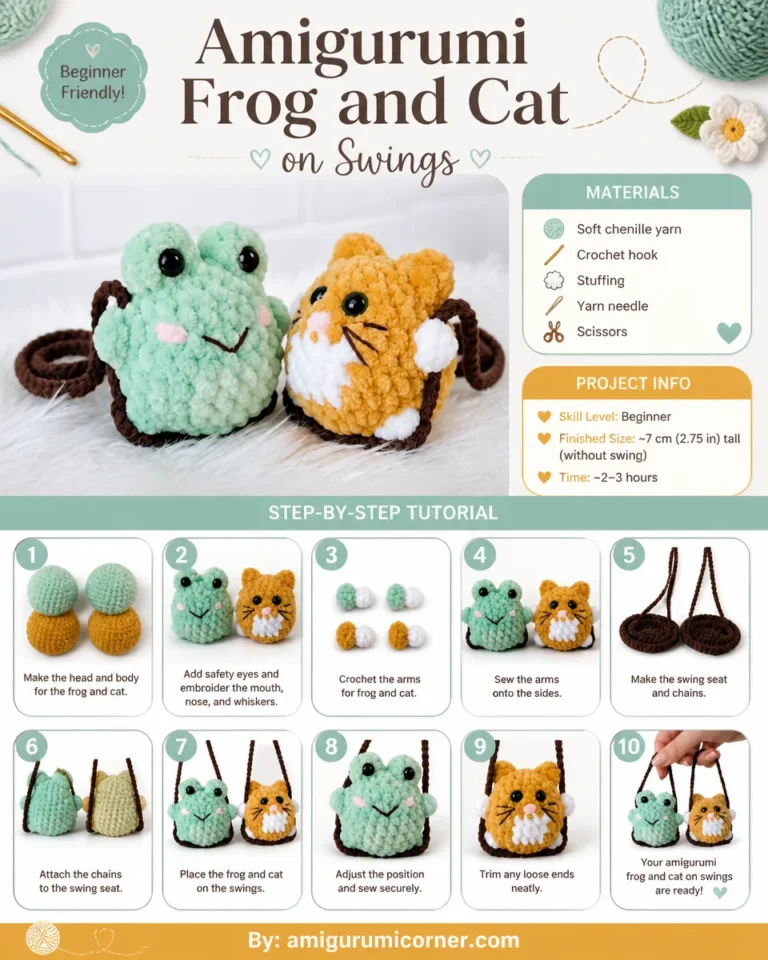
For something a little different, the Amigurumi Frog and Cat on Swings pattern combines two adorable crochet animals with tiny handmade swings.
This project is especially cute as a nursery decoration, handmade gift, or playful amigurumi display.
Materials
- Soft chenille yarn
- Crochet hook
- Stuffing
- Yarn needle
- Scissors
- Brown yarn for the swings
Step-by-Step Instructions
Step 1: Make the Heads and Bodies
Crochet the rounded head and body pieces for both the frog and the cat.
Step 2: Add the Faces
Attach the safety eyes and embroider the mouth, nose, and whiskers to give each character its own expression.
Step 3: Crochet the Arms
Make the small arms for the frog and cat.
Step 4: Attach the Arms
Sew the arms securely onto the sides of both amigurumi characters.
Step 5: Make the Swing Seats and Chains
Use brown yarn to crochet the small swing seats and their hanging chains.
Step 6: Attach the Chains
Secure the chains to each swing seat so the finished pieces can hang properly.
Step 7: Place the Frog and Cat
Position the frog and cat on their respective swings.
Step 8: Secure the Characters
Sew or attach the characters carefully so they stay safely on the swings.
Step 9: Trim Loose Ends
Check the project and trim any remaining loose yarn ends neatly.
Step 10: Finish the Amigurumi Swing Set
Adjust the position of the frog and cat until they sit nicely on their swings. Your cute amigurumi display is complete!
4. Crochet Mini Cat Pattern
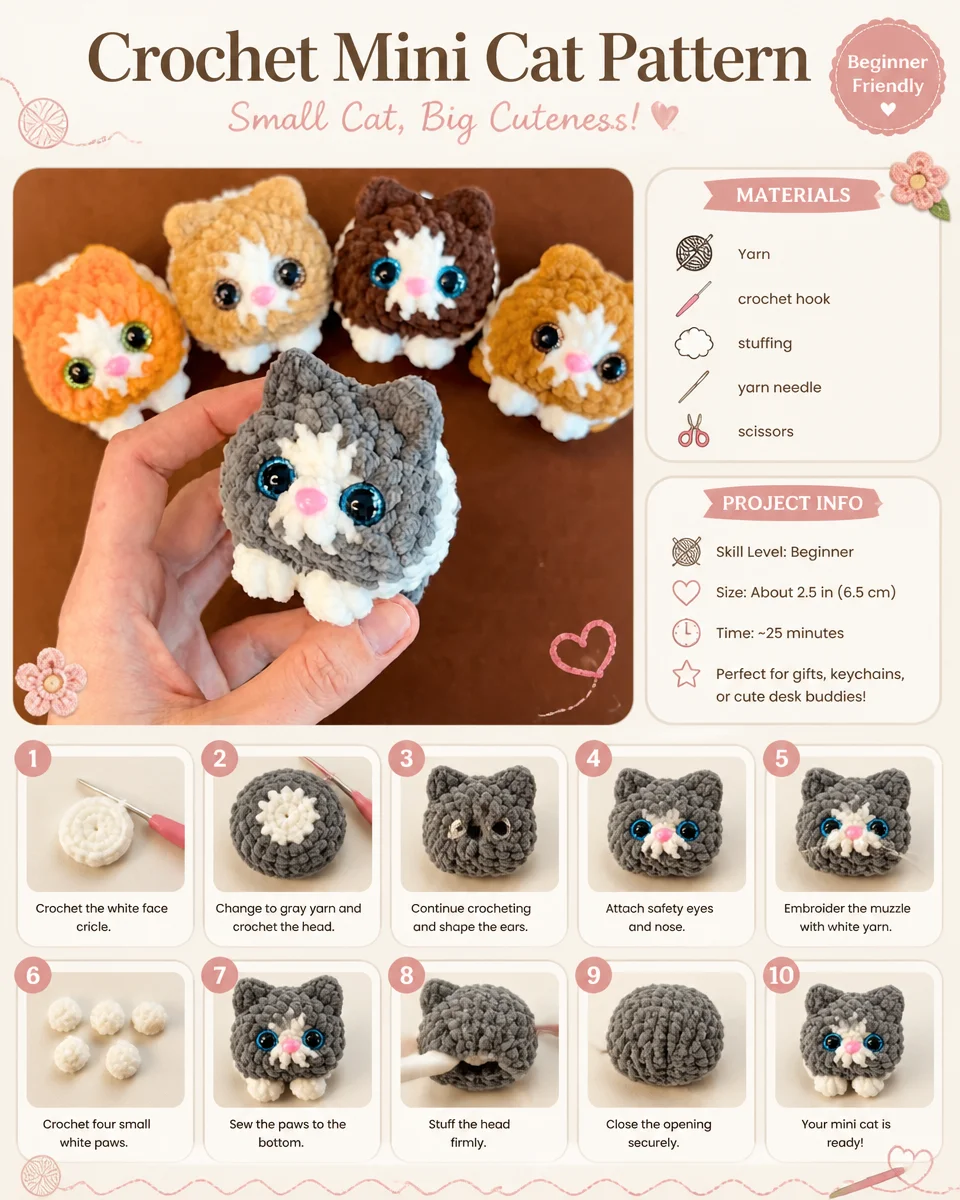
The Crochet Mini Cat Pattern – Small Cat, Big Cuteness! is another beginner-friendly project featuring tiny, colorful cats. These little cats are quick to make and are especially suitable for gifts, keychains, or small handmade decorations.
Materials
- Yarn
- Crochet hook
- Stuffing
- Yarn needle
- Scissors
- Safety eyes and small facial details
Step-by-Step Instructions
Step 1: Crochet the White Face Circle
Begin by crocheting a small white circle that will form the cat’s face.
Step 2: Change to Gray Yarn
Switch to gray yarn and continue crocheting to build the head.
Step 3: Shape the Head and Ears
Continue crocheting while shaping the top of the head and forming the cat ears.
Step 4: Attach the Safety Eyes and Nose
Place the safety eyes and add the small nose to create the face.
Step 5: Embroider the Muzzle
Use white yarn to add the muzzle and complete the facial details.
Step 6: Crochet the Paws
Make four small paws using the yarn.
Step 7: Attach the Paws
Sew the paws securely to the bottom of the cat.
Step 8: Stuff the Head
Add stuffing inside the crocheted piece until it has a firm, rounded shape.
Step 9: Close the Opening
Close the remaining opening securely and weave in the yarn ends.
Step 10: Finish Your Mini Cat
Make the final adjustments to the ears, face, and paws. Your adorable mini crochet cat is ready!
Tips for Making These Crochet Cat Patterns
- Keep your crochet tension consistent for an even shape.
- Stuff amigurumi firmly, but avoid overfilling.
- Place safety eyes before completely closing the opening.
- Use a yarn needle to sew each part securely.
- Choose soft yarn for a cuddly finished cat.
- Try different yarn colors to create your own collection of mini cats.
- Take your time when attaching small details such as ears, eyes, paws, and tails.
Final Thoughts
These easy crochet cat patterns for beginners offer several fun ways to create adorable handmade cats. The Easy Beginner Garfield Crochet Patterns are perfect for character lovers, while the Mini Amigurumi Cats and Crochet Mini Cat Pattern are great for smaller projects. If you want something more playful, the Amigurumi Frog and Cat on Swings adds a unique decorative touch.
Whether you’re making your first amigurumi cat or adding another handmade project to your collection, these step-by-step ideas are a fun way to practice crochet and create something cute by hand.
