

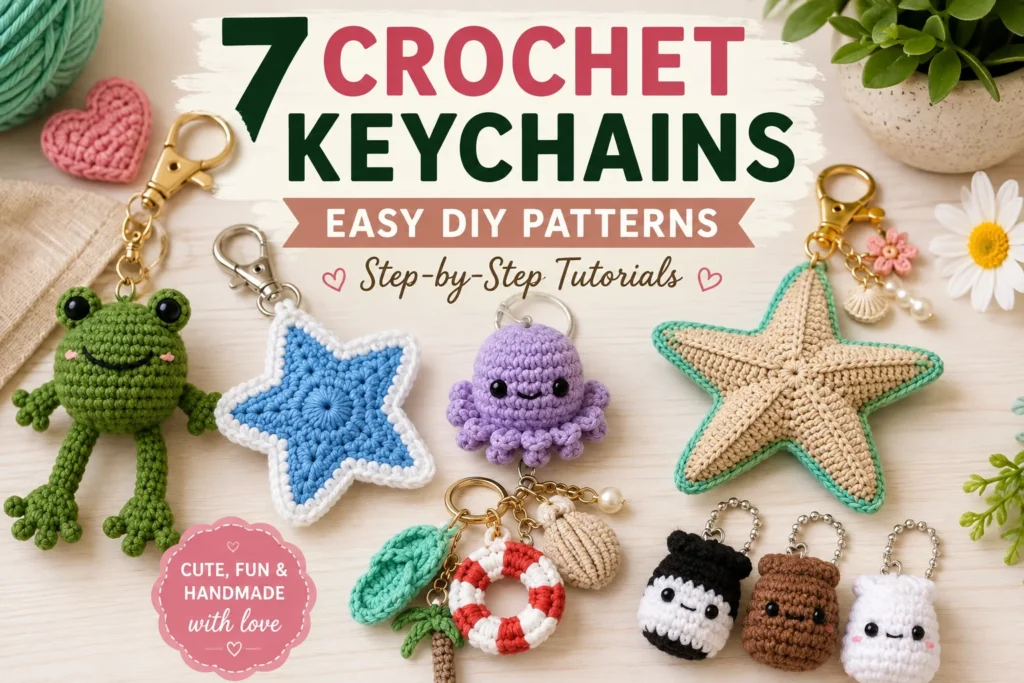
Crochet keychains are a fun way to turn a small amount of yarn into something useful, colorful, and completely handmade. Whether you want a cute bag charm, a handmade gift, or a simple crochet project for beginners, these small designs are perfect for practicing basic stitches without needing a large yarn stash.
From an adorable Frog Bag Charm and a Stunning Star Bag Charm to a mini octopus, starfish, and beach-inspired keychain set, these crochet keychain ideas are designed to be practical and beginner-friendly.
In this guide, you’ll find 7 cute crochet keychain ideas, with materials and easy step-by-step instructions for each project.
Helpful Note: The stitch counts below are project guides rather than rigid patterns. Your finished size can vary depending on yarn weight, hook size, and crochet tension. Make a small test piece first if you want a specific finished size.
Before You Start
Crochet keychains are small projects, so they are a great opportunity to experiment with different colors and yarn textures.
For the best results:
- Choose lightweight cotton or chenille yarn.
- Use a crochet hook suitable for your yarn.
- Keep your stitches fairly tight for stuffed designs.
- Use a sturdy keychain ring or swivel clasp.
- Secure all yarn ends carefully.
- Check that the hardware is firmly attached before using the keychain.
- Keep stuffed pieces firmly filled without making them overly bulky.
What You’ll Need for Crochet Keychains
Crochet Supplies
- Cotton or chenille yarn
- Crochet hook, approximately 2–4 mm depending on the yarn
- Yarn needle
- Small scissors
- Polyester fiberfill for stuffed designs
Keychain Hardware
- Key rings
- Swivel clasps
- Jump rings
- Small chains, optional
Optional Decorations
- Safety eyes
- Small beads
- Ribbon
- Embroidery thread
- Small crochet flowers
- Decorative charms
Crochet Abbreviations
| Abbreviation | Meaning |
|---|---|
| CH | Chain |
| SC | Single Crochet |
| HDC | Half Double Crochet |
| DC | Double Crochet |
| SL ST | Slip Stitch |
| INC | Increase |
| DEC | Decrease |
| MR | Magic Ring |
1. Frog Bag Charm Crochet Pattern
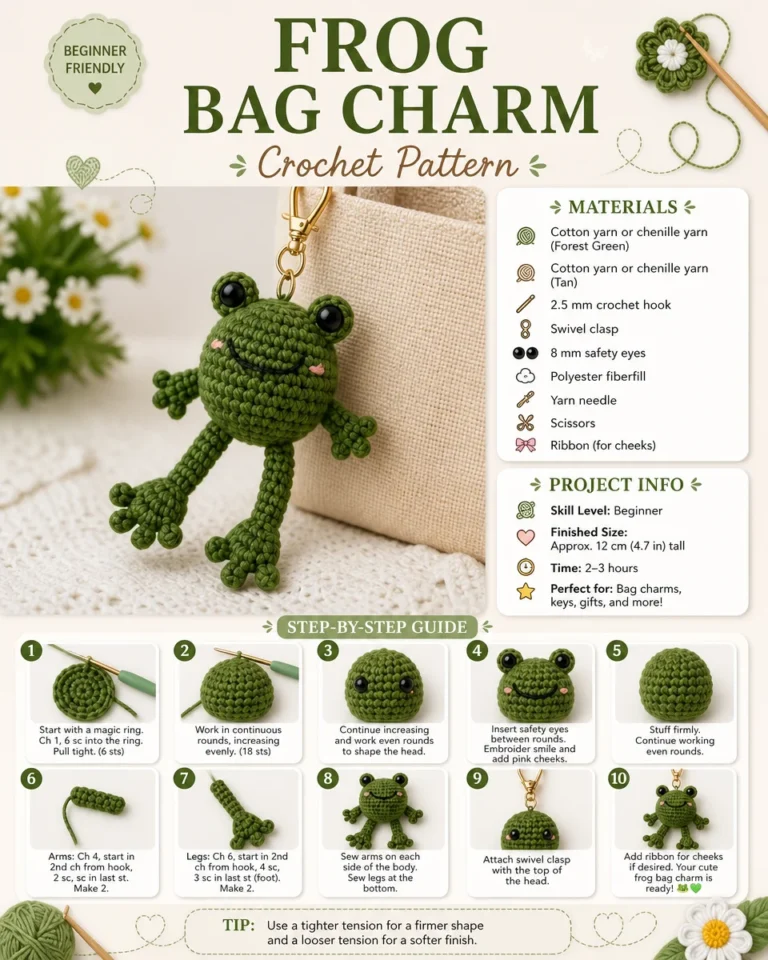
The Frog Bag Charm is one of the cutest designs in this collection. The small green frog has a rounded body, little eyes, arms, and long legs, making it especially fun to hang from a handbag, backpack, or key ring.
Materials
- Green cotton or chenille yarn
- Small amount of tan yarn
- 2.5 mm crochet hook
- Swivel clasp
- 8 mm safety eyes
- Polyester fiberfill
- Yarn needle
- Scissors
- Small ribbon, optional
Step-by-Step Instructions
Step 1: Make the magic ring.
Start with a magic ring using green yarn. Chain 1 and work 6 single crochet stitches into the ring. Pull the ring closed.
Step 2: Build the body.
Continue working single crochet rounds, increasing evenly until the body reaches the desired width.
Step 3: Shape the head and body.
Work several rounds of single crochet without increasing to create the rounded frog shape.
Step 4: Add the eyes.
Place the safety eyes near the upper portion of the body. Leave enough space between them for the embroidered facial details.
Step 5: Add the stuffing.
Begin filling the frog with polyester fiberfill. Continue crocheting while adding stuffing gradually.
Step 6: Make the arms.
Chain a short length of green yarn and work several single crochet stitches to create each small arm. Make two.
Step 7: Make the legs.
Create longer crocheted legs using chains and single crochet stitches. Add small rounded toes at the ends if desired.
Step 8: Attach the limbs.
Sew the arms to the sides and the legs to the lower portion of the body.
Step 9: Add the face.
Embroider a small smile and optional pink cheek details.
Step 10: Attach the hardware.
Secure a swivel clasp or keychain ring to a strong stitch at the top of the frog.
Your cute frog bag charm is ready!
2. Stunning Star Bag Charm Crochet Pattern
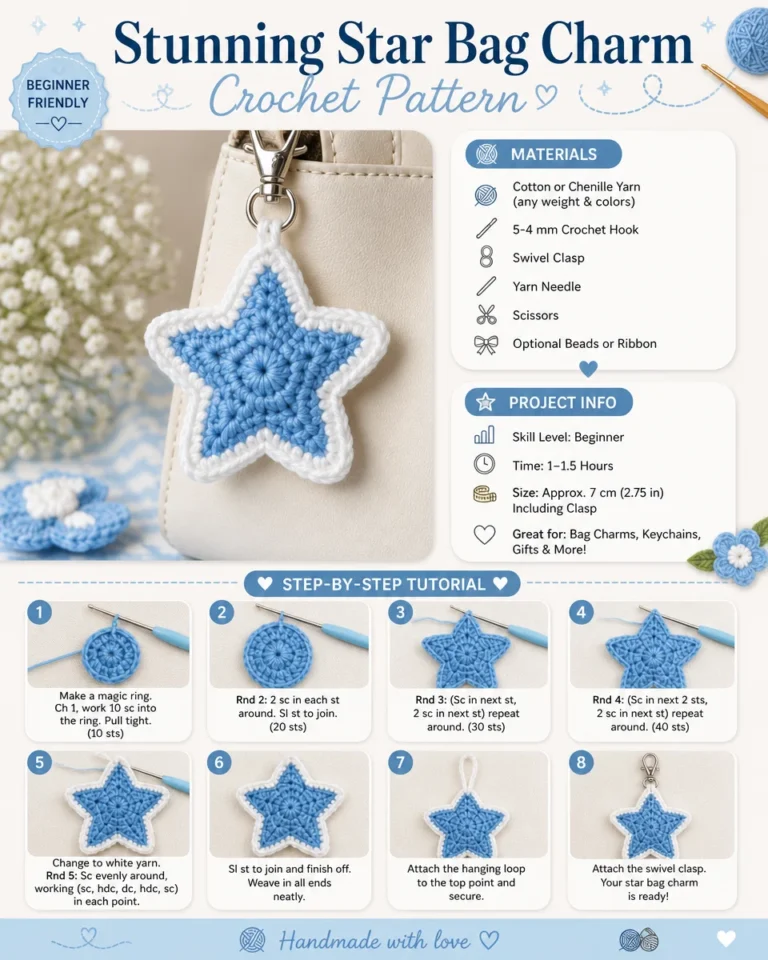
A crochet star is a simple shape that works beautifully as a bag charm or keychain. The blue-and-white version shown here has a clean, cheerful look, but you can easily customize it with your favorite colors.
Materials
- Blue cotton or chenille yarn
- White yarn for the border
- 2.5–4 mm crochet hook
- Swivel clasp
- Yarn needle
- Scissors
- Optional small bead or ribbon
Step-by-Step Instructions
Step 1: Make the center.
Start with a magic ring and work a small group of single crochet stitches into the ring.
Step 2: Close the first round.
Pull the magic ring tight and join with a slip stitch.
Step 3: Build the star points.
Work increases and chain spaces around the center to begin forming five evenly spaced points.
Step 4: Shape each point.
Use a combination of single crochet and taller stitches to create the five triangular points.
Step 5: Complete the star.
Repeat the same sequence around the entire shape, keeping the points evenly spaced.
Step 6: Add the border.
Change to white yarn and work a neat single crochet border around the outside.
Step 7: Make the hanging loop.
At the top point, create a small chain loop that will hold the hardware.
Step 8: Attach the clasp.
Connect the swivel clasp or key ring through the hanging loop.
This star makes a lovely handmade gift and can also be used as a backpack charm.
3. Mini Crochet Octopus Keychain
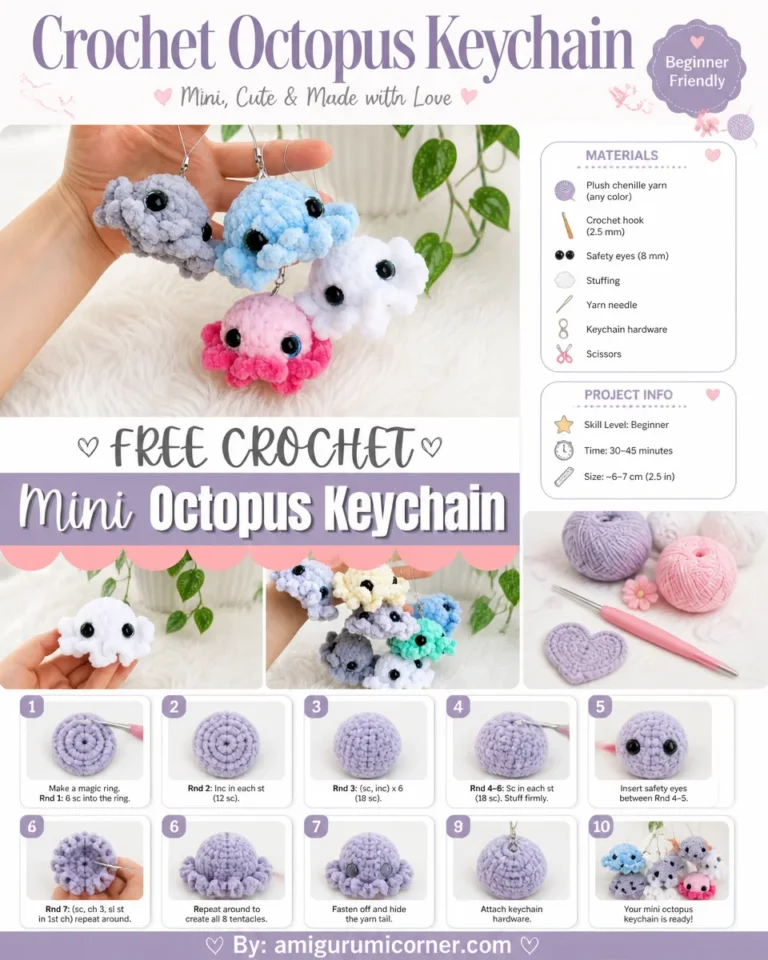
This adorable mini octopus is a great beginner crochet keychain because its rounded body and small tentacles create a playful finished design.
Materials
- Plush chenille yarn
- 2.5 mm crochet hook
- 8 mm safety eyes
- Polyester fiberfill
- Keychain hardware
- Yarn needle
- Scissors
Step-by-Step Instructions
Step 1: Start with a magic ring.
Work 6 single crochet stitches into a magic ring.
Step 2: Increase the body.
Increase evenly around the next round until you have a wider circular base.
Step 3: Continue the body.
Work several rounds of single crochet to create the rounded octopus shape.
Step 4: Add the stuffing.
Insert polyester fiberfill while the opening is still accessible.
Step 5: Attach the eyes.
Place two safety eyes between the appropriate rounds.
Step 6: Create the tentacles.
Work short chains around the lower edge, using single crochet and slip stitches to create eight small tentacles.
Step 7: Close the body.
Continue decreasing until the opening is closed.
Step 8: Hide the yarn end.
Fasten off and weave the yarn tail securely inside the body.
Step 9: Attach the keychain hardware.
Connect a small key ring or clasp to the top.
Your mini octopus keychain is ready to hang from a bag or backpack.
4. Crochet Starfish Keychain
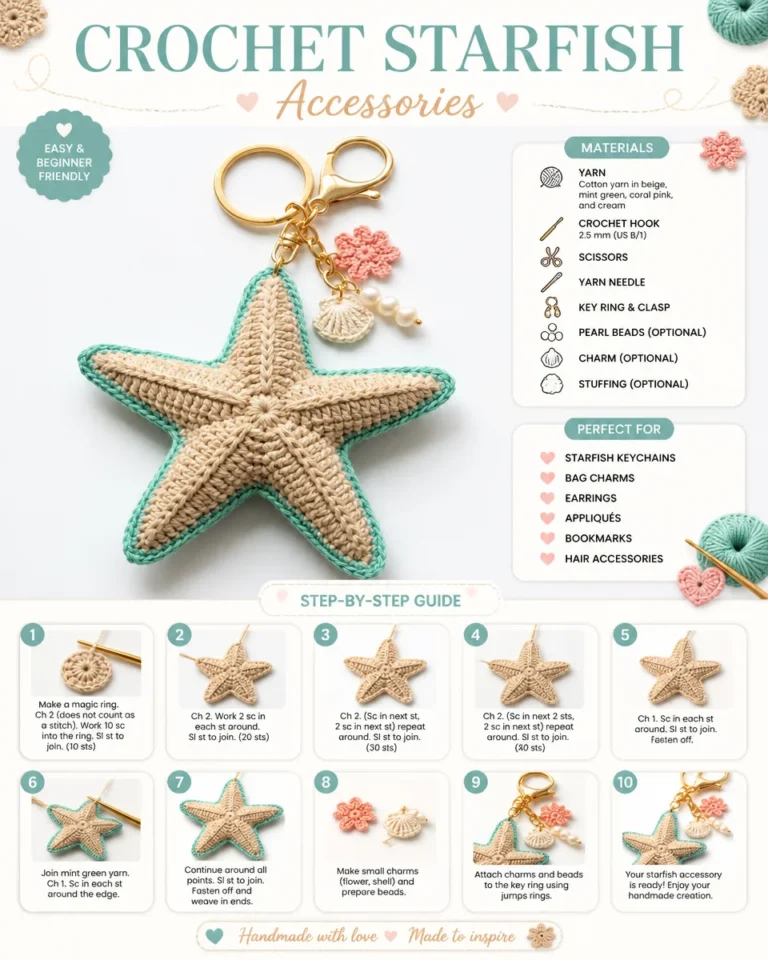
The Crochet Starfish Accessories design is perfect for a summer or beach-inspired collection. A neutral center with a colorful border gives the starfish a handmade coastal feel.
Materials
- Beige cotton yarn
- Mint or turquoise yarn
- 2.5 mm crochet hook
- Key ring
- Small swivel clasp
- Yarn needle
- Scissors
- Optional small beads or charms
Step-by-Step Instructions
Step 1: Make the center ring.
Start with a magic ring and crochet a small circular center.
Step 2: Build the first round.
Work single crochet stitches around the center and join with a slip stitch.
Step 3: Begin the starfish arms.
Create five evenly spaced points using increases and chain spaces.
Step 4: Shape the arms.
Continue crocheting around each point until all five arms are clearly formed.
Step 5: Add the contrasting border.
Change to mint or turquoise yarn and work a neat round around the outside edge.
Step 6: Fasten off.
Weave in all yarn ends securely.
Step 7: Add decorative charms.
Attach a tiny flower, shell, pearl, or bead if desired.
Step 8: Attach the key ring.
Connect the finished starfish to a key ring or swivel clasp.
5. Beach Day Crochet Keychain Set
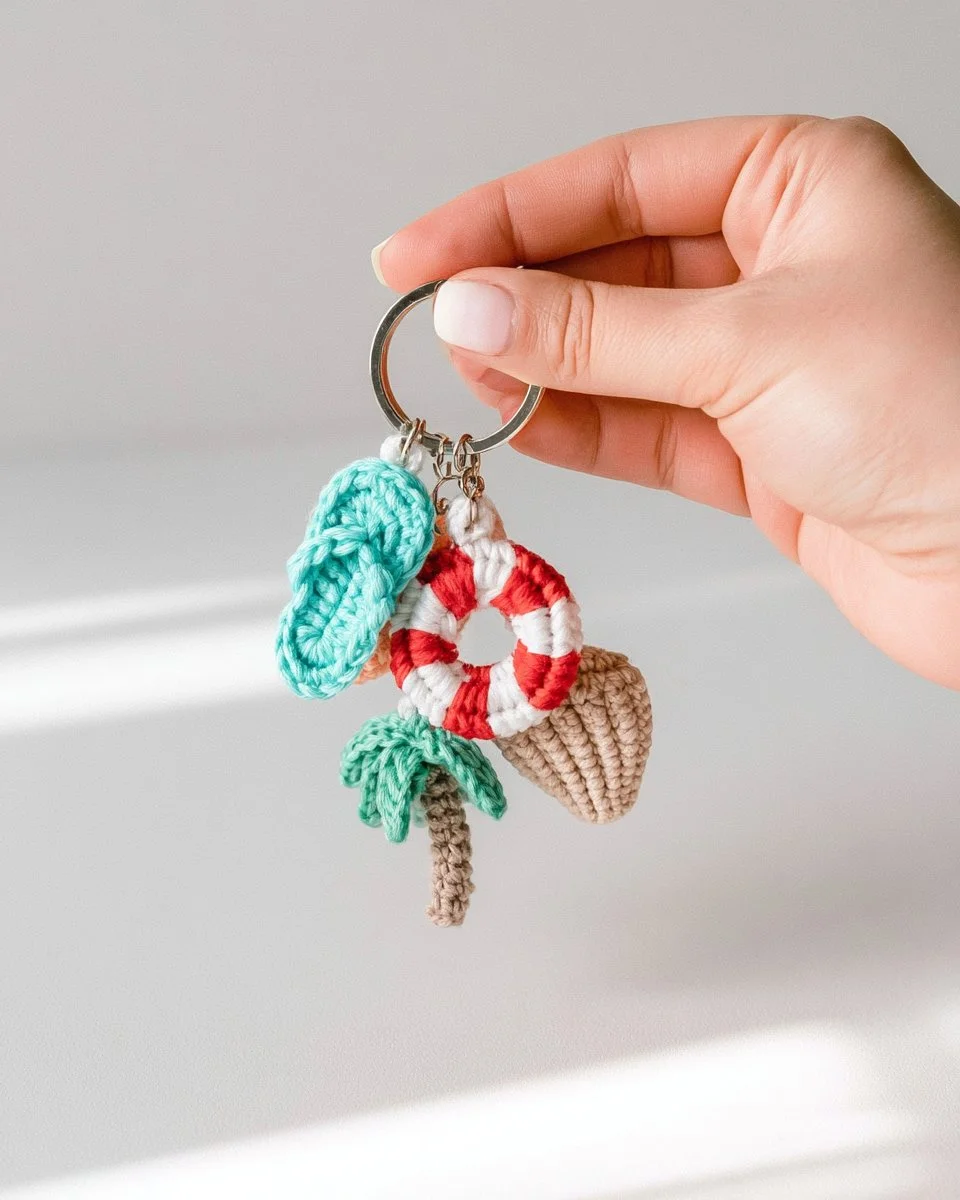
If you love beach-inspired accessories, combine several small crochet motifs into one colorful keychain. The sample shown features multiple nautical-style pieces connected to one ring.
Materials
- Cotton yarn in 2–4 colors
- 2.5–3 mm crochet hook
- Key ring
- Small jump rings
- Yarn needle
- Scissors
- Optional beads
Step-by-Step Instructions
Step 1: Choose your beach motifs.
You can combine a small leaf, shell, lifebuoy, beach hat, starfish, or other simple shapes.
Step 2: Crochet the first motif.
Start with the largest piece and complete the shape using tight single crochet stitches.
Step 3: Crochet the smaller pieces.
Make two or three complementary motifs in coordinating colors.
Step 4: Finish each piece.
Fasten off and weave in all yarn tails.
Step 5: Add jump rings.
Attach a small jump ring to each finished motif.
Step 6: Arrange the charms.
Place the pieces at different lengths so they move freely instead of overlapping.
Step 7: Attach everything to the key ring.
Connect the jump rings to the main key ring.
Step 8: Add final details.
Add a small bead or decorative element for extra texture.
This type of keychain is especially cute for summer bags, beach totes, and backpacks.
6. Cute Crochet Keychain Ideas for Gifts
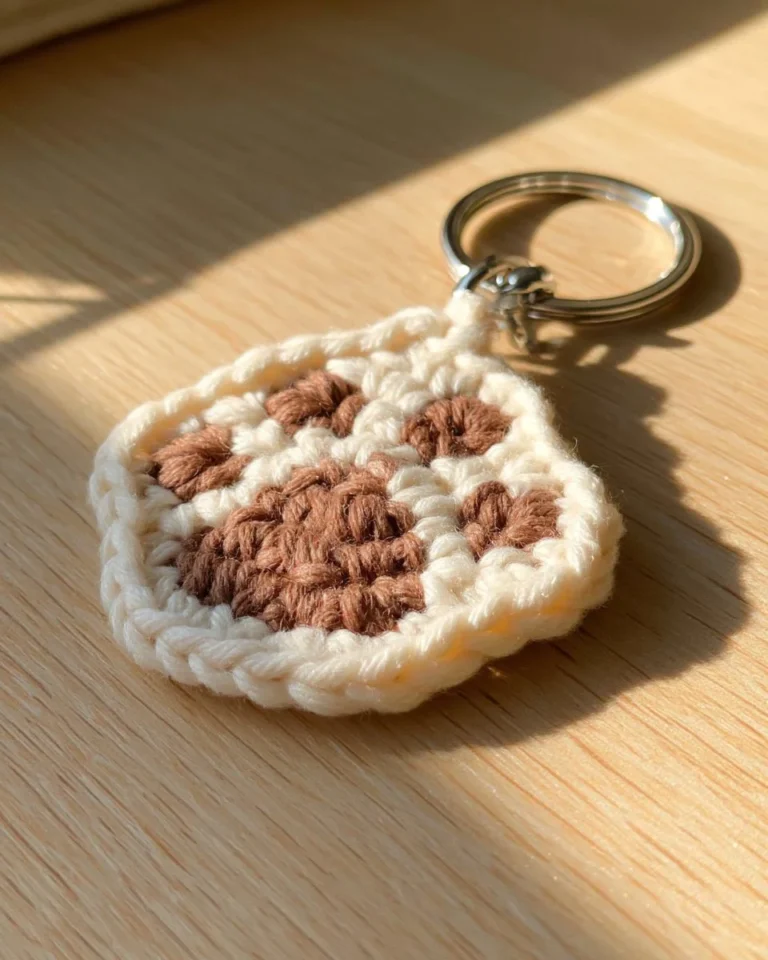
Small crochet characters make excellent handmade gifts because they can be customized to match someone’s favorite colors, animals, or hobbies.
Materials
- Cotton or chenille yarn
- 2.5–4 mm crochet hook
- Keychain rings
- Safety eyes or embroidery thread
- Fiberfill for stuffed designs
- Yarn needle
- Scissors
Step-by-Step Instructions
Step 1: Choose a simple character.
Start with a small animal, fruit, flower, heart, mushroom, or other easy shape.
Step 2: Crochet the main body.
Use single crochet stitches and increases to create the basic shape.
Step 3: Shape the piece.
Continue with even rounds and then decrease where needed.
Step 4: Add stuffing if necessary.
For an amigurumi-style design, fill the piece lightly with fiberfill.
Step 5: Add facial details.
Use safety eyes or embroidery thread for small details.
Step 6: Add accessories.
Tiny bows, flowers, hats, leaves, or beads can make each keychain unique.
Step 7: Secure all details.
Check that every small component is firmly attached.
Step 8: Add the keychain hardware.
Attach a jump ring or clasp through a strong section at the top.
These little crochet creations are perfect for birthdays, holidays, teacher gifts, stocking stuffers, and handmade gift baskets.
7. DIY Crochet Keychains: Step-by-Step Tutorial
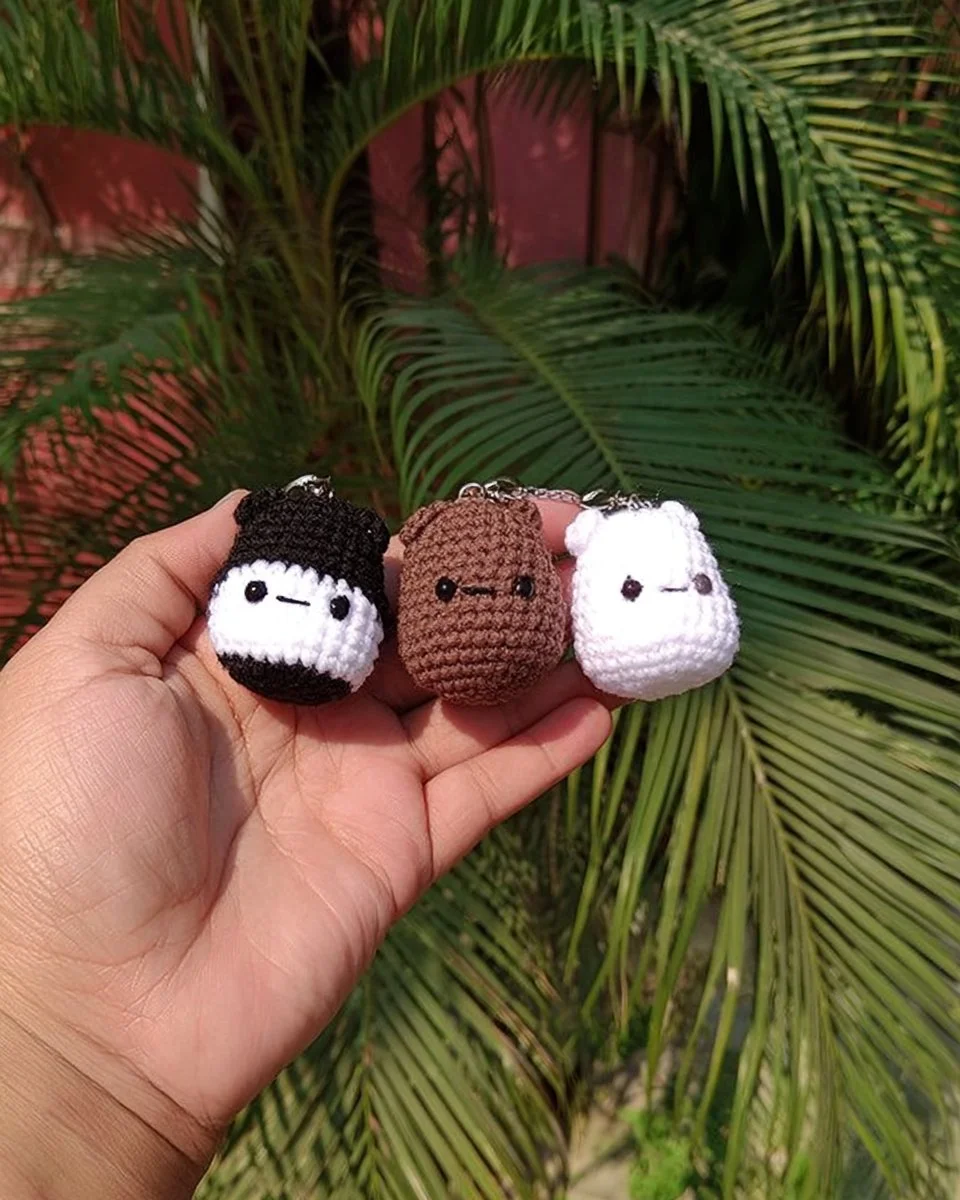
If you want to create your own crochet keychain rather than copy one specific shape, this simple workflow can be used for almost any small design.
Materials
- Cotton yarn
- Crochet hook suitable for the yarn
- Key ring or swivel clasp
- Jump ring
- Yarn needle
- Scissors
- Fiberfill if making a stuffed keychain
- Optional beads, charms, or embroidery thread
Step-by-Step Instructions
Step 1: Choose your shape.
Start with a simple design such as a star, heart, flower, circle, animal, or fruit.
Step 2: Create the center.
Use a magic ring for circular designs or a foundation chain for elongated shapes.
Step 3: Build the shape.
Work single crochet stitches and add increases wherever the design needs to become wider.
Step 4: Shape the edges.
Use decreases, chain spaces, or additional rounds to create the final outline.
Step 5: Add details.
Embroider facial features, add a contrasting border, or attach small decorative pieces.
Step 6: Stuff the piece if needed.
For a three-dimensional keychain, add a small amount of fiberfill before closing.
Step 7: Close the opening.
Use decreases or a yarn needle to close the remaining opening securely.
Step 8: Secure the yarn.
Fasten off and weave the yarn tail through the back of the stitches.
Step 9: Add the hanging loop.
Create a small chain loop or attach a jump ring to a secure stitch.
Step 10: Attach the hardware.
Connect the key ring or swivel clasp and make sure the connection is completely closed.
Tips for Making Better Crochet Keychains
Keep Your Stitches Tight
Small keychains look cleaner when the stitches are firm and consistent. This is particularly important for stuffed amigurumi designs.
Choose Lightweight Materials
A keychain should be comfortable to carry. Avoid adding too many heavy beads or metal charms.
Secure the Hardware
The hardware is one of the most important parts of the project. Attach it through a strong stitch or reinforced loop rather than a loose yarn strand.
Match Your Colors
Try combinations such as:
- Sage + cream
- Pink + white
- Blue + white
- Mint + beige
- Orange + green
- Lavender + white
- Brown + cream
Make Matching Sets
Instead of creating one keychain, make several coordinated pieces. A frog, star, flower, and heart can become a cute handmade collection.
Crochet Keychains as Handmade Gifts
Crochet keychains are small enough to make in batches, which makes them especially useful for handmade gifts.
You can create:
- Birthday gifts
- Backpack charms
- Teacher gifts
- Stocking stuffers
- Party favors
- Handmade market items
- Friendship gifts
- Personalized bag charms
For an extra-special presentation, place each finished keychain inside a small fabric pouch or gift box.
How to Care for Crochet Keychains
To keep your crochet keychains looking their best:
- Keep them away from excessive moisture.
- Avoid placing them directly on dirty surfaces.
- Store delicate designs in a small pouch.
- Check the key ring and clasp regularly.
- Hand-wash washable yarn gently when necessary.
- Allow the keychain to dry completely before using it again.
For stuffed designs, avoid soaking them unless the yarn and filling are suitable for washing.
Frequently Asked Questions
Are crochet keychains good for beginners?
Yes. Small crochet keychains are excellent beginner projects because they use small amounts of yarn and can help you practice basic stitches, increases, decreases, and finishing techniques.
What yarn is best for crochet keychains?
Cotton yarn is a great option for many flat keychains because it creates defined stitches. Chenille yarn works beautifully for soft, stuffed designs such as frogs and octopuses.
What crochet hook should I use?
The hook size depends on your yarn. A small hook around 2–4 mm is commonly useful for these projects, but always check the yarn label and your tension.
How do I attach a keychain ring to crochet?
Attach a jump ring through a secure crochet stitch or a reinforced hanging loop. Then connect the jump ring to the key ring or swivel clasp.
Can I sell handmade crochet keychains?
You can generally sell finished items that you make yourself. If you use another designer’s specific pattern, check that designer’s terms regarding commercial use before selling finished pieces.
What can I use crochet keychains for?
They can be used as traditional keychains, purse charms, backpack decorations, zipper pulls, gifts, and small handmade accessories.
Final Thoughts
These 7 crochet keychain ideas are a fun way to turn simple yarn into useful handmade accessories. From the adorable Frog Bag Charm and Mini Crochet Octopus to the Stunning Star, Starfish, and beach-inspired designs, there are plenty of shapes to experiment with.
Start with a simple flat design if you’re a beginner, then move on to stuffed characters once you’re comfortable with increasing, decreasing, and shaping.
Choose your favorite colors, add a few personalized details, attach sturdy hardware, and create a collection of cute crochet keychains that you can use yourself or give as handmade gifts. 🧶✨
