

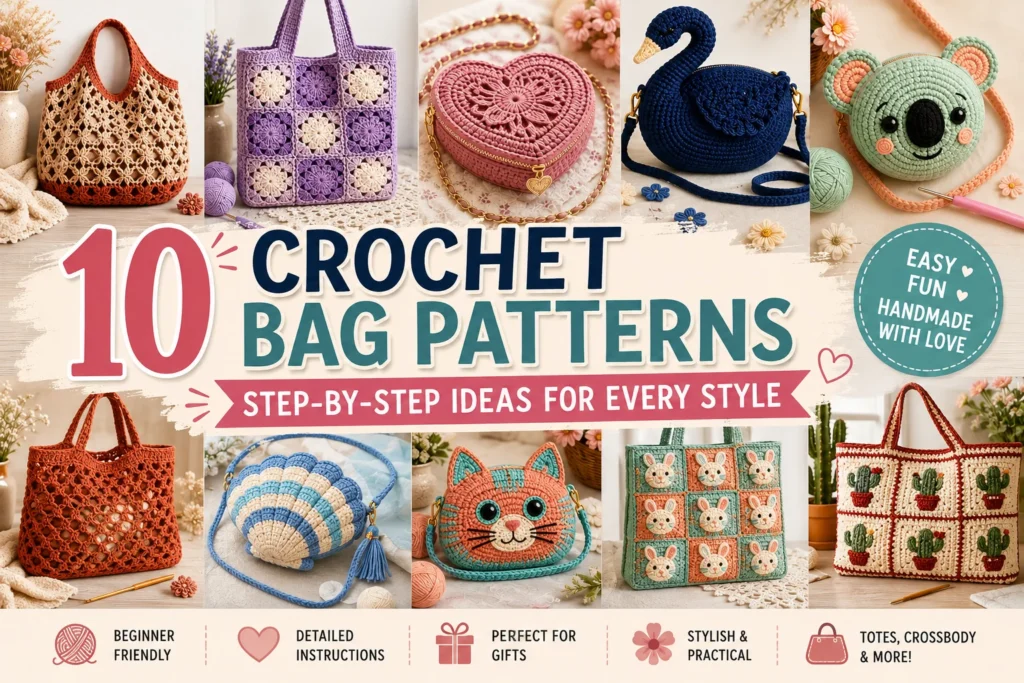
Crochet bags are practical, stylish, and fun handmade projects. This collection brings together 10 different crochet bag designs, from open mesh market totes and granny square bags to cute animal-inspired mini crossbody bags. Each project includes the materials you need and simple step-by-step instructions to help you recreate the look.
1. Star Mesh Market Bag Crochet Pattern
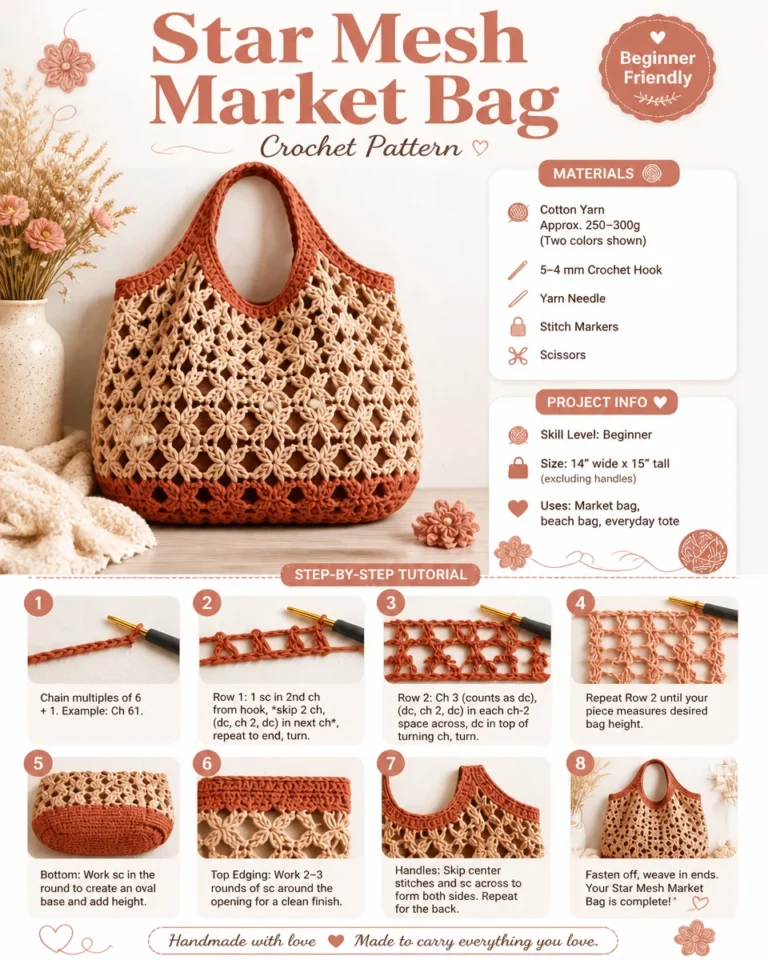
The Star Mesh Market Bag Crochet Pattern features an openwork mesh design, a sturdy base, and comfortable crochet handles. It is a practical tote for shopping, beach days, groceries, and everyday use.
Materials
Cotton yarn, approximately 250–300 g
5–4 mm crochet hook
Yarn needle
Stitch markers
Scissors
Measuring tape
Step-by-Step Instructions
Step 1: Make the Foundation Chain
Chain a multiple of 6 plus 1. For a medium bag, you can start with 61 chains.
Step 2: Work the First Row
Single crochet into the second chain from the hook. Skip 2 chains, work the next stitches according to the mesh repeat, and continue across the row.
Step 3: Create the Mesh
Work the chain spaces and double crochet stitches to create the open star-mesh pattern.
Step 4: Repeat the Pattern
Continue repeating the mesh rows until the body reaches your preferred height.
Step 5: Create the Bottom
Work several rounds of single crochet to create a stronger, more solid base.
Step 6: Finish the Top
Add 2–3 rounds of single crochet around the top opening.
Step 7: Make the Handles
Create two chain-based handles and reinforce them with several rows of stitches.
Step 8: Finish
Fasten off, weave in all ends, and reinforce the handle joins.
2. Cloud Granny Square Tote Crochet Pattern
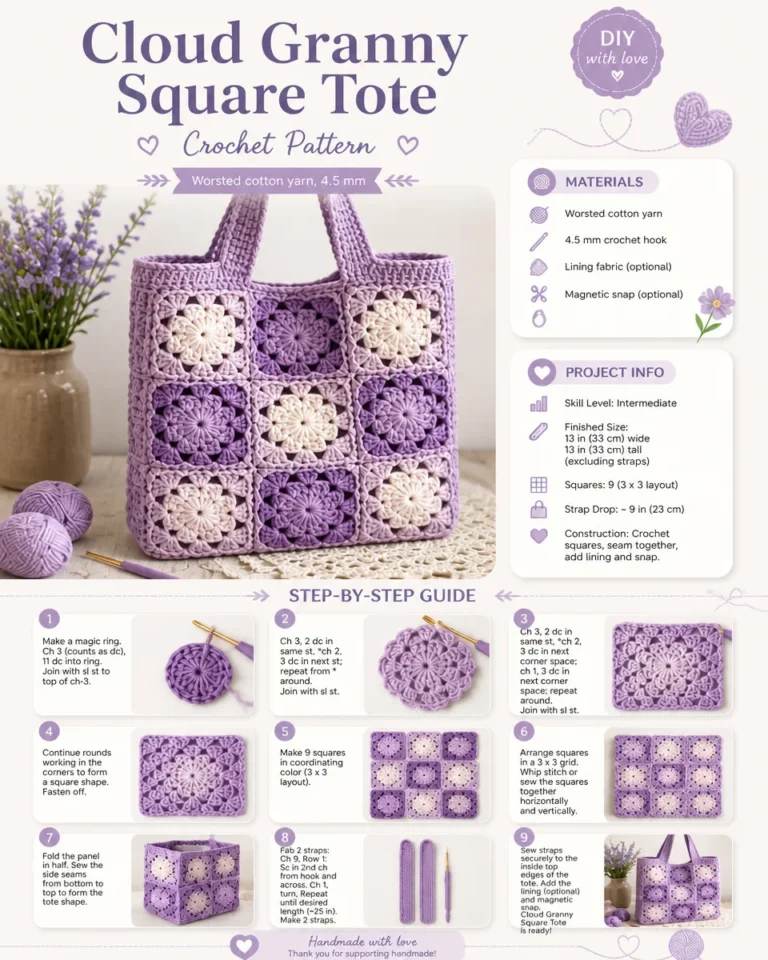
The Cloud Granny Square Tote Crochet Pattern combines lavender and cream granny squares to create a soft, decorative tote. The square construction makes this a beautiful project for crocheters who enjoy modular designs.
Materials
Worsted cotton yarn
4.5 mm crochet hook
Yarn needle
Scissors
Optional lining fabric
Optional magnetic snap
Step-by-Step Instructions
Step 1: Start the Granny Square
Make a magic ring and crochet the center round.
Step 2: Build the Square
Continue working rounds into the corners until the piece becomes a flat square.
Step 3: Make More Squares
Create 9 granny squares in lavender and cream combinations.
Step 4: Arrange the Squares
Arrange them in a 3 × 3 layout.
Step 5: Join the Squares
Join the squares together using slip stitches, single crochet, or your preferred joining method.
Step 6: Form the Tote
Fold and join the panels to create the tote body.
Step 7: Crochet the Straps
Make two long crochet straps.
Step 8: Attach the Straps
Sew the straps securely to the bag and add optional lining or a magnetic snap.
3. Heart Mini Crossbody Bag Crochet Pattern
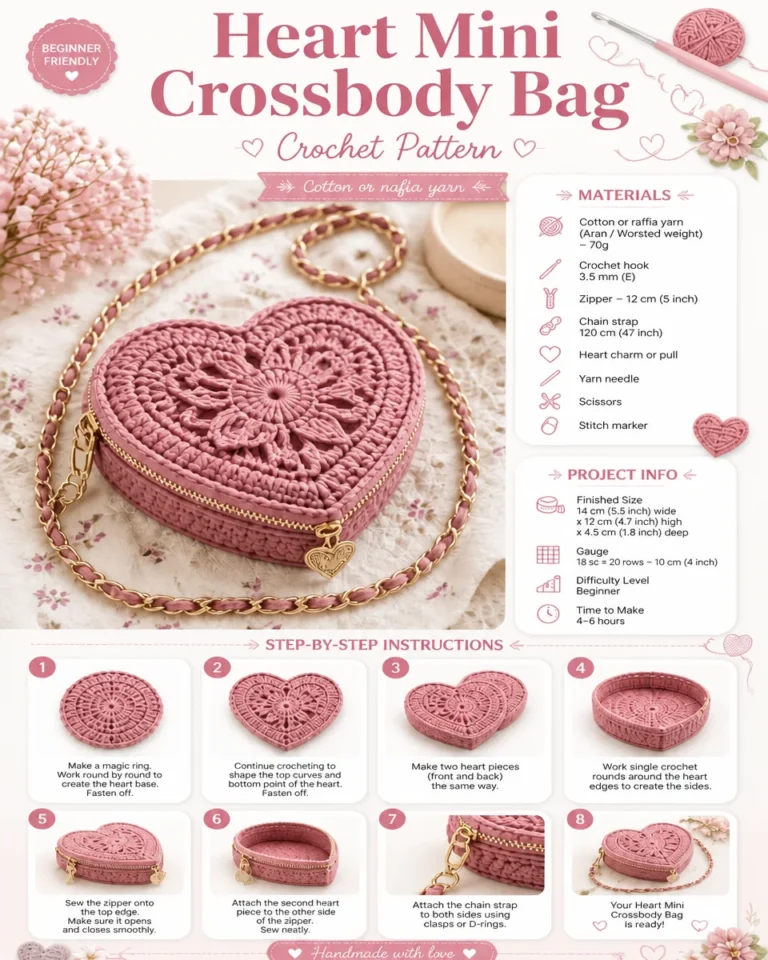
The Heart Mini Crossbody Bag Crochet Pattern is a cute heart-shaped purse with a textured crochet surface, zipper closure, and chain strap. It is perfect for carrying small essentials.
Materials
Cotton or nylon yarn
3.5 mm crochet hook
12 cm zipper
Chain strap
Heart charm or decorative pull
Yarn needle
Stitch marker
Scissors
Step-by-Step Instructions
Step 1: Crochet the Front
Start with a magic ring and crochet the first heart-shaped panel.
Step 2: Shape the Heart
Continue working the upper curves and lower point until the heart shape is complete.
Step 3: Make the Back
Repeat the same process for a second heart-shaped panel.
Step 4: Join the Panels
Single crochet around the outside edges to form the bag depth.
Step 5: Add the Zipper
Sew the zipper neatly along the upper opening.
Step 6: Reinforce the Sides
Secure the side seams and zipper ends.
Step 7: Attach the Strap
Connect the chain strap using suitable rings or clasps.
Step 8: Finish the Decoration
Add a small heart charm or crochet pull.
4. Swan Mini Crossbody Bag Crochet Pattern
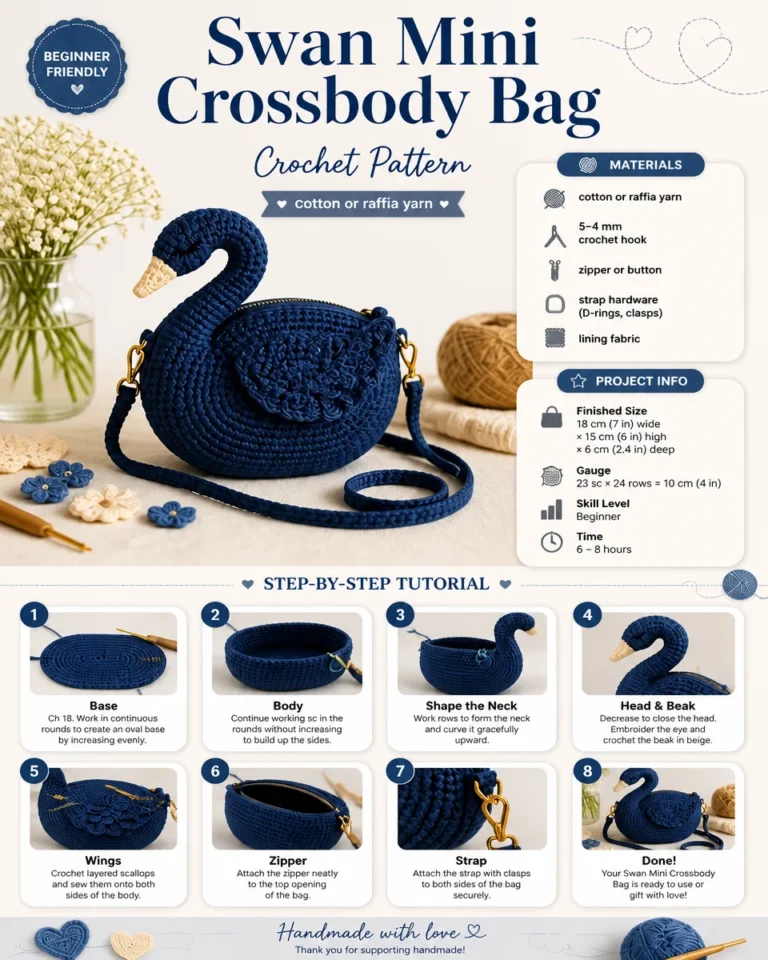
The Swan Mini Crossbody Bag Crochet Pattern creates a whimsical navy swan-shaped purse with a curved neck, beak, wings, and a long shoulder strap.
Materials
Cotton or raffia yarn
5–4 mm crochet hook
Zipper or button
Strap hardware
D-rings or clasps
Optional lining fabric
Yarn needle
Scissors
Step-by-Step Instructions
Step 1: Crochet the Base
Start with a magic ring and work in rounds, increasing evenly.
Step 2: Build the Body
Continue working single crochet without increasing to form the bag body.
Step 3: Shape the Neck
Gradually reduce and shape the upper section into a curved swan neck.
Step 4: Create the Head
Form the head and add the contrasting beak.
Step 5: Add the Wings
Crochet two decorative wings and sew them onto the sides.
Step 6: Install the Closure
Add the zipper or button.
Step 7: Attach the Strap
Secure D-rings and the crossbody strap to both sides.
Step 8: Finish
Weave in loose ends and shape the finished swan bag.
5. Koala Mini Crossbody Bag
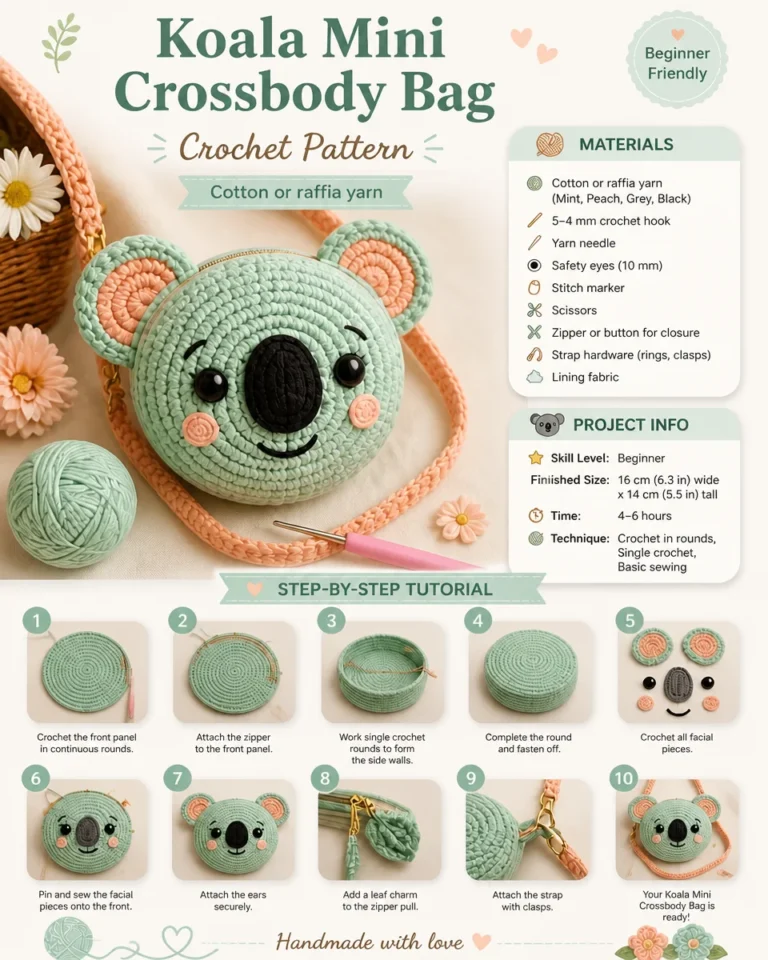
The Koala Mini Crossbody Bag is a cute animal-inspired purse featuring a mint-green koala face, rounded ears, a black nose, and small decorative details.
Materials
Cotton or raffia yarn
5–4 mm crochet hook
Yarn needle
10 mm safety eyes
Stitch marker
Scissors
Zipper or button
Strap hardware
Optional lining fabric
Step-by-Step Instructions
Step 1: Crochet the Front Panel
Work the circular front panel in continuous rounds.
Step 2: Attach the Closure
Sew the zipper into the front opening.
Step 3: Build the Bag Body
Continue with single crochet around the base to form the side walls.
Step 4: Complete the Body
Work the final round and fasten off.
Step 5: Crochet the Face
Make the koala ears, nose, cheeks, and other facial pieces.
Step 6: Attach the Face
Sew the facial pieces and safety eyes securely onto the front.
Step 7: Add the Hardware
Attach the zipper pull and strap connectors.
Step 8: Add the Strap
Secure the crossbody strap and weave in all loose ends.
6. Star Mesh Market Bag Crochet Pattern
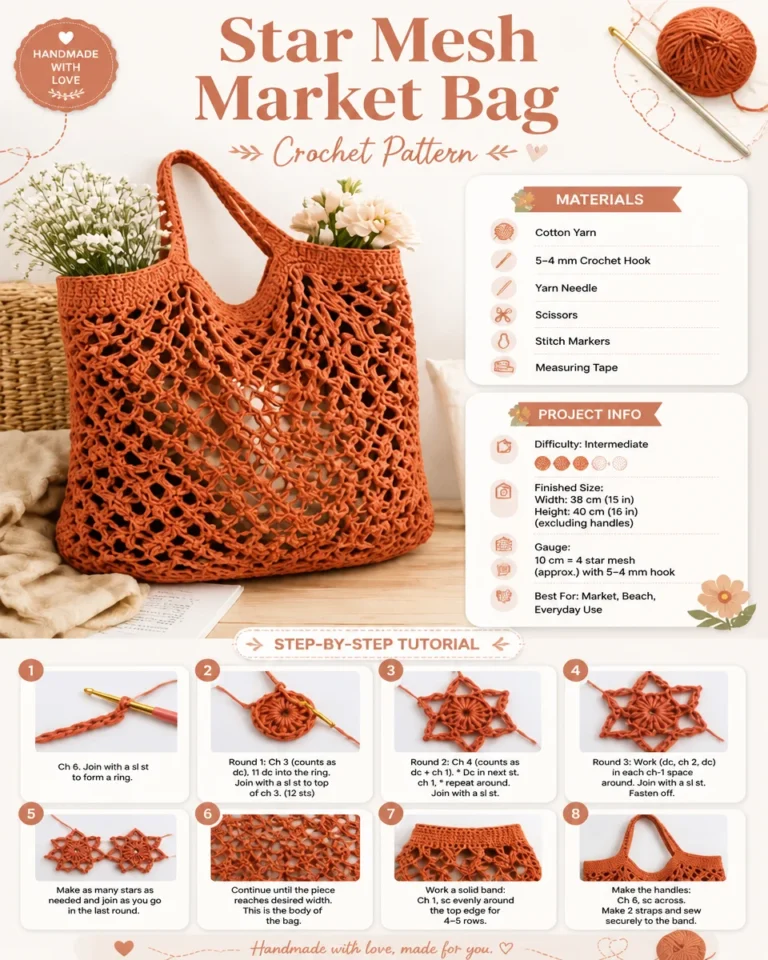
This second Star Mesh Market Bag Crochet Pattern variation uses a rich terracotta color and an airy openwork construction. The result is a lightweight but useful reusable tote.
Materials
Cotton yarn
5–4 mm crochet hook
Yarn needle
Scissors
Stitch markers
Measuring tape
Step-by-Step Instructions
Step 1: Make the Foundation
Create the starting chain according to the desired width.
Step 2: Begin the Mesh
Work the first row of chain spaces and crochet stitches.
Step 3: Repeat the Star Pattern
Continue the repeating mesh sequence around the bag.
Step 4: Build the Height
Add more rows until the bag reaches the desired height.
Step 5: Work the Top Band
Crochet several compact rounds around the opening.
Step 6: Crochet the Handles
Create two sturdy handles.
Step 7: Reinforce the Joins
Attach the handles securely to the top edge.
Step 8: Finish
Fasten off, weave in the ends, and shape the tote.
7. Seashell Mini Crossbody Bag
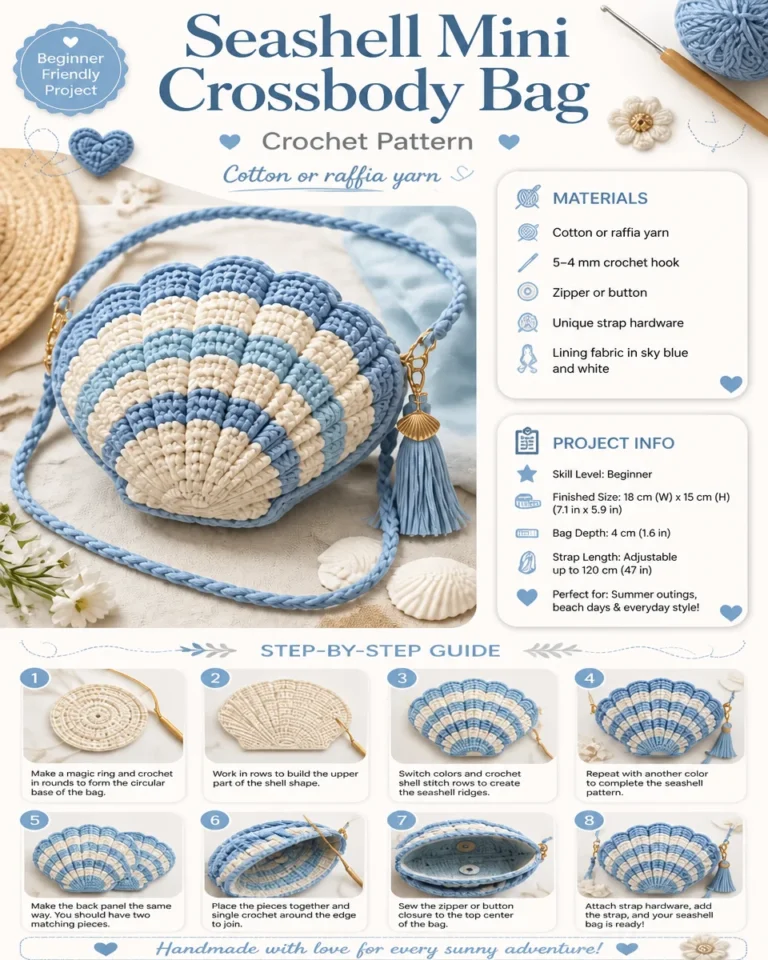
The Seashell Mini Crossbody Bag is inspired by a seashell and features soft blue and cream crochet sections with a matching strap and decorative tassel.
Materials
Cotton or raffia yarn
5–4 mm crochet hook
Zipper or button
Strap hardware
Optional lining fabric
Yarn needle
Scissors
Decorative tassel
Step-by-Step Instructions
Step 1: Make the Base
Start with a magic ring and crochet the circular base.
Step 2: Shape the Shell
Work rows that gradually create the curved shell form.
Step 3: Change Colors
Alternate cream and blue yarn to create the shell stripes.
Step 4: Finish the Front
Continue until the desired front size is reached.
Step 5: Crochet the Back
Make a matching back panel.
Step 6: Join the Panels
Sew or crochet around the edges to create the bag.
Step 7: Add the Closure
Install the zipper or button.
Step 8: Attach the Strap
Add the crossbody strap and decorative tassel.
8. Cat Mini Crossbody Bag Crochet Pattern
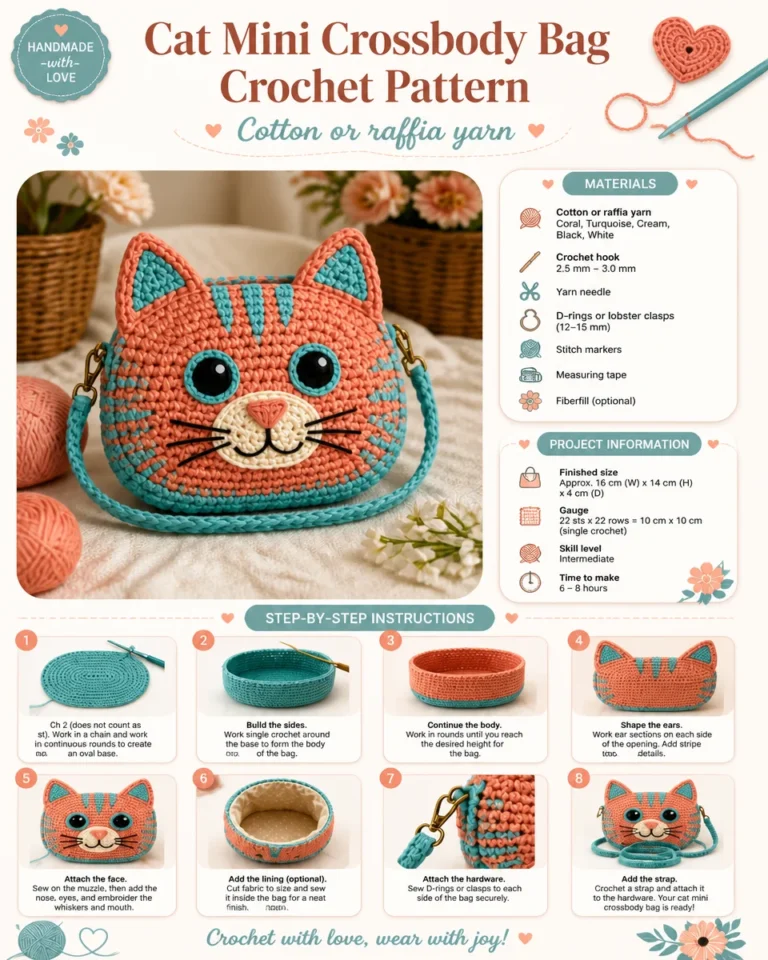
The Cat Mini Crossbody Bag Crochet Pattern is a playful purse shaped like a cat face, complete with ears, eyes, whiskers, and colorful striped details.
Materials
Cotton or raffia yarn in coral, turquoise, cream, black, and white
2.5–3 mm crochet hook
Yarn needle
D-rings or lobster clasps
Stitch markers
Measuring tape
Optional fiberfill
Step-by-Step Instructions
Step 1: Crochet the Base
Start with a round crochet base.
Step 2: Build the Bag
Continue working single crochet around the base.
Step 3: Create the Body
Continue until the bag reaches the desired depth.
Step 4: Shape the Ears
Form two pointed ears at the top.
Step 5: Add the Cat Face
Attach the eyes, muzzle, nose, and embroidered whiskers.
Step 6: Add Optional Lining
Insert a fabric lining if you want extra structure.
Step 7: Attach the Hardware
Secure the D-rings or lobster clasps.
Step 8: Add the Strap
Crochet the strap and attach it securely.
9. Bunny Granny Square Tote
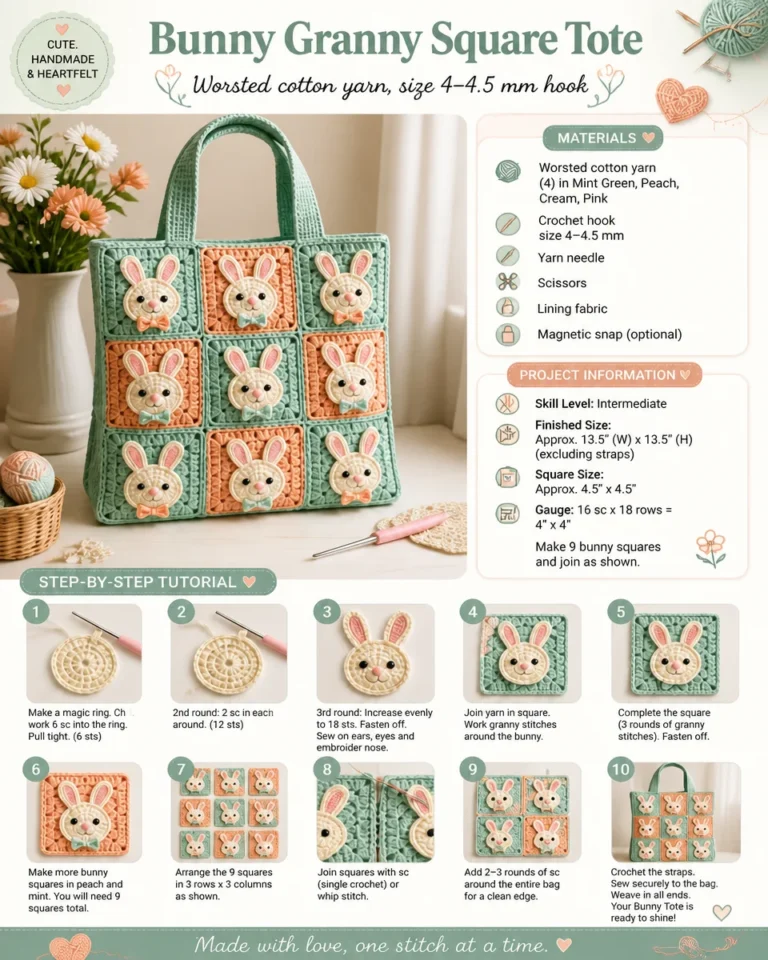
The Bunny Granny Square Tote features nine decorative granny squares with cute bunny faces in soft mint, peach, cream, and pink shades.
Materials
Worsted cotton yarn
4–4.5 mm crochet hook
Yarn needle
Scissors
Optional lining fabric
Optional magnetic snap
Step-by-Step Instructions
Step 1: Crochet the Center
Make a magic ring and work the center rounds.
Step 2: Create the Square
Increase evenly around the corners.
Step 3: Make the Bunny Motif
Create the bunny face and attach the ears, eyes, and nose.
Step 4: Finish the Square
Continue the granny-square rounds around the bunny.
Step 5: Make More Squares
Create 9 matching squares.
Step 6: Arrange the Squares
Place the squares in a 3 × 3 layout.
Step 7: Join the Squares
Join the squares into front and back panels.
Step 8: Add the Handles
Crochet two sturdy tote handles.
Step 9: Finish
Sew on the handles, add an optional lining, and weave in all ends.
10. Cactus Granny Square Tote Crochet Pattern
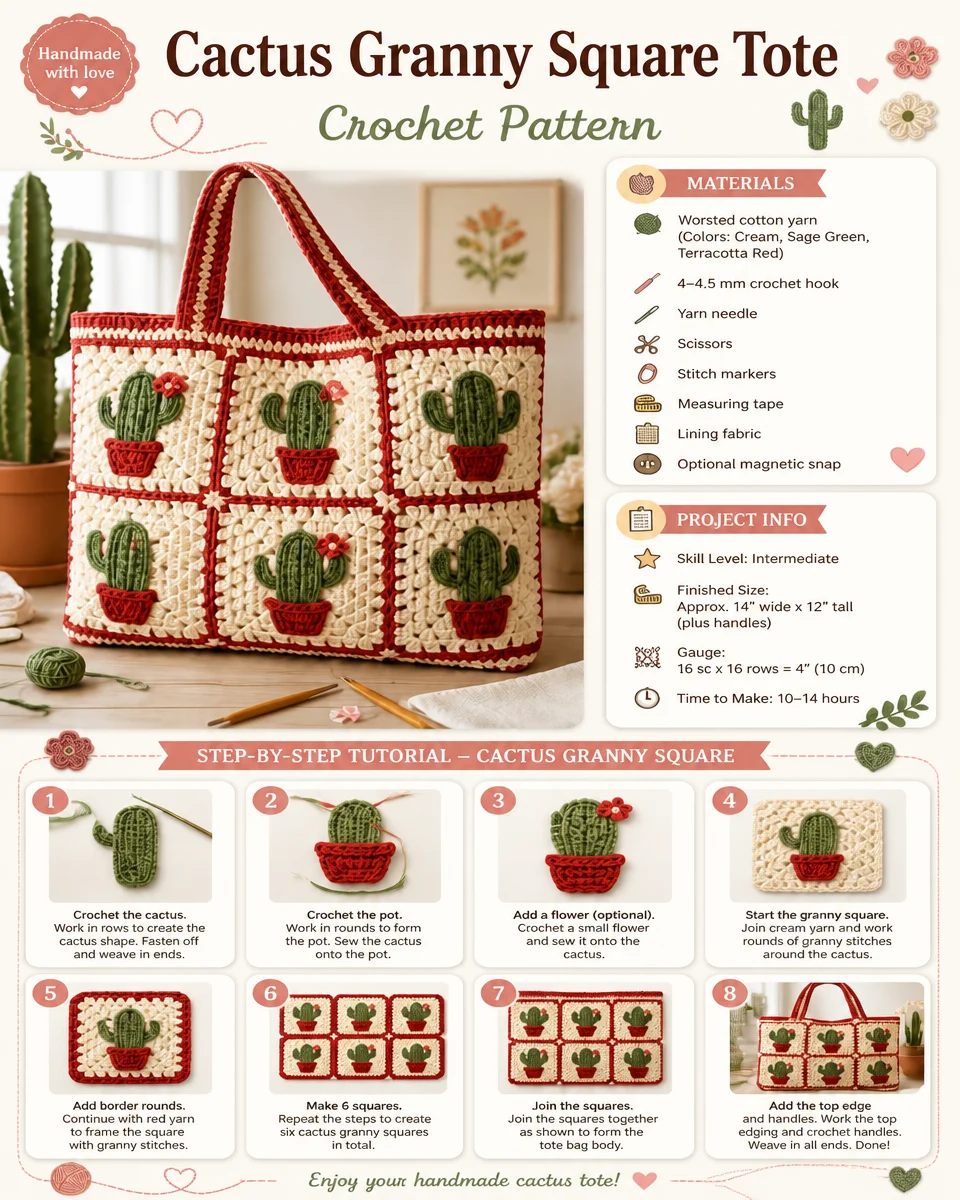
The Cactus Granny Square Tote Crochet Pattern features cream granny squares decorated with green cactus motifs and terracotta pots. It is a great choice for plant lovers and colorful handmade accessory fans.
Materials
Worsted cotton yarn in cream, sage green, and terracotta red
4–4.5 mm crochet hook
Yarn needle
Scissors
Stitch markers
Measuring tape
Optional lining fabric
Optional magnetic snap
Step-by-Step Instructions
Step 1: Crochet the Cactus
Work the cactus motif using sage-green yarn.
Step 2: Crochet the Pot
Make the small terracotta pot separately.
Step 3: Add a Flower
Crochet a tiny flower and attach it to the cactus if desired.
Step 4: Create the Granny Square
Use cream yarn to crochet the surrounding granny-square pattern.
Step 5: Add the Border
Work the final border rounds in terracotta yarn.
Step 6: Make the Remaining Squares
Repeat until you have 6 cactus granny squares.
Step 7: Join the Squares
Arrange the squares and join them into the tote panels.
Step 8: Add the Handles
Crochet the handles and attach them securely to the top edge.
Step 9: Finish the Tote
Add an optional lining or magnetic snap and weave in every loose end.
Helpful Tips for Crochet Bags
Use cotton or cotton-blend yarn when you want a durable bag with good stitch definition.
Check your tension regularly so granny squares and bag panels remain consistent in size.
Reinforce handles and strap attachment points because these areas receive the most stress.
Add a lining to mini crossbody bags or openwork totes when you want to prevent small items from slipping through.
Experiment with yarn colors to personalize each design. Pastels create a soft look, while strong contrasting colors can make the crochet details stand out.
Final Thoughts
These 10 crochet bag patterns give you a wide range of projects to try, from the practical Star Mesh Market Bag Crochet Pattern and Cloud Granny Square Tote Crochet Pattern to the playful Koala Mini Crossbody Bag and Cat Mini Crossbody Bag Crochet Pattern.
With the right materials, a crochet hook, and a little patience, each design can become a beautiful handmade accessory for yourself or a thoughtful gift for someone special.
