

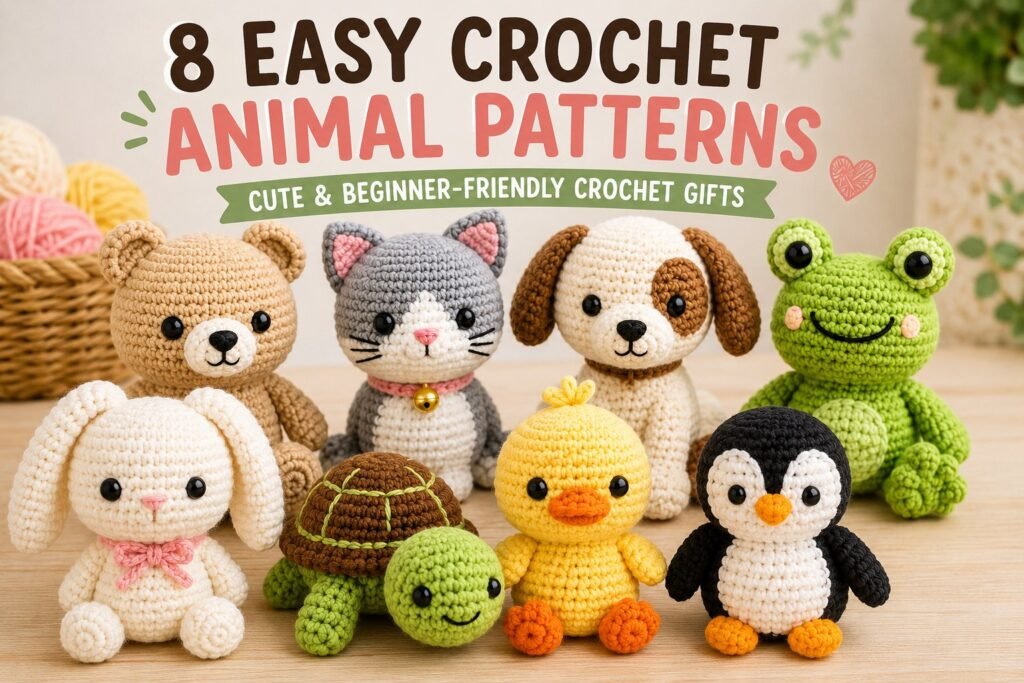
If you love making cute handmade projects, these 8 easy crochet animal patterns are perfect for your next crochet session. From an adorable bunny and cuddly bear to a playful frog, sweet duck, and tiny penguin, these amigurumi animals are fun to make and wonderful to give as handmade gifts.
These crochet animal projects are especially great for beginners because they use simple shapes, basic crochet techniques, stuffing, and easy assembly. You can also change the yarn colors and add your own accessories to make every animal unique.
If you enjoy making handmade presents, visit our Crochet Gifts collection for more creative gift ideas.
1. Easy Crochet Bunny Pattern
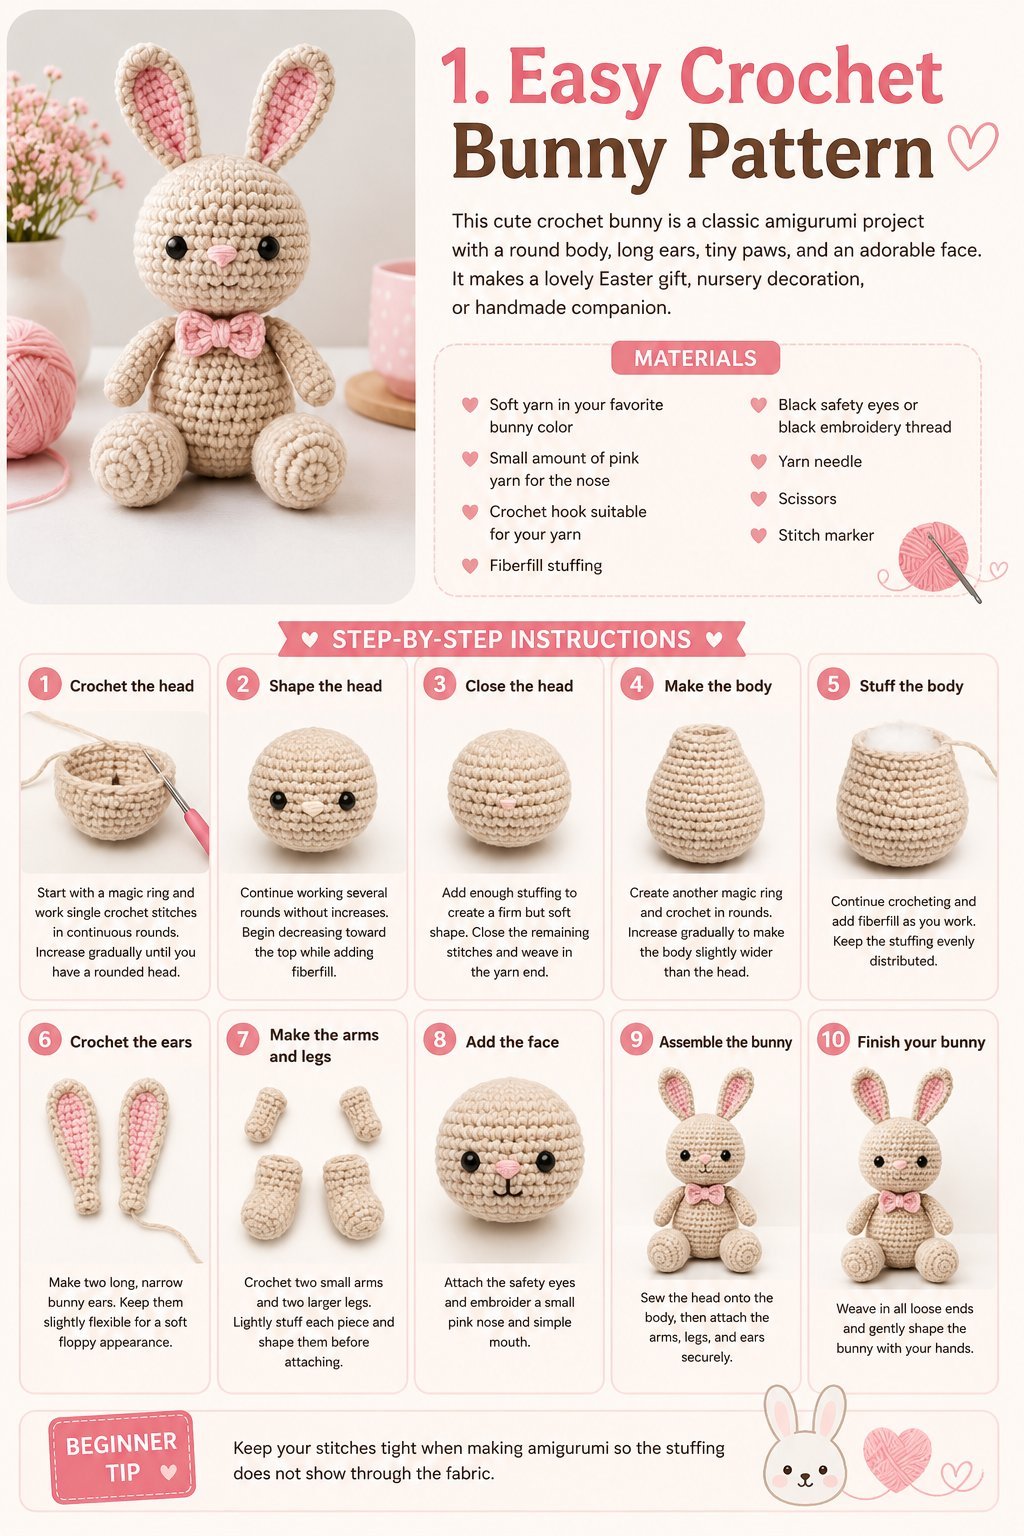
This cute crochet bunny is a classic amigurumi project with a round body, long ears, tiny paws, and an adorable face. It makes a lovely Easter gift, nursery decoration, or handmade companion.
Materials
Soft yarn in your favorite bunny color
Small amount of pink yarn for the nose
Crochet hook suitable for your yarn
Fiberfill stuffing
Black safety eyes or black embroidery thread
Yarn needle
Scissors
Stitch marker
Step-by-Step Instructions
Step 1: Crochet the head
Start with a magic ring and work single crochet stitches in continuous rounds. Increase gradually until you have a rounded head.
Step 2: Shape the head
Continue working several rounds without increases. Begin decreasing toward the top while adding fiberfill.
Step 3: Close the head
Add enough stuffing to create a firm but soft shape. Close the remaining stitches and weave in the yarn end.
Step 4: Make the body
Create another magic ring and crochet in rounds. Increase gradually to make the body slightly wider than the head.
Step 5: Stuff the body
Continue crocheting and add fiberfill as you work. Keep the stuffing evenly distributed.
Step 6: Crochet the ears
Make two long, narrow bunny ears. Keep them slightly flexible for a soft floppy appearance.
Step 7: Make the arms and legs
Crochet two small arms and two larger legs. Lightly stuff each piece and shape them before attaching.
Step 8: Add the face
Attach the safety eyes and embroider a small pink nose and simple mouth.
Step 9: Assemble the bunny
Sew the head onto the body, then attach the arms, legs, and ears securely.
Step 10: Finish your bunny
Weave in all loose ends and gently shape the bunny with your hands.
Beginner Tip
Keep your stitches tight when making amigurumi so the stuffing does not show through the fabric.
2. Easy Crochet Bear Pattern
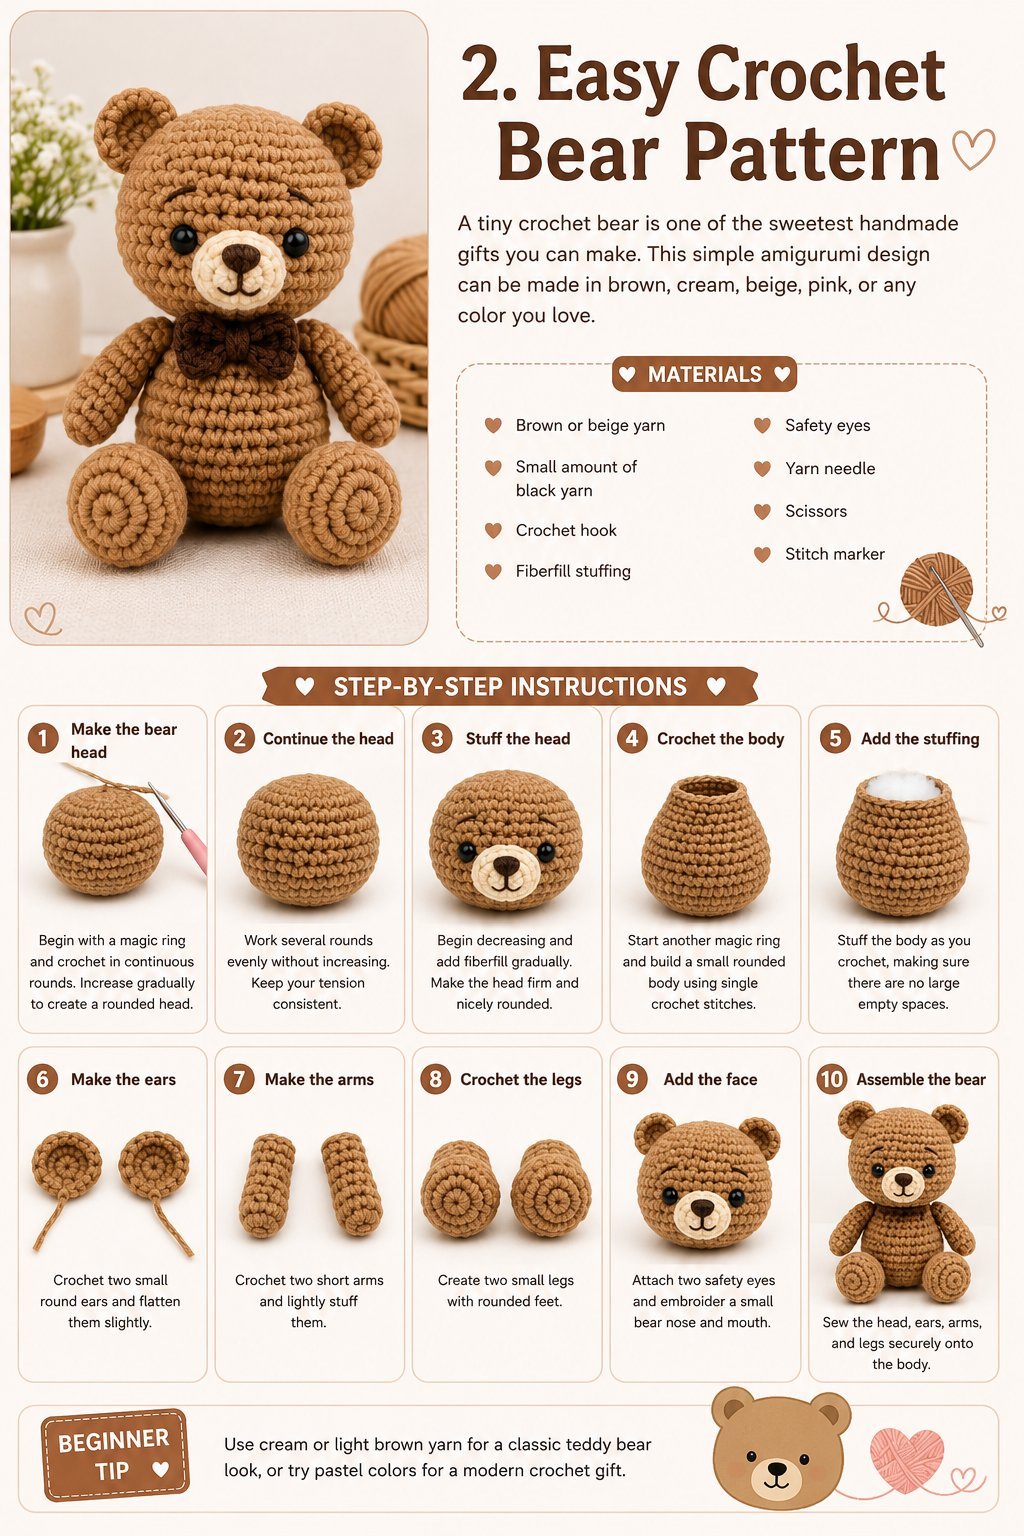
A tiny crochet bear is one of the sweetest handmade gifts you can make. This simple amigurumi design can be made in brown, cream, beige, pink, or any color you love.
Materials
Brown or beige yarn
Small amount of black yarn
Crochet hook
Fiberfill stuffing
Safety eyes
Yarn needle
Scissors
Stitch marker
Step-by-Step Instructions
Step 1: Make the bear head
Begin with a magic ring and crochet in continuous rounds. Increase gradually to create a rounded head.
Step 2: Continue the head
Work several rounds evenly without increasing. Keep your tension consistent.
Step 3: Stuff the head
Begin decreasing and add fiberfill gradually. Make the head firm and nicely rounded.
Step 4: Crochet the body
Start another magic ring and build a small rounded body using single crochet stitches.
Step 5: Add the stuffing
Stuff the body as you crochet, making sure there are no large empty spaces.
Step 6: Make the ears
Crochet two small round ears and flatten them slightly.
Step 7: Make the arms
Crochet two short arms and lightly stuff them.
Step 8: Crochet the legs
Create two small legs with rounded feet.
Step 9: Add the face
Attach two safety eyes and embroider a small bear nose and mouth.
Step 10: Assemble the bear
Sew the head, ears, arms, and legs securely onto the body.
Beginner Tip
Use cream or light brown yarn for a classic teddy bear look, or try pastel colors for a modern crochet gift.
3. Easy Crochet Cat Pattern
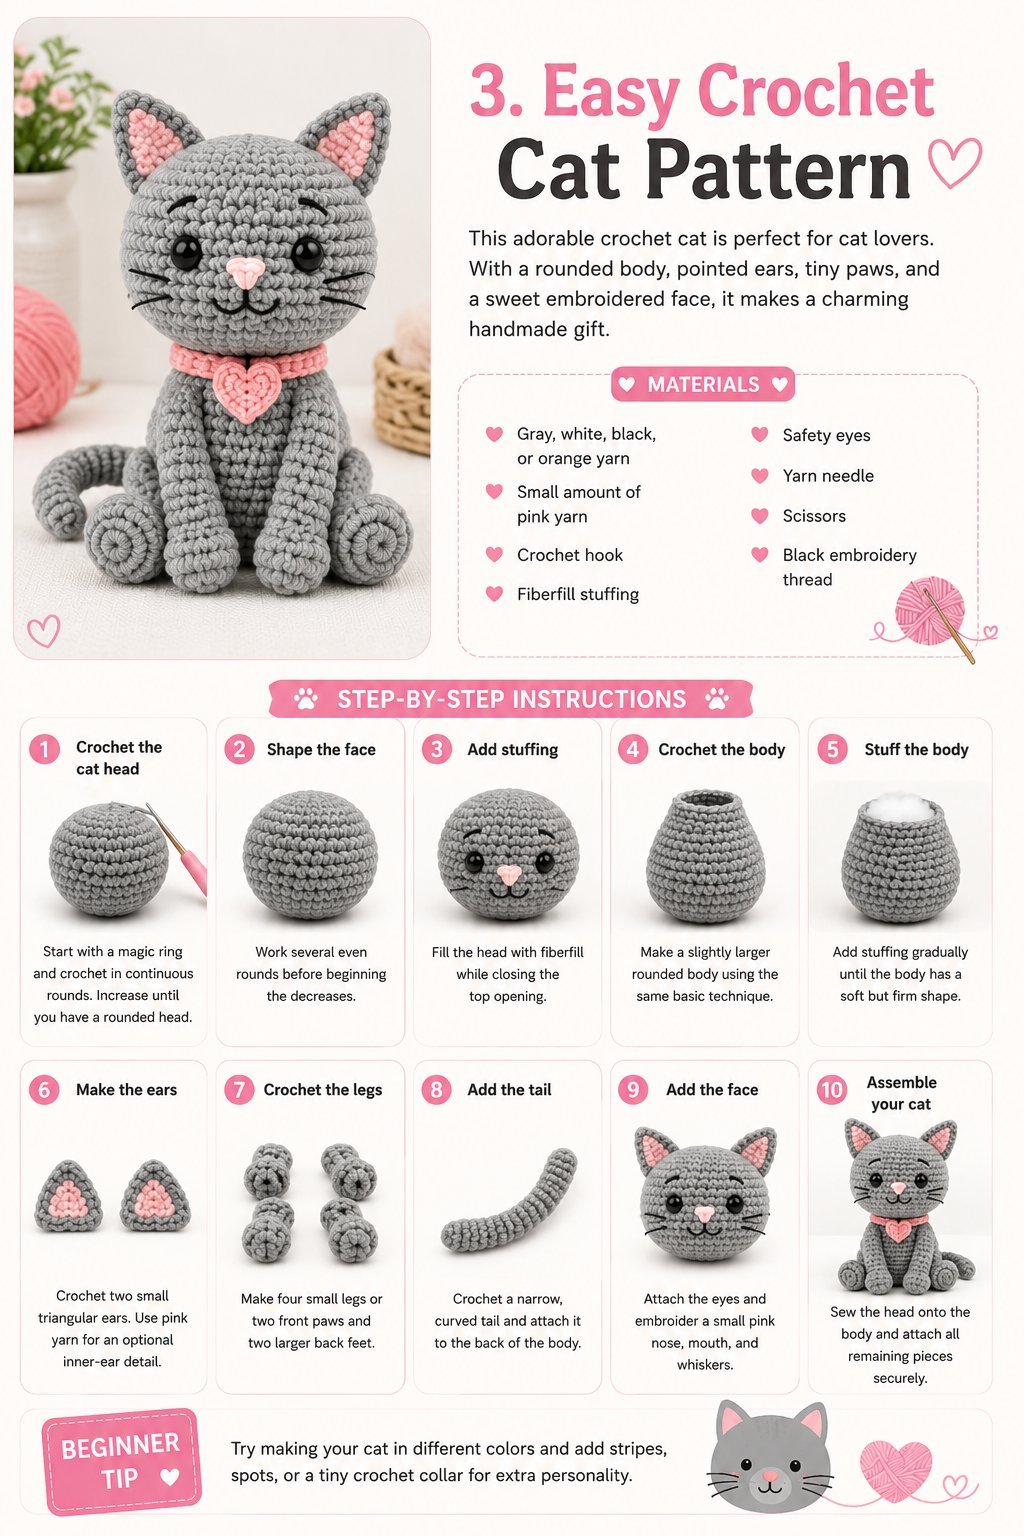
This adorable crochet cat is perfect for cat lovers. With a rounded body, pointed ears, tiny paws, and a sweet embroidered face, it makes a charming handmade gift.
Materials
Gray, white, black, or orange yarn
Small amount of pink yarn
Crochet hook
Fiberfill stuffing
Safety eyes
Yarn needle
Scissors
Black embroidery thread
Step-by-Step Instructions
Step 1: Crochet the cat head
Start with a magic ring and crochet in continuous rounds. Increase until you have a rounded head.
Step 2: Shape the face
Work several even rounds before beginning the decreases.
Step 3: Add stuffing
Fill the head with fiberfill while closing the top.
Step 4: Crochet the body
Make a slightly larger rounded body using the same basic technique.
Step 5: Stuff the body
Add stuffing gradually until the body has a soft but firm shape.
Step 6: Make the ears
Crochet two small triangular ears. Use pink yarn for an optional inner-ear detail.
Step 7: Crochet the legs
Make four small legs or two front paws and two larger back feet.
Step 8: Add the tail
Crochet a narrow, curved tail and attach it to the back of the body.
Step 9: Add the face
Attach the eyes and embroider a small pink nose, mouth, and whiskers.
Step 10: Assemble your cat
Sew the head onto the body and attach all remaining pieces securely.
Beginner Tip
Try making your cat in different colors and add stripes, spots, or a tiny crochet collar for extra personality.
4. Easy Crochet Dog Pattern
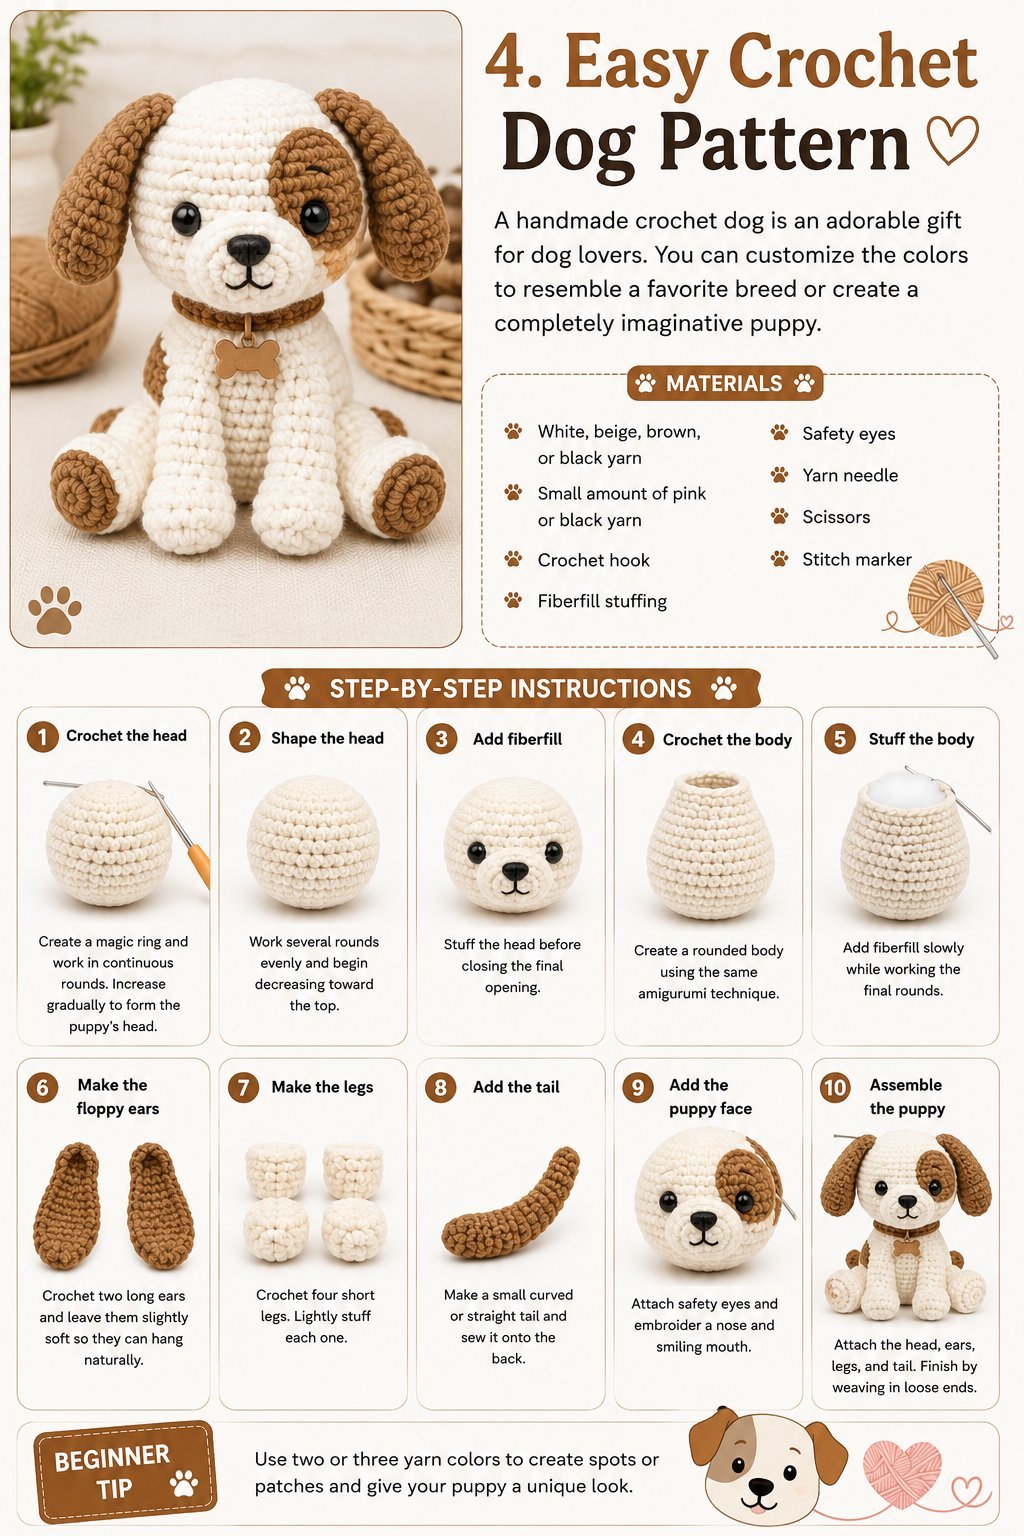
A handmade crochet dog is an adorable gift for dog lovers. You can customize the colors to resemble a favorite breed or create a completely imaginative puppy.
Materials
White, beige, brown, or black yarn
Small amount of pink or black yarn
Crochet hook
Fiberfill stuffing
Safety eyes
Yarn needle
Scissors
Stitch marker
Step-by-Step Instructions
Step 1: Crochet the head
Create a magic ring and work in continuous rounds. Increase gradually to form the puppy’s head.
Step 2: Shape the head
Work several rounds evenly and begin decreasing toward the top.
Step 3: Add fiberfill
Stuff the head before closing the final opening.
Step 4: Crochet the body
Create a rounded body using the same amigurumi technique.
Step 5: Stuff the body
Add fiberfill slowly while working the final rounds.
Step 6: Make the floppy ears
Crochet two long ears and leave them slightly soft so they can hang naturally.
Step 7: Make the legs
Crochet four short legs. Lightly stuff each one.
Step 8: Add the tail
Make a small curved or straight tail and sew it onto the back.
Step 9: Add the puppy face
Attach safety eyes and embroider a nose and smiling mouth.
Step 10: Assemble the puppy
Attach the head, ears, legs, and tail. Finish by weaving in loose ends.
Beginner Tip
Use two or three yarn colors to create spots or patches and give your puppy a unique look.
5. Easy Crochet Frog Pattern
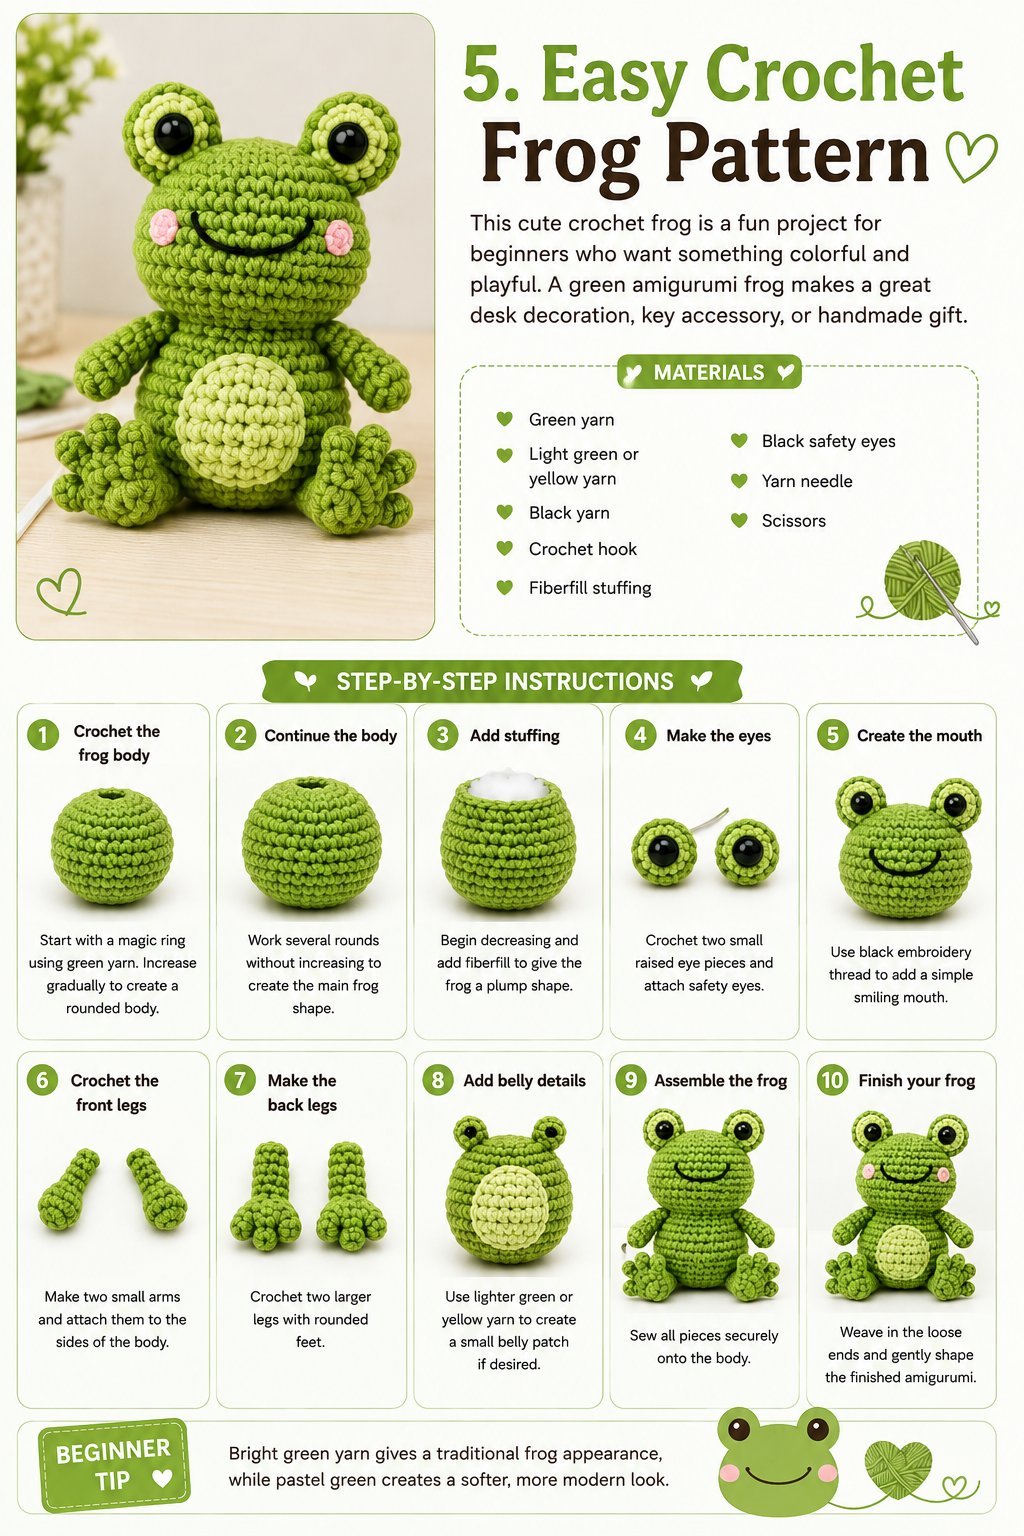
This cute crochet frog is a fun project for beginners who want something colorful and playful. A green amigurumi frog makes a great desk decoration, key accessory, or handmade gift.
Materials
Green yarn
Light green or yellow yarn
Black yarn
Crochet hook
Fiberfill stuffing
Black safety eyes
Yarn needle
Scissors
Step-by-Step Instructions
Step 1: Crochet the frog body
Start with a magic ring using green yarn. Increase gradually to create a rounded body.
Step 2: Continue the body
Work several rounds without increasing to create the main frog shape.
Step 3: Add stuffing
Begin decreasing and add fiberfill to give the frog a plump shape.
Step 4: Make the eyes
Crochet two small raised eye pieces and attach safety eyes.
Step 5: Create the mouth
Use black embroidery thread to add a simple smiling mouth.
Step 6: Crochet the front legs
Make two small arms and attach them to the sides of the body.
Step 7: Make the back legs
Crochet two larger legs with rounded feet.
Step 8: Add belly details
Use lighter green or yellow yarn to create a small belly patch if desired.
Step 9: Assemble the frog
Sew all pieces securely onto the body.
Step 10: Finish your frog
Weave in the loose ends and gently shape the finished amigurumi.
Beginner Tip
Bright green yarn gives a traditional frog appearance, while pastel green creates a softer, more modern look.
6. Easy Crochet Turtle Pattern
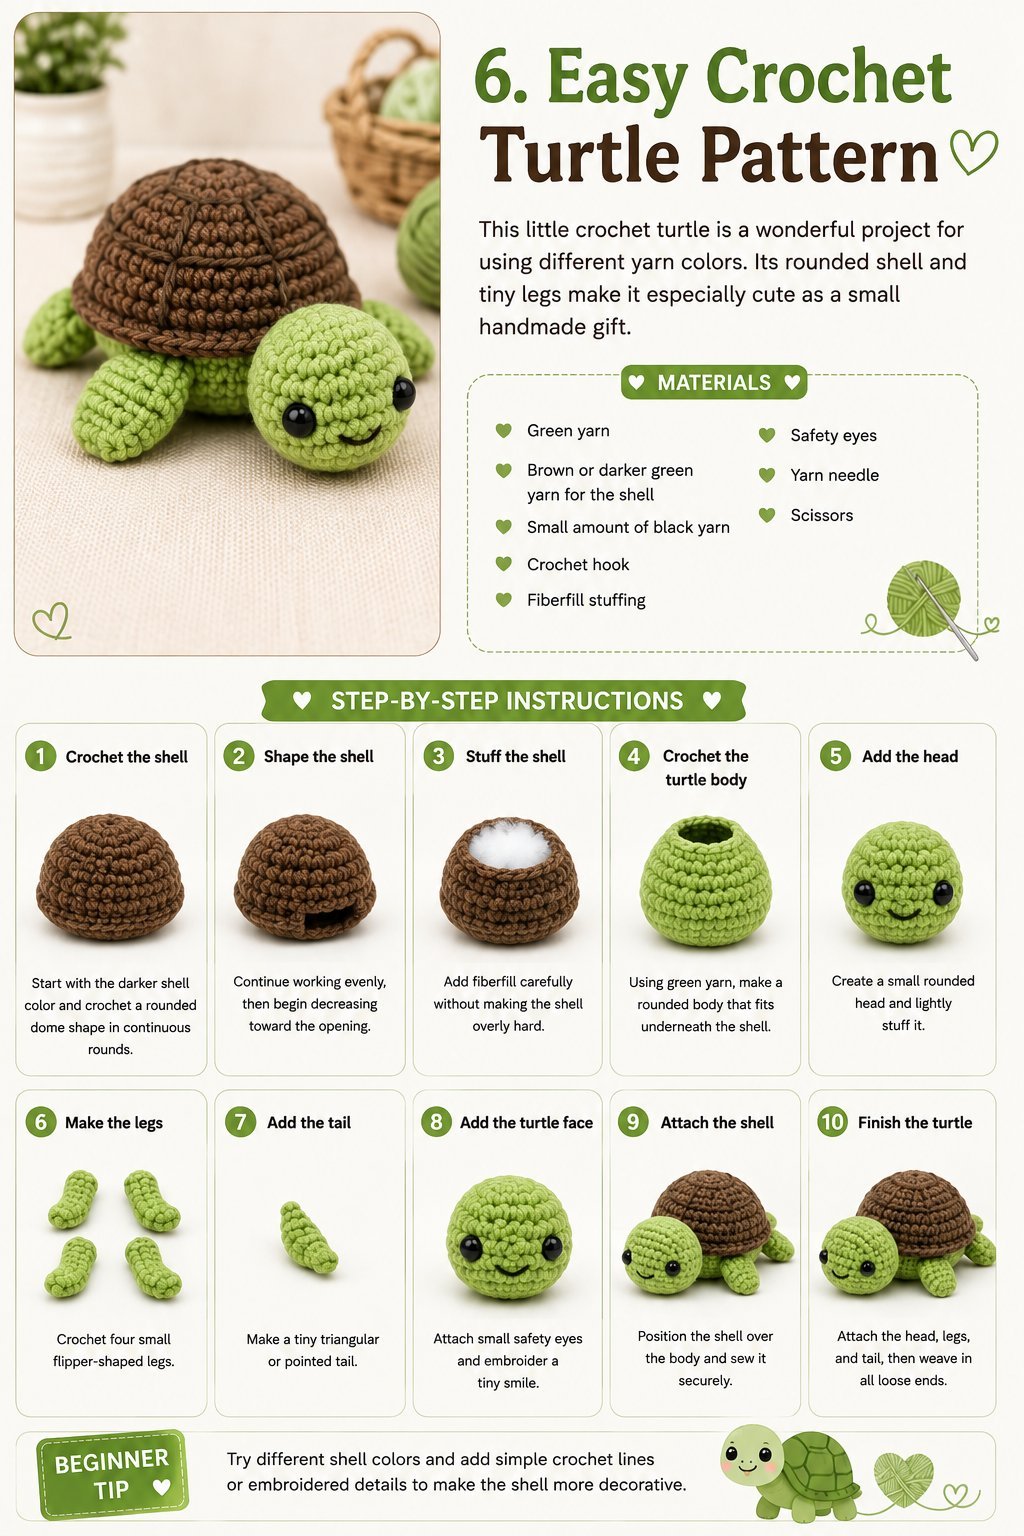
This little crochet turtle is a wonderful project for using different yarn colors. Its rounded shell and tiny legs make it especially cute as a small handmade gift.
Materials
Green yarn
Brown or darker green yarn for the shell
Small amount of black yarn
Crochet hook
Fiberfill stuffing
Safety eyes
Yarn needle
Scissors
Step-by-Step Instructions
Step 1: Crochet the shell
Start with the darker shell color and crochet a rounded dome shape in continuous rounds.
Step 2: Shape the shell
Continue working evenly, then begin decreasing toward the opening.
Step 3: Stuff the shell
Add fiberfill carefully without making the shell overly hard.
Step 4: Crochet the turtle body
Using green yarn, make a rounded body that fits underneath the shell.
Step 5: Add the head
Create a small rounded head and lightly stuff it.
Step 6: Make the legs
Crochet four small flipper-shaped legs.
Step 7: Add the tail
Make a tiny triangular or pointed tail.
Step 8: Add the turtle face
Attach small safety eyes and embroider a tiny smile.
Step 9: Attach the shell
Position the shell over the body and sew it securely.
Step 10: Finish the turtle
Attach the head, legs, and tail, then weave in all loose ends.
Beginner Tip
Try different shell colors and add simple crochet lines or embroidered details to make the shell more decorative.
7. Easy Crochet Duck Pattern
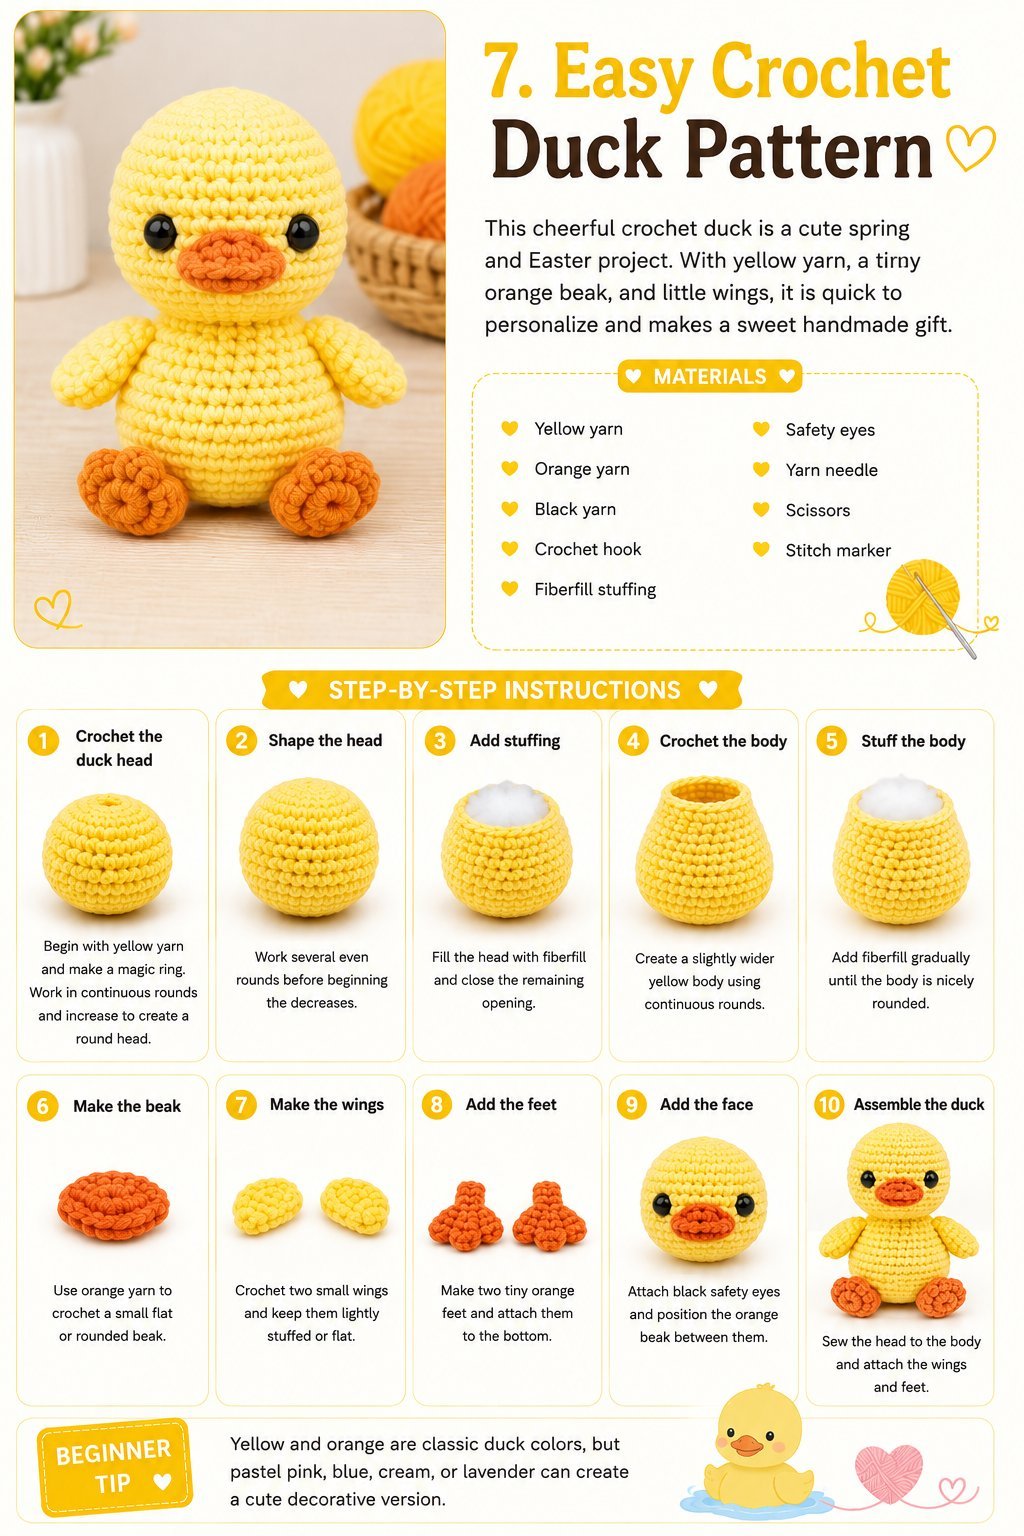
This cheerful crochet duck is a cute spring and Easter project. With yellow yarn, a tiny orange beak, and little wings, it is quick to personalize and makes a sweet handmade gift.
Materials
Yellow yarn
Orange yarn
Black yarn
Crochet hook
Fiberfill stuffing
Safety eyes
Yarn needle
Scissors
Stitch marker
Step-by-Step Instructions
Step 1: Crochet the duck head
Begin with yellow yarn and make a magic ring. Work in continuous rounds and increase to create a round head.
Step 2: Shape the head
Work several even rounds before beginning the decreases.
Step 3: Add stuffing
Fill the head with fiberfill and close the remaining opening.
Step 4: Crochet the body
Create a slightly wider yellow body using continuous rounds.
Step 5: Stuff the body
Add fiberfill gradually until the body is nicely rounded.
Step 6: Make the beak
Use orange yarn to crochet a small flat or rounded beak.
Step 7: Make the wings
Crochet two small wings and keep them lightly stuffed or flat.
Step 8: Add the feet
Make two tiny orange feet and attach them to the bottom.
Step 9: Add the face
Attach black safety eyes and position the orange beak between them.
Step 10: Assemble the duck
Sew the head to the body and attach the wings and feet.
Beginner Tip
Yellow and orange are classic duck colors, but pastel pink, blue, cream, or lavender can create a cute decorative version.
8. Easy Crochet Penguin Pattern
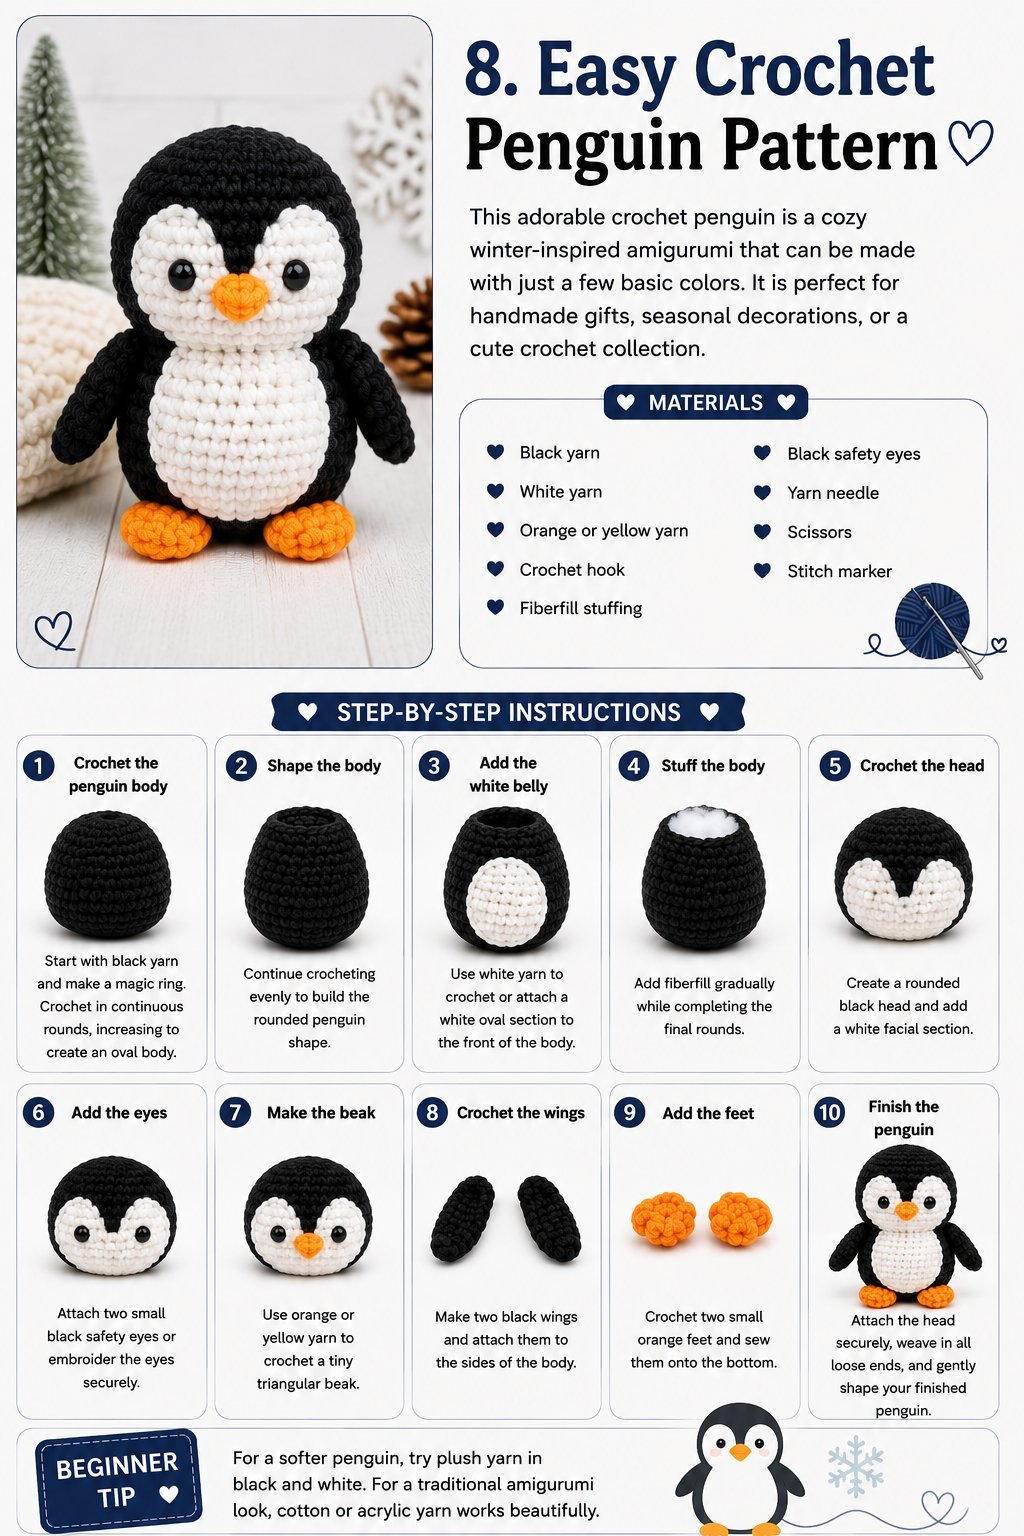
This adorable crochet penguin is a cozy winter-inspired amigurumi that can be made with just a few basic colors. It is perfect for handmade gifts, seasonal decorations, or a cute crochet collection.
Materials
Black yarn
White yarn
Orange or yellow yarn
Crochet hook
Fiberfill stuffing
Black safety eyes
Yarn needle
Scissors
Stitch marker
Step-by-Step Instructions
Step 1: Crochet the penguin body
Start with black yarn and make a magic ring. Crochet in continuous rounds, increasing to create an oval body.
Step 2: Shape the body
Continue crocheting evenly to build the rounded penguin shape.
Step 3: Add the white belly
Use white yarn to crochet or attach a white oval section to the front of the body.
Step 4: Stuff the body
Add fiberfill gradually while completing the final rounds.
Step 5: Crochet the head
Create a rounded black head and add a white facial section.
Step 6: Add the eyes
Attach two small black safety eyes or embroider the eyes securely.
Step 7: Make the beak
Use orange or yellow yarn to crochet a tiny triangular beak.
Step 8: Crochet the wings
Make two black wings and attach them to the sides of the body.
Step 9: Add the feet
Crochet two small orange feet and sew them onto the bottom.
Step 10: Finish the penguin
Attach the head securely, weave in all loose ends, and gently shape your finished penguin.
Beginner Tip
For a softer penguin, try plush yarn in black and white. For a traditional amigurumi look, cotton or acrylic yarn works beautifully.
Helpful Tips for Crocheting Animal Amigurumi
Crochet animals are much easier to make when you keep your stitches consistent. Here are a few simple tips to help your projects look neat and professional.
Use Tight Stitches
Amigurumi usually looks best when crocheted with tight stitches. This helps prevent the stuffing from showing through.
Use a Stitch Marker
When crocheting in continuous rounds, a stitch marker makes it much easier to identify the beginning of each round.
Stuff Gradually
Don’t wait until the very end to add stuffing. Add small amounts as you crochet so you can control the shape.
Keep Your Pieces Similar
When making pairs such as ears, arms, legs, or wings, try to make both pieces the same size.
Secure Small Pieces Carefully
If the finished animal will be handled frequently, make sure all sewn-on pieces are firmly attached.
Customize Your Crochet Animals
One of the best things about crochet animals is how easy they are to personalize. Change the colors, add bows, flowers, scarves, tiny hats, hearts, or other crochet accessories.
Crochet Animal Gift Ideas
These easy crochet animals can be turned into thoughtful handmade gifts for many occasions.
A crochet bunny is perfect for Easter and spring.
A crochet bear makes a sweet birthday or baby-shower gift.
A crochet cat is ideal for cat lovers.
A crochet dog makes a thoughtful gift for pet lovers.
A crochet frog is fun for children and colorful room decor.
A crochet turtle is perfect for nature lovers.
A crochet duck works beautifully as an Easter or spring gift.
A crochet penguin is a cute winter and Christmas handmade project.
For even more handmade inspiration, explore our Crochet Gifts collection.
Frequently Asked Questions
Are these crochet animal patterns good for beginners?
Yes. The projects are designed around basic amigurumi techniques such as magic rings, single crochet, increases, decreases, stuffing, and sewing pieces together.
What yarn is best for crochet animals?
Cotton and acrylic yarn are both popular choices for amigurumi. Plush and chenille yarn can also create wonderfully soft animals, although they can be slightly harder for beginners to see while crocheting.
Can I change the size of the crochet animals?
Yes. Using thicker yarn and a larger crochet hook will generally create a larger finished animal, while thinner yarn and a smaller hook will produce a smaller version.
Can I give crochet animals as gifts?
Absolutely. Handmade crochet animals make lovely gifts for birthdays, Easter, baby showers, holidays, nursery decor, and many other occasions.
Can I customize these crochet animals?
Yes. Changing yarn colors, facial expressions, ears, tails, accessories, and small decorative details is an easy way to make each crochet animal unique.
Final Thoughts
These 8 easy crochet animal patterns are a fun way to practice amigurumi while creating adorable handmade gifts. Whether you choose a bunny, bear, cat, dog, frog, turtle, duck, or penguin, each project gives you plenty of opportunities to experiment with colors and personal details.
Grab your favorite yarn and crochet hook, choose your favorite animal, and start creating. These cute crochet animals are small enough to make without feeling overwhelming and special enough to become memorable handmade gifts.
And when you’re ready for more ideas, don’t forget to explore our Crochet Gifts collection for more cute handmade projects.
