

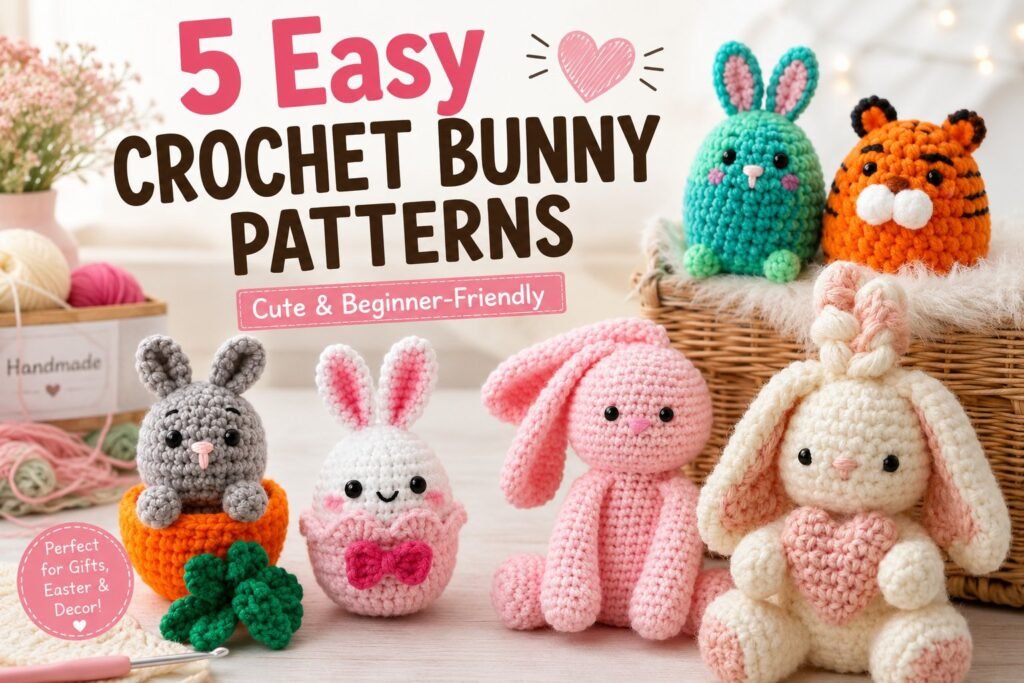
Here are 5 easy crochet bunny patterns perfect for beginners. These adorable amigurumi projects include simple shapes, soft yarn, and step-by-step instructions to help you create cute handmade bunnies for Easter, gifts, nursery decor, or everyday decoration.
Each project includes the materials you need and an easy step-by-step tutorial to guide you from the first stitch to the finished bunny.
Crochet a Bunny-in-a-Carrot: A Fun and Adorable DIY Project
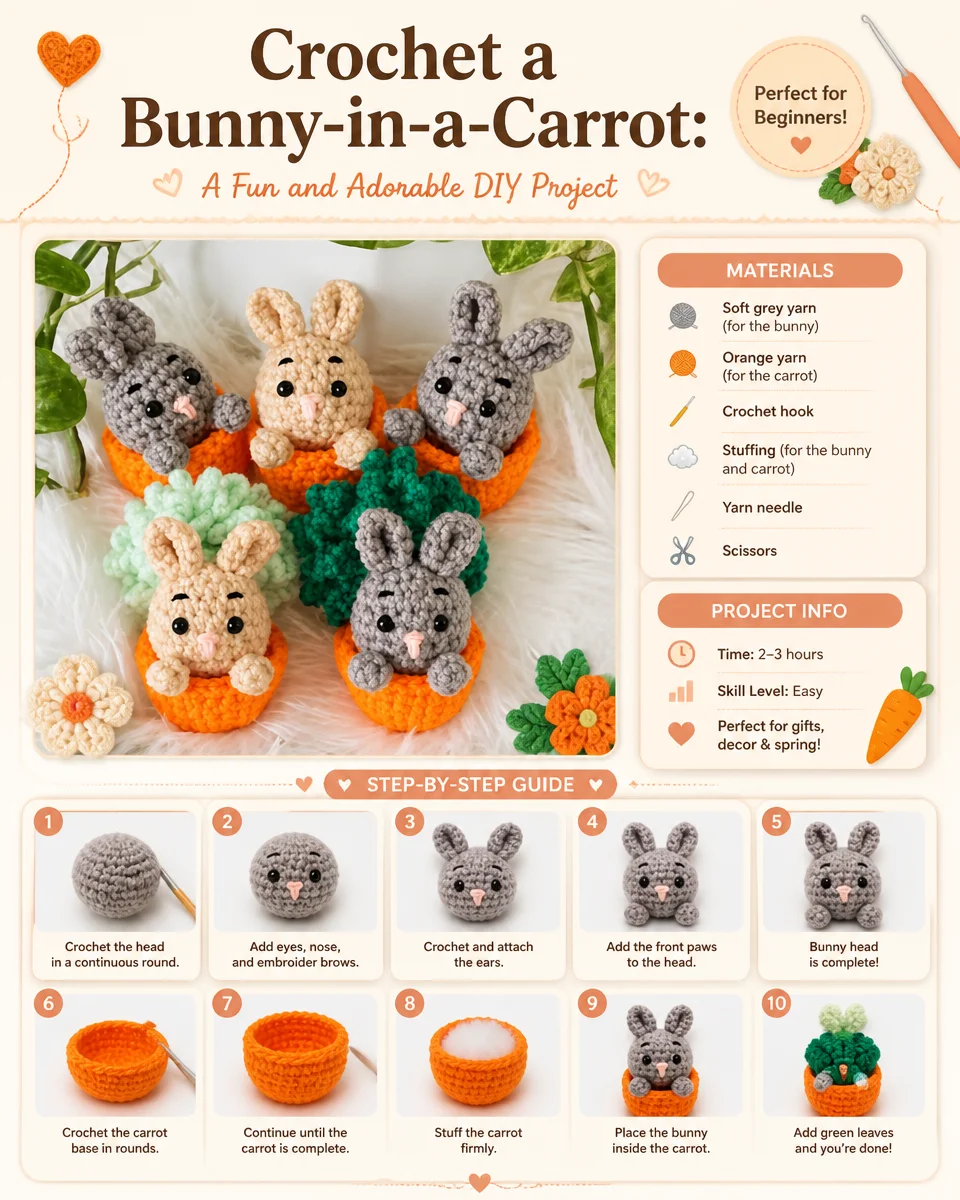
This adorable crochet bunny-in-a-carrot is a fun amigurumi project that combines a tiny cuddly bunny with a bright orange crochet carrot. It is perfect for spring decorating, Easter baskets, handmade gifts, or anyone who loves cute crochet animals.
The project is beginner-friendly and can be made with basic crochet skills, simple shaping, and a little stuffing.
Materials
Soft gray or beige yarn for the bunny
Orange yarn for the carrot
Green yarn for the carrot leaves
Crochet hook suitable for your yarn
Fiberfill stuffing
Yarn needle
Black safety eyes or black embroidery thread
Pink yarn or embroidery thread for the nose
Scissors
Project Information
Skill Level: Easy
Time: Approximately 2–3 hours
Project Type: Crochet amigurumi
Best For: Gifts, spring decorations, Easter decor, and nursery decor
Step-by-Step Tutorial
Step 1: Crochet the Bunny Head
Start with a magic ring and crochet the head in continuous rounds. Work evenly around the circle, increasing gradually to create a rounded shape. Continue crocheting until the head reaches the desired size.
Step 2: Shape and Stuff the Head
Begin decreasing the stitches toward the top of the head. Before completely closing the opening, add fiberfill stuffing and shape the piece firmly into a smooth round head.
Step 3: Add the Face
Attach two small black safety eyes. Add a tiny pink nose and embroider simple eyebrows or facial details if desired.
Step 4: Crochet the Ears
Make two long bunny ears using the same yarn as the head. Crochet each ear in narrow rounds, then lightly stuff or flatten them depending on the look you want.
Step 5: Attach the Ears
Position both ears evenly on top of the bunny’s head. Sew them securely using a yarn needle, making sure they stand upright or curve naturally.
Step 6: Make the Bunny Paws
Crochet two small front paws and two larger feet. Stuff them lightly and shape them before sewing them onto the bunny.
Step 7: Crochet the Carrot
Using orange yarn, start with a magic ring and crochet in rounds. Increase gradually to create the rounded upper section, then continue working downward while shaping the carrot.
Step 8: Stuff the Carrot
Add fiberfill inside the carrot as you crochet. Keep the stuffing firm enough to hold its shape without making the stitches too loose.
Step 9: Place the Bunny Inside
Position the finished bunny inside the opening of the carrot. Secure the bunny gently so that it sits comfortably above the carrot.
Step 10: Add the Green Leaves
Crochet a few small leaves using green yarn and attach them around the top of the carrot. Adjust the leaves until you get a full, decorative finish.
Crochet Tips
Keep your stitches tight when making amigurumi so the stuffing does not show through. Use a stitch marker when working in continuous rounds, and stuff gradually instead of waiting until the very end.
This cute crochet bunny-in-a-carrot makes an especially sweet handmade Easter decoration and a lovely spring crochet gift.
2. Crochet Bunny Egg: A Sweet Little Make for Easter!
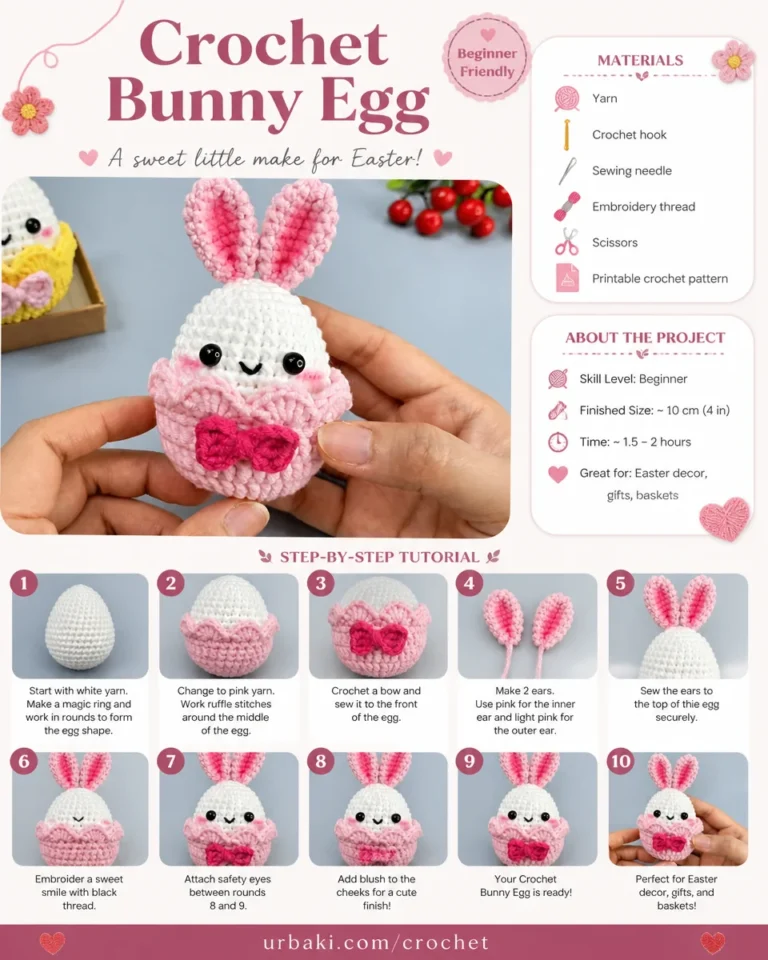
Crochet Bunny Egg: A Sweet Little Make for Easter!
Looking for a cute and easy Easter crochet project? This Crochet Bunny Egg is a charming little amigurumi that combines a soft white bunny with a pink decorative egg base.
It is small, adorable, and perfect for Easter baskets, handmade gifts, spring decorations, and crochet lovers who enjoy quick beginner projects.
Materials
White yarn
Pink yarn
Crochet hook
Fiberfill stuffing
Black safety eyes
Pink embroidery thread
Embroidery thread for facial details
Yarn needle
Scissors
Optional decorative yarn for the bow
Project Information
Skill Level: Beginner
Finished Size: Approximately 10 cm / 4 inches
Time: Approximately 1.5–2 hours
Perfect For: Easter decor, gifts, baskets, and spring decorations
Step-by-Step Tutorial
Step 1: Crochet the White Egg Body
Start with white yarn and create a magic ring. Crochet in continuous rounds while increasing stitches gradually. Shape the piece into an egg rather than a perfect sphere.
Step 2: Continue the Egg Shape
Keep crocheting around the body, maintaining an even tension. Work several rounds without increasing to create the main egg shape.
Step 3: Begin the Pink Bottom
Change from white yarn to pink yarn around the middle or lower section of the egg. Continue crocheting around the piece to create the pink basket-like portion.
Step 4: Shape the Pink Border
Work additional rounds with pink yarn and create a slightly decorative edge. Keep the stitches even so the pink section sits neatly around the bunny.
Step 5: Crochet the Bow
Using pink or darker pink yarn, crochet a small bow. Shape the two loops and wrap the center with yarn to keep the bow secure.
Step 6: Attach the Bow
Sew the finished bow onto the front of the pink section. Position it in the center for a cute Easter decoration.
Step 7: Make the Bunny Ears
Crochet two elongated ears using white yarn. Make the outer part white and add a smaller pink section inside each ear.
Step 8: Sew the Ears to the Top
Position the ears evenly on top of the white egg-shaped body. Sew them securely with a yarn needle.
Step 9: Add the Face
Attach two black safety eyes. Embroider a tiny nose and a simple smiling mouth using pink and black thread.
Step 10: Finish Your Bunny Egg
Check all the seams and gently shape the finished piece. Add a small amount of stuffing if needed to keep the bunny egg firm and rounded.
Easter Crochet Tips
Choose soft pastel colors such as white, blush pink, cream, or lavender for a classic spring look. For a more playful design, you can also make several Bunny Eggs in different colors.
This Crochet Bunny Egg is an easy handmade Easter craft that works beautifully as basket filler, table decor, or a small crochet gift.
3. Crochet a Reversible Tiger & Bunny Amigurumi Flip Toy
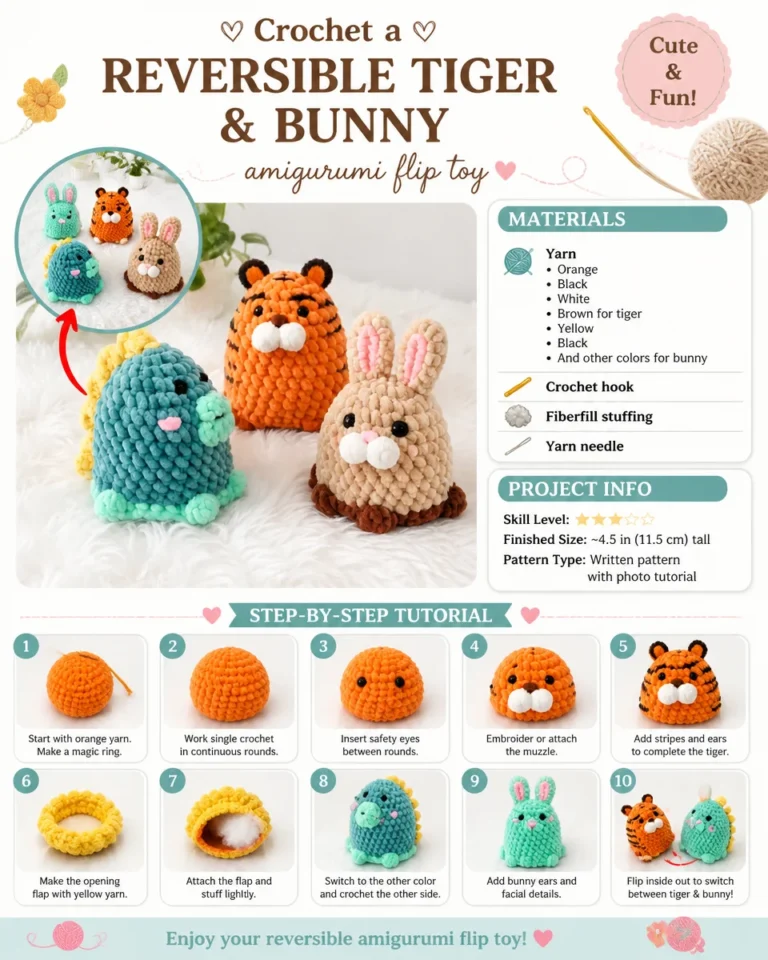
Crochet a Reversible Tiger & Bunny Amigurumi Flip Toy
Make two adorable characters in one with this fun reversible Tiger & Bunny crochet amigurumi flip toy. One side features a cute orange tiger while the other transforms into a soft bunny.
This creative crochet project is perfect for amigurumi lovers, handmade gifts, children’s room decor, and anyone who enjoys unique crochet toys.
Materials
Orange yarn
White yarn
Black yarn
Brown yarn
Yellow yarn
Pink yarn
Additional colors for the bunny
Crochet hook
Fiberfill stuffing
Safety eyes
Yarn needle
Scissors
Project Information
Skill Level: Easy to Intermediate
Finished Size: Approximately 11.5 cm / 4.5 inches tall
Pattern Type: Reversible crochet amigurumi
Step-by-Step Tutorial
Step 1: Crochet the Tiger Body
Begin with orange yarn and make a magic ring. Work in continuous rounds, increasing gradually until you have a rounded tiger body.
Step 2: Shape the Tiger
Continue crocheting without increases for the main body section. Begin decreasing toward the top to create a compact rounded shape.
Step 3: Add the Tiger Face
Attach the safety eyes and create the muzzle using white yarn. Add a small nose and embroidered facial details.
Step 4: Add Tiger Stripes and Ears
Use black yarn to embroider or crochet small stripes around the orange body. Make two small rounded ears and attach them securely to the top.
Step 5: Finish the Tiger Side
Check the face and stripes, then gently stuff the body. The tiger should remain rounded and soft while still holding its shape.
Step 6: Create the Reversible Opening
Crochet the opening or flap that allows the toy to transform from one character into the other. Use a contrasting color such as yellow for a decorative transition.
Step 7: Add the Inner Structure
Attach the flap carefully and add stuffing evenly. Avoid overstuffing because the toy needs enough flexibility to flip between its two forms.
Step 8: Crochet the Bunny Side
Switch to bunny colors and crochet the second character around the reversible structure. Use a soft color such as mint, turquoise, cream, or beige.
Step 9: Add Bunny Details
Attach two long bunny ears, safety eyes, a tiny pink nose, and small facial details. Shape the ears so they remain visible when the toy is flipped.
Step 10: Flip Between Characters
Once both sides are securely finished, gently turn the structure inside out to reveal the bunny and tiger. Make sure all seams are secure before using the finished toy.
Crochet Tips
Use tight, even stitches for amigurumi and avoid adding too much stuffing. When sewing the reversible sections together, reinforce the seams because they will be handled more frequently than a regular stuffed toy.
The finished reversible tiger and bunny is a fun handmade crochet project and a great way to experiment with creative amigurumi construction.
4. Cute Crochet Bunny Patterns for Amigurumi: Easy and Adorable
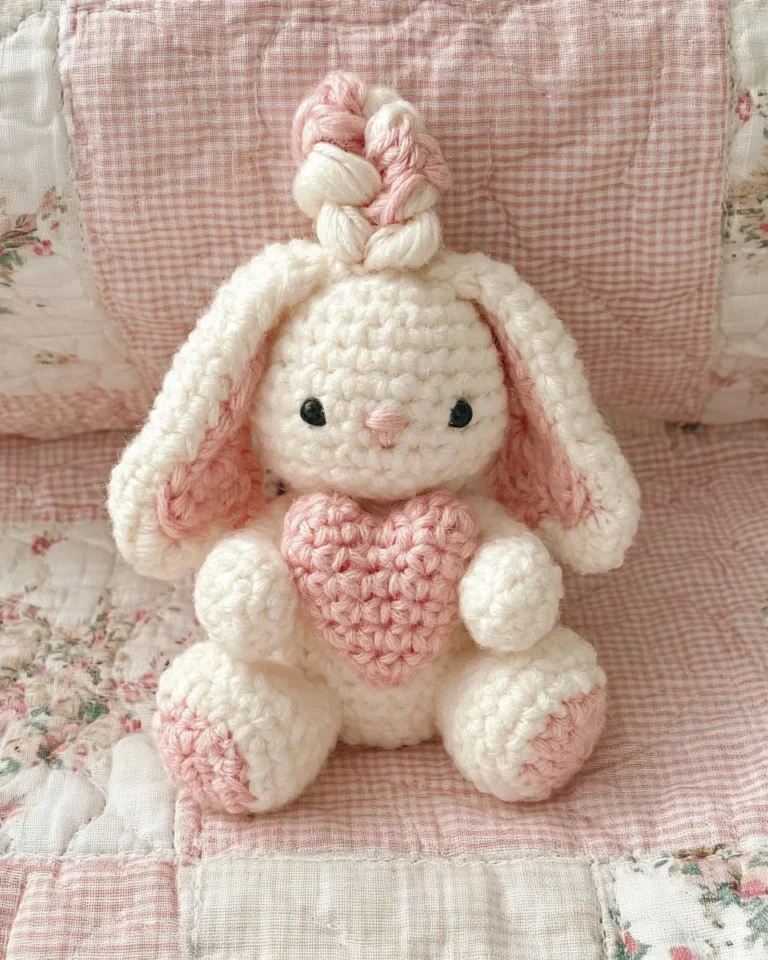
Cute Crochet Bunny Patterns for Amigurumi: Easy and Adorable
This cute crochet bunny is a soft, cuddly amigurumi project with a simple handmade look. Its rounded body, floppy ears, little paws, and sweet face make it a lovely project for crochet beginners.
Whether you want to make a handmade bunny for a child, nursery decoration, Easter, or a crochet gift, this pattern is a great place to start.
Materials
Soft pink or pastel yarn
Crochet hook
Fiberfill stuffing
Black safety eyes
Pink yarn for the nose
Yarn needle
Scissors
Optional embroidery thread
Project Information
Skill Level: Beginner
Project Type: Amigurumi bunny
Finished Size: Depends on yarn and hook size
Time: Approximately 3–5 hours
Perfect For: Gifts, Easter decor, nursery decor, and handmade toys
Step-by-Step Tutorial
Step 1: Crochet the Head
Start with a magic ring and crochet the bunny head in continuous rounds. Increase gradually to form a smooth sphere.
Step 2: Shape the Head
Continue crocheting around the head without increasing for several rounds. Start decreasing near the top and add stuffing before closing the opening.
Step 3: Crochet the Body
Begin the body with a magic ring and work in continuous rounds. Increase until you reach the desired width, then crochet several even rounds.
Step 4: Stuff the Body
Add fiberfill gradually while crocheting. Keep the stuffing evenly distributed so the bunny has a smooth, rounded body.
Step 5: Make the Arms
Crochet two narrow arms using the same yarn. Keep them lightly stuffed and flatten the ends slightly before attaching them.
Step 6: Crochet the Legs
Make two larger legs with rounded feet. Stuff them gently and shape them before sewing them onto the lower part of the body.
Step 7: Add the Face
Attach two small black safety eyes. Add a tiny pink nose and optional embroidered facial details for a cute expression.
Step 8: Crochet the Ears
Make two long floppy ears. Crochet them in rows or rounds, then flatten them slightly to create a soft floppy appearance.
Step 9: Attach the Ears
Sew both ears securely to the top of the bunny’s head. You can position them downward, sideways, or slightly forward for different expressions.
Step 10: Assemble Your Crochet Bunny
Attach the head to the body, then sew on the arms and legs. Shape the bunny gently with your hands and check that all parts are firmly attached.
Easy Amigurumi Tips
For a neat finish, keep your tension consistent and use a stitch marker to identify the beginning of each round. If you’re making the bunny for a small child, embroidered eyes can be used instead of safety eyes.
This adorable crochet bunny is a wonderful beginner-friendly amigurumi project and can easily be customized with different yarn colors and accessories.
5. Crochet Bunny: Soft, Cuddly & Handmade
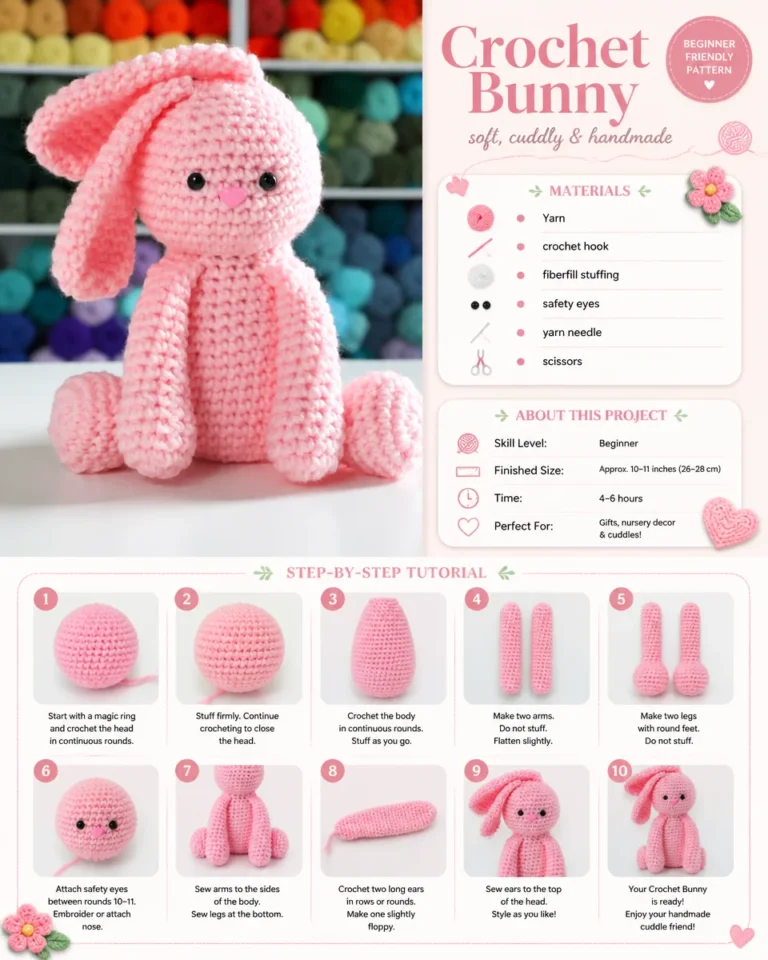
Crochet Bunny: Soft, Cuddly & Handmade
Create a soft and cuddly handmade crochet bunny with this beginner-friendly amigurumi tutorial. This sweet bunny features a rounded body, long floppy ears, tiny paws, and an adorable face.
It is a perfect crochet project for gifts, nursery decoration, Easter, or simply adding a handmade touch to your home.
Materials
Pink yarn
Crochet hook
Fiberfill stuffing
Black safety eyes
Pink yarn for the nose
Yarn needle
Scissors
Optional embroidery thread
Project Information
Skill Level: Beginner
Finished Size: Approximately 10–11 inches / 26–28 cm
Time: Approximately 4–6 hours
Perfect For: Gifts, nursery decor, cuddly handmade toys, and Easter
Step-by-Step Tutorial
Step 1: Crochet the Head
Start with a magic ring and work the head in continuous rounds. Increase gradually until you create a rounded head.
Step 2: Stuff and Close the Head
Continue working around the head and begin decreasing toward the opening. Add fiberfill and close the remaining stitches securely.
Step 3: Crochet the Body
Begin the body with a magic ring and crochet in continuous rounds. Gradually increase to create the wider lower section of the bunny.
Step 4: Stuff the Body
Add fiberfill as you work. Keep the stuffing firm but soft enough to give the bunny a cuddly feel.
Step 5: Make the Arms
Crochet two long narrow arms. Do not overstuff them. Flatten the ends slightly so they are easy to sew onto the body.
Step 6: Make the Legs
Crochet two rounded legs with larger feet. Stuff each leg lightly and shape the feet before attaching them.
Step 7: Add the Bunny Face
Attach the safety eyes between the appropriate rounds and add a small pink embroidered nose. You can also embroider a tiny mouth for extra character.
Step 8: Crochet the Long Ears
Make two long floppy ears using pink yarn. Crochet each ear in rows or rounds and keep the shape slightly flexible.
Step 9: Sew the Ears to the Head
Position the ears at the top of the head and sew them securely. Let them fall naturally down the sides of the bunny for the soft floppy-ear look.
Step 10: Complete Your Crochet Bunny
Attach the head to the body and sew the arms and legs into place. Gently shape the finished bunny, check all the seams, and trim any loose yarn ends.
Crochet Bunny Tips
For an extra soft bunny, choose a plush or chenille yarn. If you’re using standard acrylic yarn, a slightly larger hook can create a softer fabric, but make sure the stitches remain tight enough that the stuffing doesn’t show.
You can also personalize your bunny by adding a tiny bow, a heart, a dress, or a different color for the inner ears and feet.
This soft crochet bunny is a timeless handmade amigurumi project that makes a thoughtful gift and a beautiful addition to a handmade crochet collection.
