

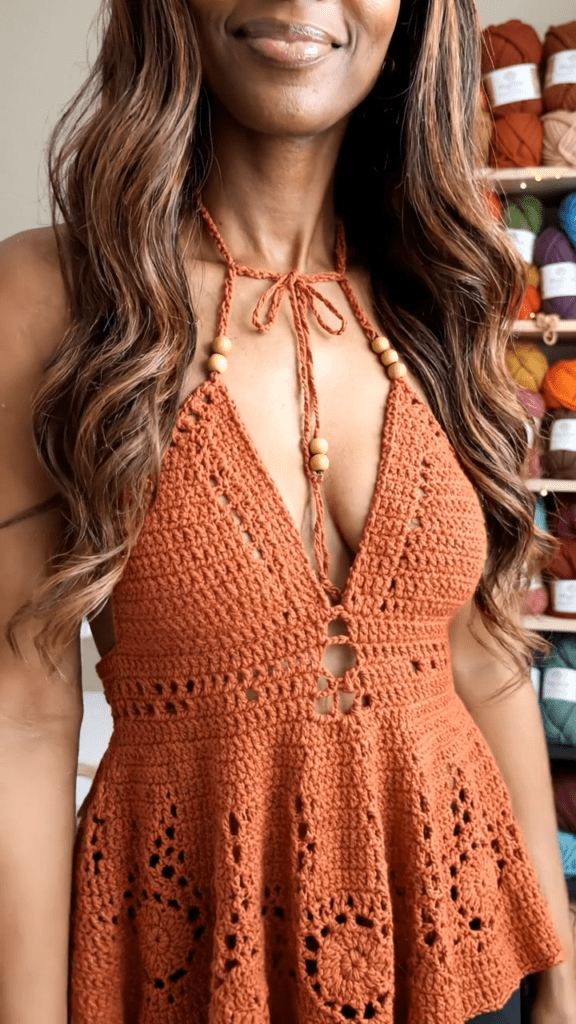
The Crochet Lace-Up Halter Top is a beautiful handmade summer project featuring a flattering halter neckline, adjustable front ties, an open lace-up detail, and a feminine flared peplum-style bottom. This crochet top is perfect with jeans, shorts, skirts, or layered over a summer dress.
The design combines simple crochet stitches with an attractive openwork pattern, making it a stylish project for intermediate crocheters. You can easily customize the length, width, and color to create your own unique crochet halter top.
Crochet Lace-Up Halter Top Pattern
This handmade crochet halter top is worked from the top downward, allowing you to adjust the fit as you crochet. The upper section creates two triangular cups, while the lower section expands slightly to form the pretty flared shape.
The front opening is finished with crochet cords that can be tied for an adjustable fit.
Materials Needed
You will need approximately 250–350 g of lightweight or medium-weight cotton yarn, depending on your size and desired length.
A 3.5 mm crochet hook is recommended, although you can use a 3.0–4.0 mm hook depending on your yarn and preferred tension.
You will also need a yarn needle for weaving in the ends, scissors, and a measuring tape.
Choose a soft cotton or cotton-blend yarn for a comfortable summer crochet top. Terracotta, rust, cream, beige, brown, black, and pastel shades all work beautifully for this design.
Crochet Abbreviations
ch = chain
sc = single crochet
dc = double crochet
sl st = slip stitch
st = stitch
sk = skip
sp = space
inc = increase
rep = repeat
Gauge and Sizing
Before starting, crochet a small swatch to check your tension.
For a comfortable fit, measure around the fullest part of your bust and compare it with the finished garment measurements.
The pattern can be adapted for different sizes by adding or removing rows from the cups and adjusting the number of stitches across the waist.
For a more fitted crochet halter top, use a slightly smaller hook. For a looser fit, use a larger hook.
Step 1: Crochet the First Halter Cup
Start with a magic ring or chain 4 and join with a slip stitch to form a small ring.
Chain 3 to count as the first double crochet.
Work several double crochet stitches into the center of the ring and close the round.
Turn your work.
For the next row, chain 3 and work double crochet stitches across the row. At the center point, increase by working additional stitches into the same stitch.
Continue working back and forth.
At the beginning and end of each row, maintain the shaping so that the piece gradually becomes triangular.
The goal is to create a triangle that comfortably covers one side of the bust.
Continue until the cup reaches your desired height.
Do not make the cup too loose. The finished crochet fabric should sit comfortably against the body without excessive stretching.
Step 2: Shape the Second Cup
Repeat the same process to create the second triangular cup.
Try to keep both cups the same size by counting your rows and stitches.
Place the two cups next to each other and check their proportions before joining them.
The cups should meet near the center of the bust while leaving enough space for the lace-up detail.
Step 3: Join the Cups
Place the two crochet cups side by side.
Using your yarn and crochet hook, join the lower inner edges with single crochet stitches.
Work slowly so the center remains symmetrical.
For the front opening, leave a small gap between the cups rather than closing the entire center.
This opening will later be decorated with a long crochet lace that can be tied to adjust the neckline.
Step 4: Create the Lace-Up Front
To make the adjustable front tie, attach your yarn near the center of the first cup.
Chain approximately 50–70 stitches, depending on how long you want the tie.
Work slip stitches back along the chain to create a neat crochet cord.
Fasten off and weave in the end.
Repeat on the opposite side.
Thread the cords through the center opening and tie them into a bow.
You can make the cords longer if you want a more dramatic lace-up effect.
Step 5: Crochet the Waist Section
Once both cups are joined, begin working across the bottom edge.
Attach the yarn to one side of the top.
Chain 3 and work double crochet stitches evenly across the row.
At this stage, avoid making the fabric too tight.
The waist section should sit comfortably around your body.
Continue working rows of double crochet until you reach your preferred waist length.
For the style shown in the photo, keep the upper section relatively fitted and begin increasing gradually as you move downward.
Step 6: Add the Openwork Crochet Pattern
Now you can create the decorative lace section.
A simple openwork pattern can be made using chain spaces and skipped stitches.
For example:
Row 1: Chain 3, work 1 double crochet, chain 1, skip 1 stitch, then work 1 double crochet in the next stitch. Repeat across.
Row 2: Chain 3, work 1 double crochet into the next chain space, chain 1, then continue the same pattern across.
Repeat these rows to create a lightweight mesh effect.
For a more decorative finish, you can replace some of the chain spaces with small shell stitches.
The openwork section gives the crochet top its airy, feminine appearance while also adding visual texture.
Step 7: Create the Flared Bottom
To recreate the slightly flared silhouette, gradually increase your stitch count.
Every few rows, add extra stitches evenly across the row.
For example, work two double crochet stitches into selected stitches instead of one.
Spread your increases evenly rather than placing them all in one area.
Continue until the bottom reaches your preferred width.
The more increases you add, the more pronounced the peplum effect will become.
Step 8: Crochet the Decorative Bottom Edge
Finish the bottom with a simple scalloped or shell border.
One easy option is:
Chain 1, skip 2 stitches, work 5 double crochet stitches into the next stitch, skip 2 stitches, then work 1 single crochet into the next stitch.
Repeat this pattern around the entire bottom edge.
This creates a pretty crochet lace border that complements the openwork body.
Step 9: Add the Neck and Back Ties
For the halter straps, attach yarn to the top corner of each cup.
Chain enough stitches to create a comfortable strap.
Work slip stitches or single crochet stitches back across the chain.
Fasten off securely.
Repeat for the other side.
For the back closure, create two long crochet cords and attach them to the sides of the top.
These ties allow you to adjust the fit around your back and make the Crochet Lace-Up Halter Top more comfortable to wear.
Step 10: Finishing the Crochet Top
Carefully weave all loose yarn ends into the back of the stitches using a yarn needle.
Trim the excess yarn.
Before wearing the top, gently block it to help the cups and lace pattern hold their shape.
Lay the garment flat and lightly shape the triangular cups and bottom edge.
Allow it to dry completely.
Tips for Making Your Crochet Lace-Up Halter Top
Use cotton yarn if you want a lightweight and breathable summer garment.
Keep checking the fit while crocheting instead of waiting until the end.
If the cups are too small, add additional rows.
If the top is too wide, reduce the number of increases in the lower section.
For more coverage, use tighter stitches in the cup section.
For a more open and delicate look, use a slightly larger crochet hook and a lighter yarn.
You can also make the top longer by adding additional openwork rows before finishing the bottom border.
How to Style a Crochet Lace-Up Halter Top
This crochet halter top looks especially cute with high-waisted jeans for a casual summer outfit.
For a beach-inspired look, pair it with a crochet skirt, denim shorts, sandals, and a woven bag.
You can also layer it over a simple camisole or fitted tank top for more coverage.
Changing the yarn color can completely transform the style. Earthy shades such as rust and terracotta create a boho handmade look, while white and cream give the top a soft summer aesthetic.
Final Thoughts
Making your own Crochet Lace-Up Halter Top is a fun way to create a stylish handmade summer garment. The combination of triangular crochet cups, adjustable lace-up ties, openwork stitches, and a slightly flared bottom creates a beautiful boho-inspired silhouette.
Once you understand the basic construction, you can easily customize the length, color, neckline, straps, and decorative border to make a crochet top that fits your personal style.
If you love handmade summer fashion, this Crochet Lace-Up Halter Top is a wonderful project to add to your crochet wardrobe. 🧶✨
SEO Keywords
Crochet Lace-Up Halter Top, crochet halter top pattern, crochet summer top, crochet top pattern, easy crochet halter top, DIY crochet top, crochet lace top, crochet tie front top, crochet peplum top, handmade crochet clothing, boho crochet top, summer crochet pattern.
