

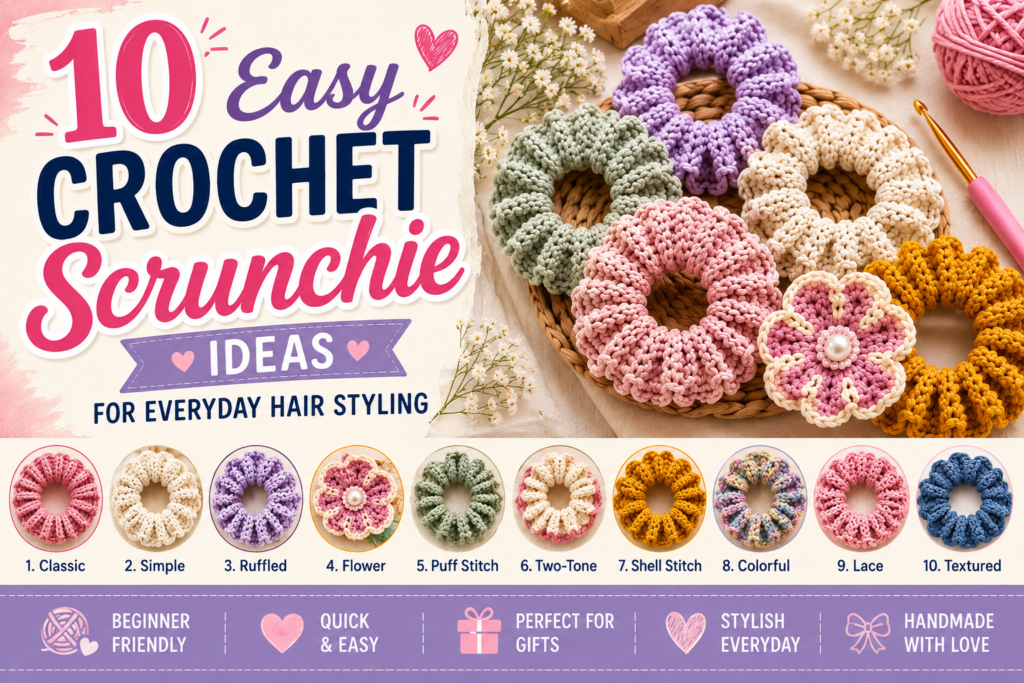
Crochet scrunchies are a fun way to turn leftover yarn into cute, practical hair accessories. They work up quickly, require only a few materials, and can be customized with different colors, stitches, flowers, and textures.
Whether you prefer a simple everyday scrunchie or a decorative floral design, these 10 easy crochet scrunchie ideas are perfect for beginners and experienced crocheters alike.
In this guide, you’ll find the materials needed and step-by-step instructions for each design, along with helpful tips for getting a neat, comfortable finish.
Before You Start
For most crochet scrunchies, you’ll crochet around a regular elastic hair tie. The elastic acts as the foundation while your stitches create the decorative covering.
For a consistent result:
- Keep your crochet stitches fairly firm.
- Do not stretch the elastic too much while crocheting.
- Make sure the stitches completely cover the elastic.
- Count your stitches when making the first scrunchie.
- Test the finished scrunchie in your hair before adding heavy decorations.
- Weave in all yarn ends securely.
What You’ll Need
Basic Materials
- 1 elastic hair tie
- Worsted-weight or cotton yarn
- Crochet hook suitable for your yarn
- Yarn needle
- Scissors
Optional Materials
- Small crochet flowers
- Beads
- Pearls
- Embroidery needle
- Contrasting yarn
- Decorative buttons
Helpful Tip: Cotton yarn gives a neat, defined texture, while soft acrylic yarn can create a fuller and more colorful scrunchie.
1. Classic Crochet Scrunchie
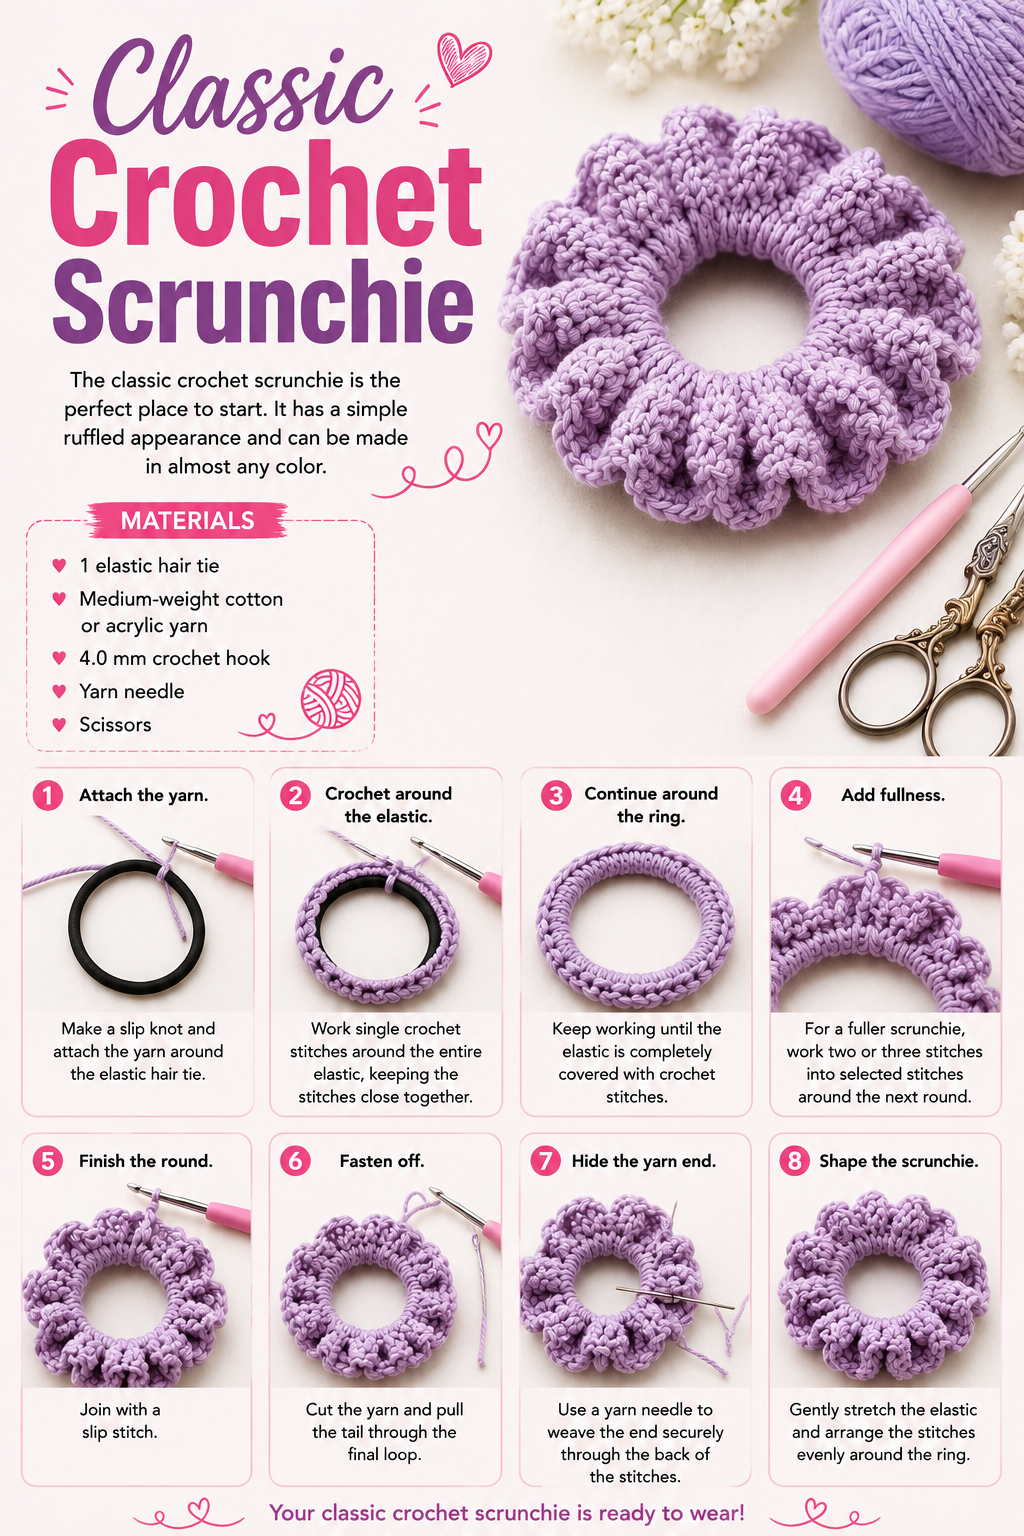
The classic crochet scrunchie is the perfect place to start. It has a simple ruffled appearance and can be made in almost any color.
Materials
- 1 elastic hair tie
- Medium-weight cotton or acrylic yarn
- 4.0 mm crochet hook
- Yarn needle
- Scissors
Step-by-Step Instructions
Step 1: Attach the yarn.
Make a slip knot and attach the yarn around the elastic hair tie.
Step 2: Crochet around the elastic.
Work single crochet stitches around the entire elastic, keeping the stitches close together.
Step 3: Continue around the ring.
Keep working until the elastic is completely covered with crochet stitches.
Step 4: Add fullness.
For a fuller scrunchie, work two or three stitches into selected stitches around the next round.
Step 5: Finish the round.
Join with a slip stitch.
Step 6: Fasten off.
Cut the yarn and pull the tail through the final loop.
Step 7: Hide the yarn end.
Use a yarn needle to weave the end securely through the back of the stitches.
Step 8: Shape the scrunchie.
Gently stretch the elastic and arrange the stitches evenly around the ring.
2. Ruffled Crochet Scrunchie
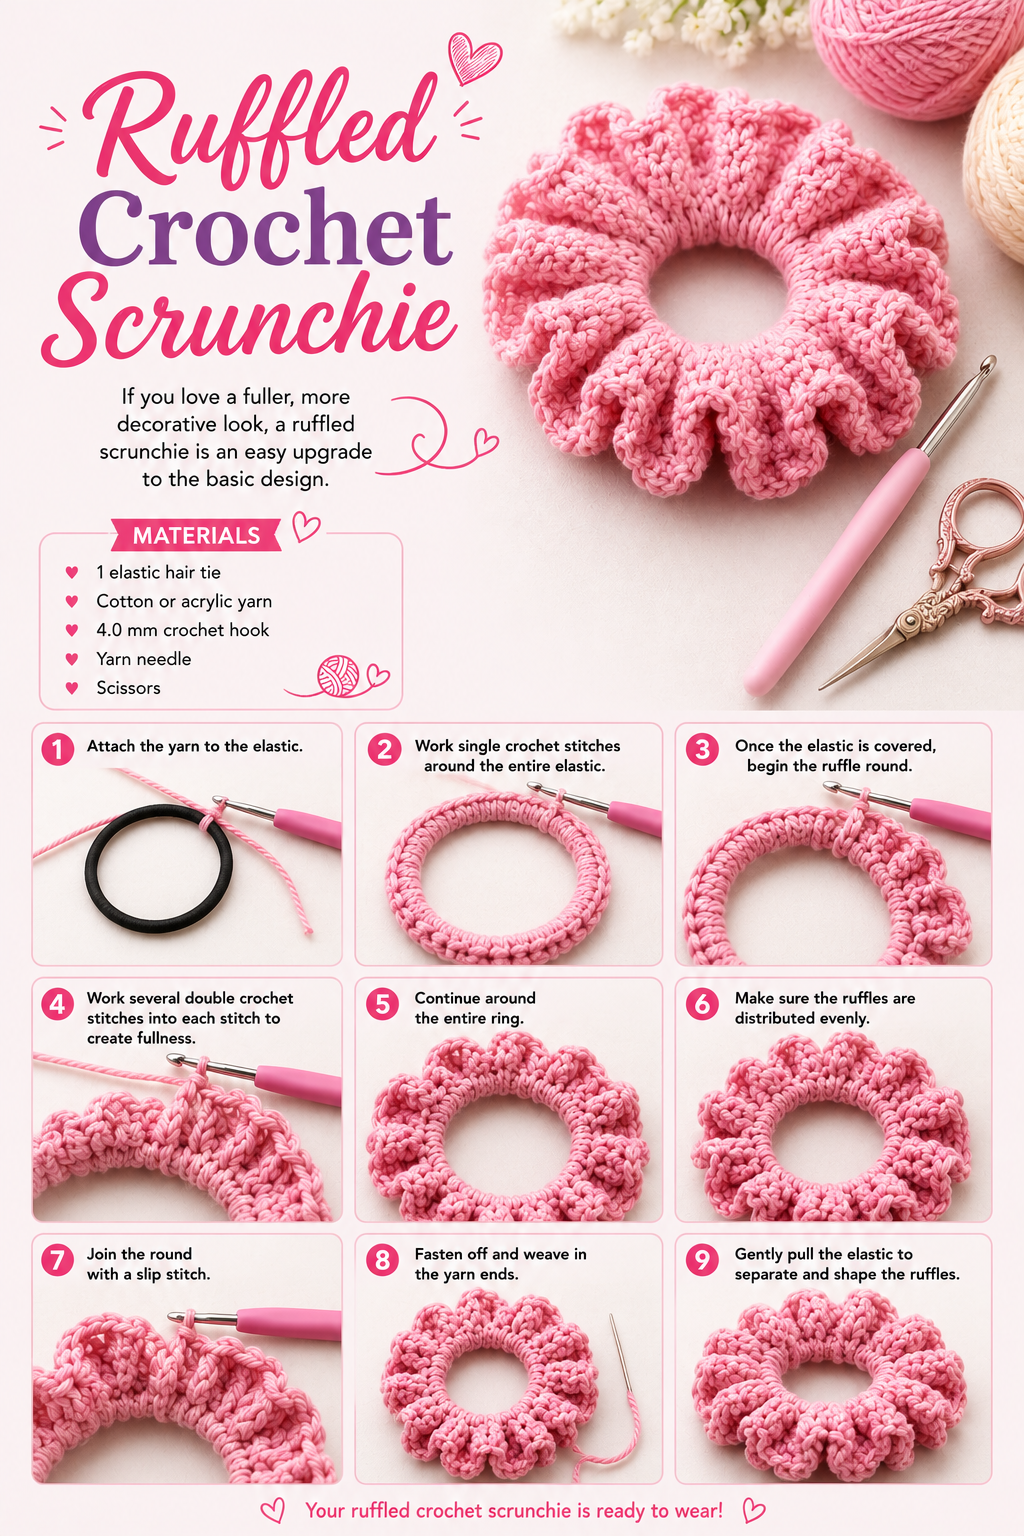
If you love a fuller, more decorative look, a ruffled scrunchie is an easy upgrade to the basic design.
Materials
- 1 elastic hair tie
- Cotton or acrylic yarn
- 4.0 mm crochet hook
- Yarn needle
- Scissors
Step-by-Step Instructions
Step 1: Attach the yarn to the elastic.
Step 2: Work single crochet stitches around the entire elastic.
Step 3: Once the elastic is covered, begin the ruffle round.
Step 4: Work several double crochet stitches into each stitch to create fullness.
Step 5: Continue around the entire ring.
Step 6: Make sure the ruffles are distributed evenly.
Step 7: Join the round with a slip stitch.
Step 8: Fasten off and weave in the yarn ends.
Step 9: Gently pull the elastic to separate and shape the ruffles.
3. Crochet Flower Scrunchie
A flower scrunchie adds a feminine handmade detail and is especially pretty in pastel colors.
Materials
- 1 completed crochet-covered scrunchie
- Pink, cream, lavender, or pastel yarn
- Crochet hook
- Yarn needle
- Scissors
Step-by-Step Instructions
Step 1: Make the scrunchie base.
Cover the elastic using your preferred crochet stitch.
Step 2: Crochet a small flower.
Create a small center ring and work several stitches into the ring.
Step 3: Make the petals.
Work chains and taller stitches around the center to create 5–6 petals.
Step 4: Close the flower.
Join the final petal with a slip stitch.
Step 5: Fasten off.
Leave a yarn tail long enough for sewing.
Step 6: Position the flower.
Place the flower on one side of the scrunchie.
Step 7: Sew it securely.
Use the yarn needle to attach the flower through several stitches.
Step 8: Hide the yarn ends.
Weave the remaining yarn securely into the back.
4. Crochet Daisy Scrunchie
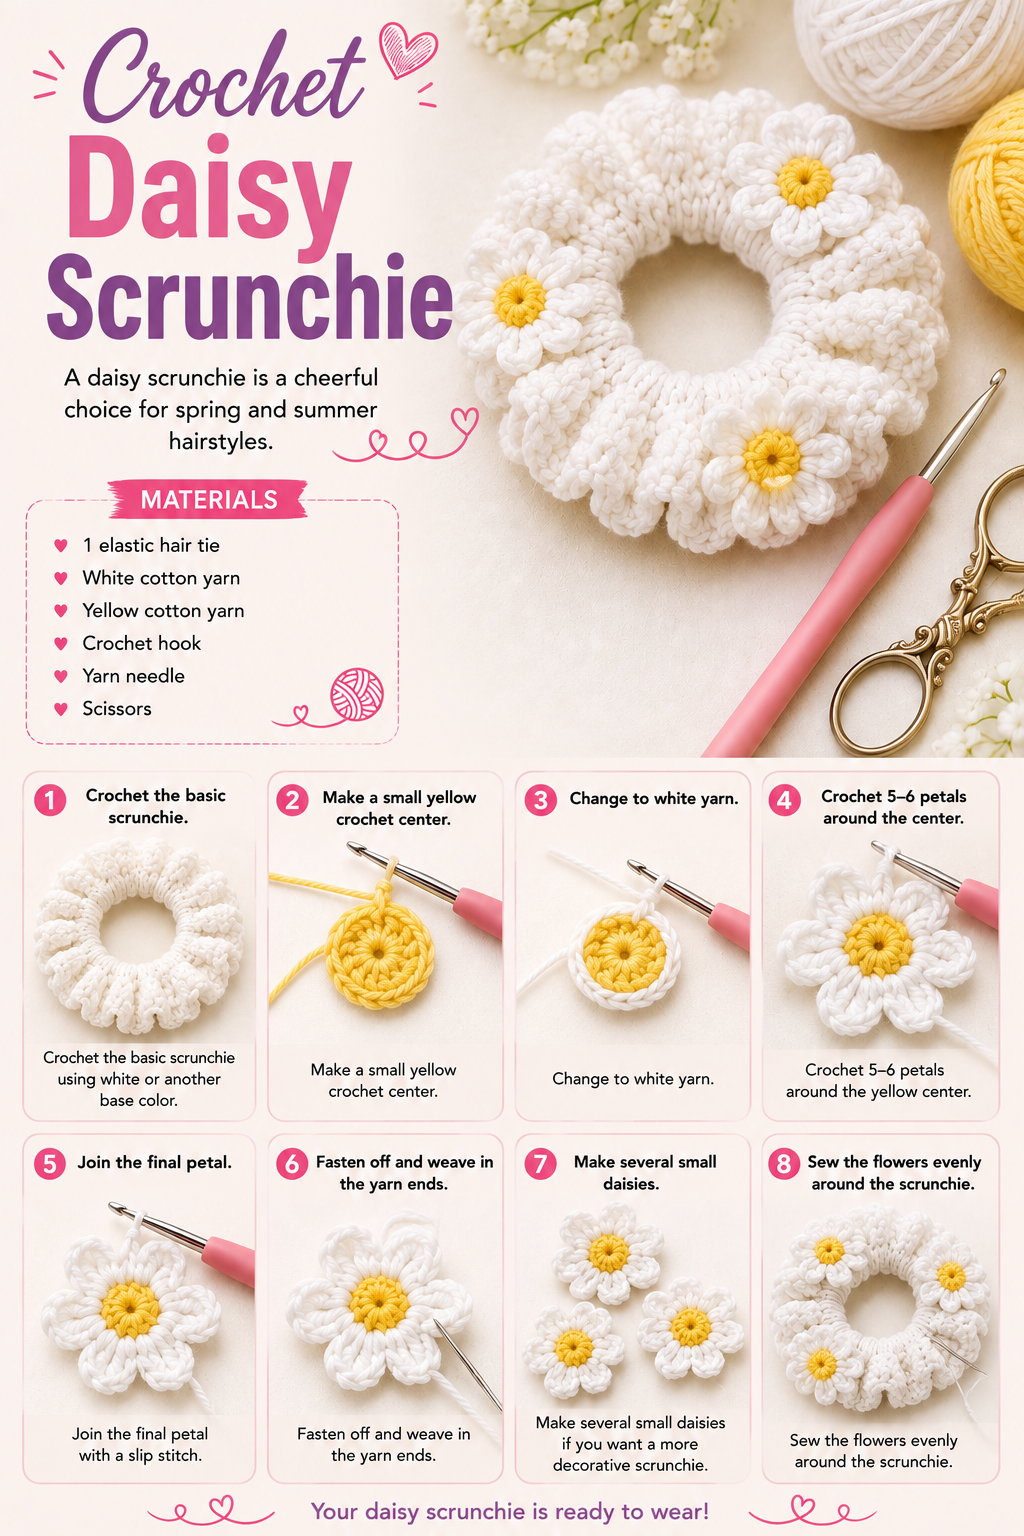
A daisy scrunchie is a cheerful choice for spring and summer hairstyles.
Materials
- 1 elastic hair tie
- White cotton yarn
- Yellow cotton yarn
- Crochet hook
- Yarn needle
- Scissors
Step-by-Step Instructions
Step 1: Crochet the basic scrunchie using white or another base color.
Step 2: Make a small yellow crochet center.
Step 3: Change to white yarn.
Step 4: Crochet 5–6 petals around the yellow center.
Step 5: Join the final petal.
Step 6: Fasten off and weave in the yarn ends.
Step 7: Make several small daisies if you want a more decorative scrunchie.
Step 8: Sew the flowers evenly around the scrunchie.
5. Crochet Flower Cluster Scrunchie
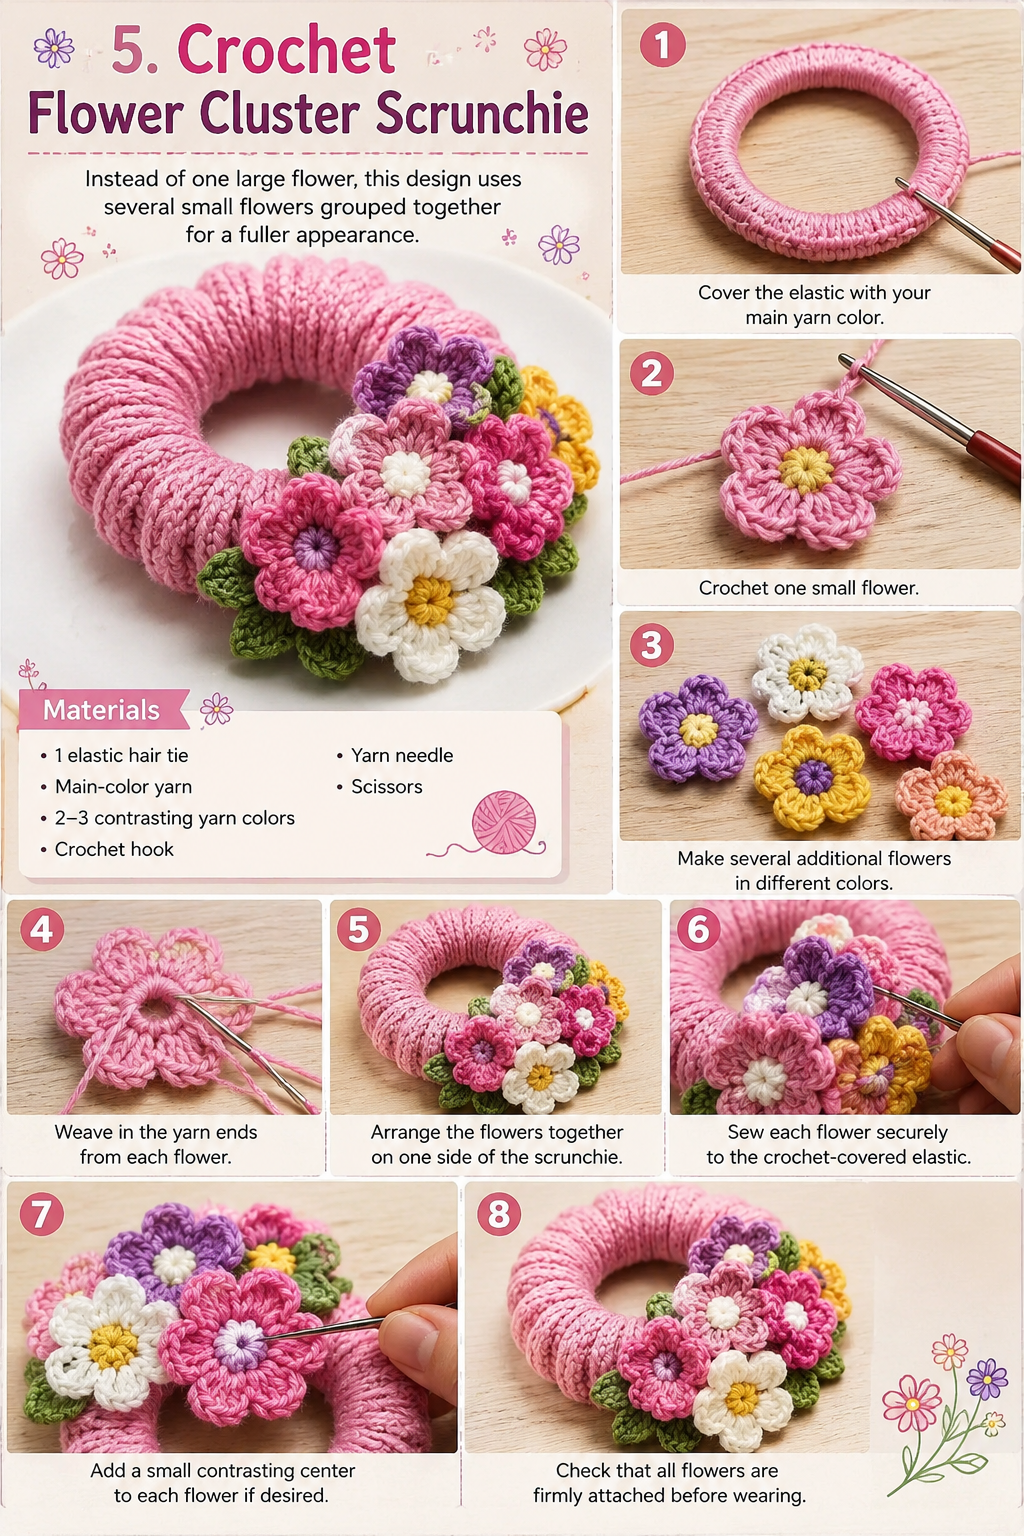
Instead of one large flower, this design uses several small flowers grouped together for a fuller appearance.
Materials
- 1 elastic hair tie
- Main-color yarn
- 2–3 contrasting yarn colors
- Crochet hook
- Yarn needle
- Scissors
Step-by-Step Instructions
Step 1: Cover the elastic with your main yarn color.
Step 2: Crochet one small flower.
Step 3: Make several additional flowers in different colors.
Step 4: Weave in the yarn ends from each flower.
Step 5: Arrange the flowers together on one side of the scrunchie.
Step 6: Sew each flower securely to the crochet-covered elastic.
Step 7: Add a small contrasting center to each flower if desired.
Step 8: Check that all flowers are firmly attached before wearing.
6. Pastel Crochet Scrunchie
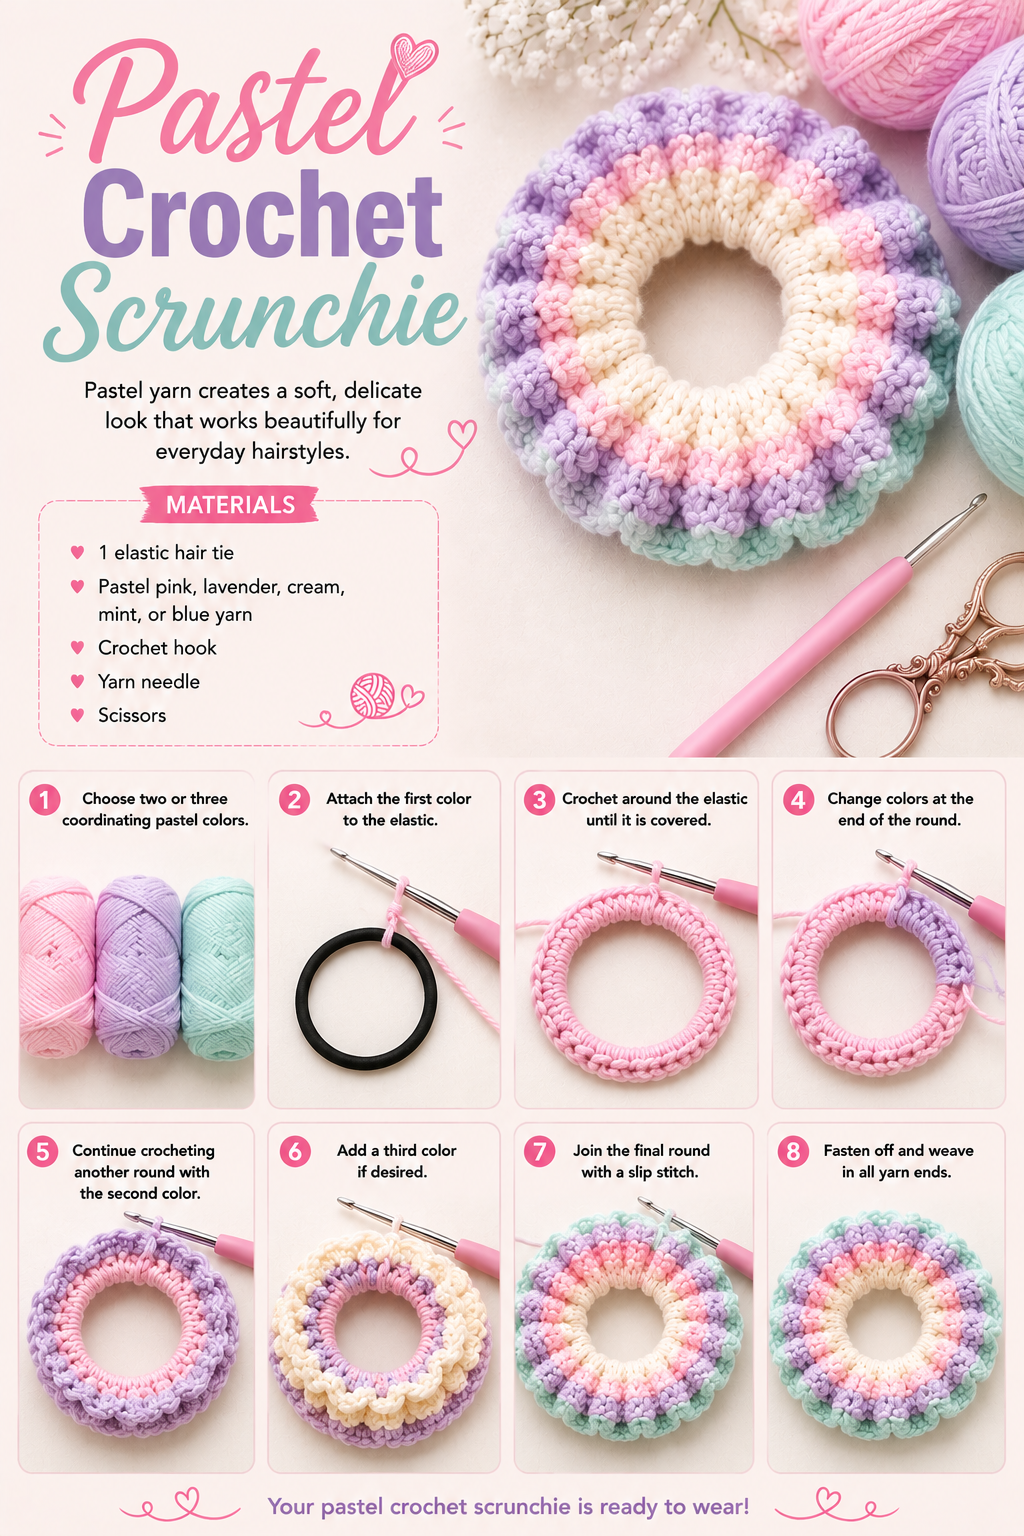
Pastel yarn creates a soft, delicate look that works beautifully for everyday hairstyles.
Materials
- 1 elastic hair tie
- Pastel pink, lavender, cream, mint, or blue yarn
- Crochet hook
- Yarn needle
- Scissors
Step-by-Step Instructions
Step 1: Choose two or three coordinating pastel colors.
Step 2: Attach the first color to the elastic.
Step 3: Crochet around the elastic until it is covered.
Step 4: Change colors at the end of the round.
Step 5: Continue crocheting another round with the second color.
Step 6: Add a third color if desired.
Step 7: Join the final round with a slip stitch.
Step 8: Fasten off and weave in all yarn ends.
7. Crochet Leaf Scrunchie
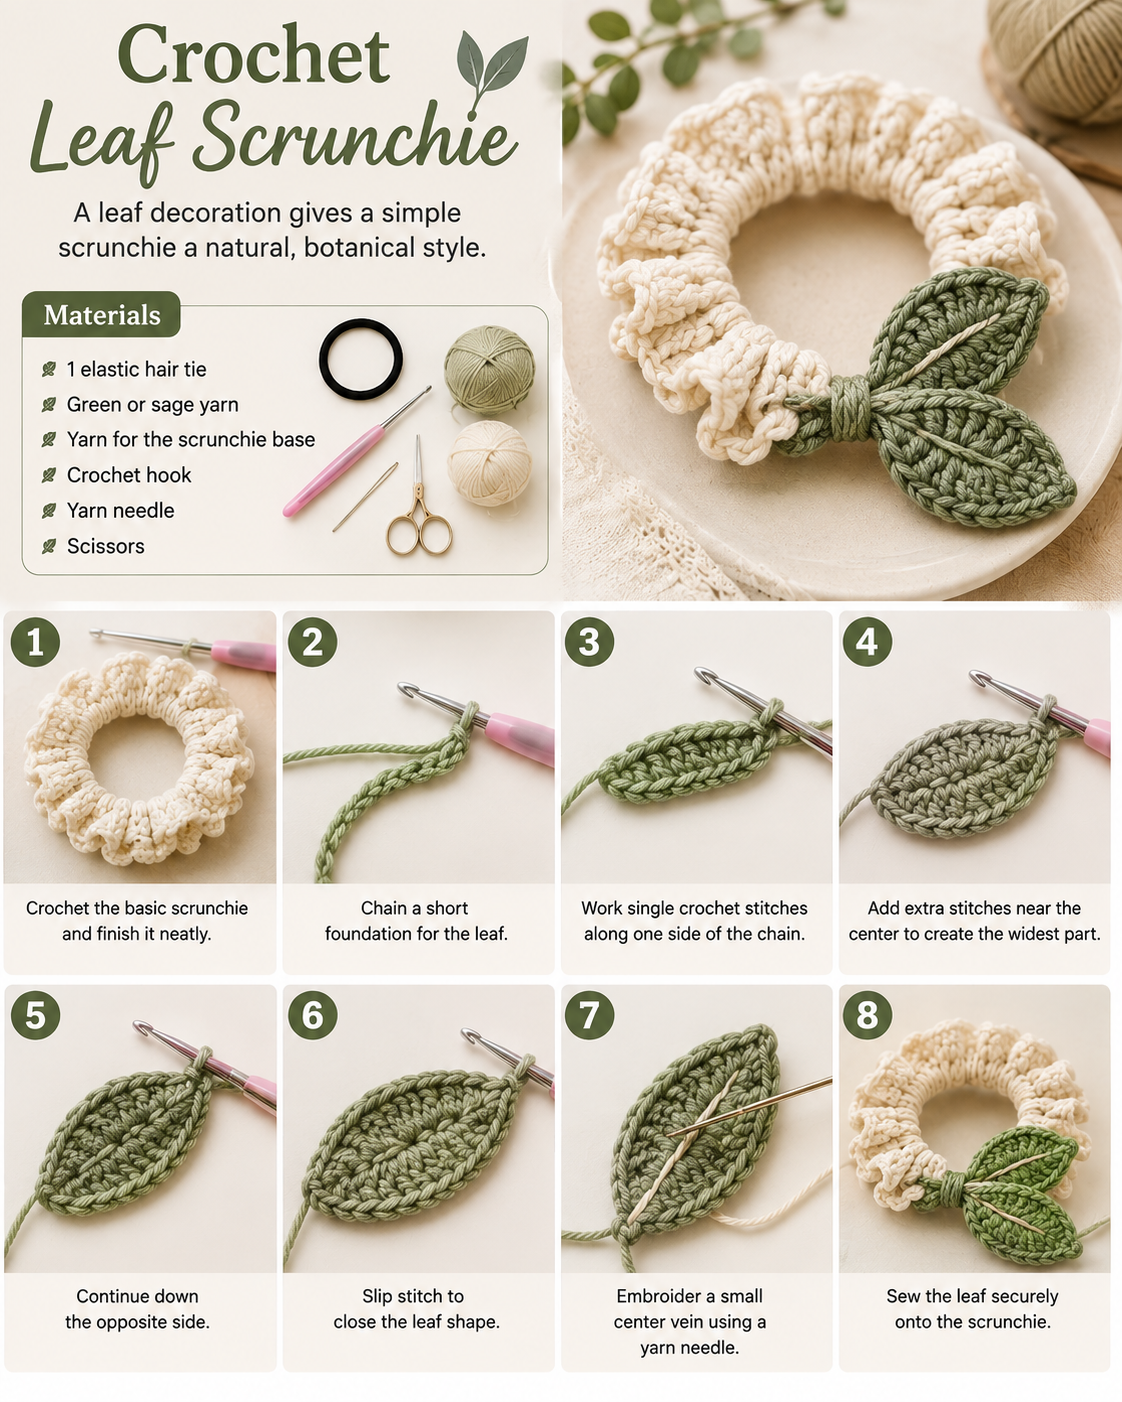
A leaf decoration gives a simple scrunchie a natural, botanical style.
Materials
- 1 elastic hair tie
- Green or sage yarn
- Yarn for the scrunchie base
- Crochet hook
- Yarn needle
- Scissors
Step-by-Step Instructions
Step 1: Crochet the basic scrunchie and finish it neatly.
Step 2: Chain a short foundation for the leaf.
Step 3: Work single crochet stitches along one side of the chain.
Step 4: Add extra stitches near the center to create the widest part.
Step 5: Continue down the opposite side.
Step 6: Slip stitch to close the leaf shape.
Step 7: Embroider a small center vein using a yarn needle.
Step 8: Sew the leaf securely onto the scrunchie.
8. Crochet Pearl Flower Scrunchie
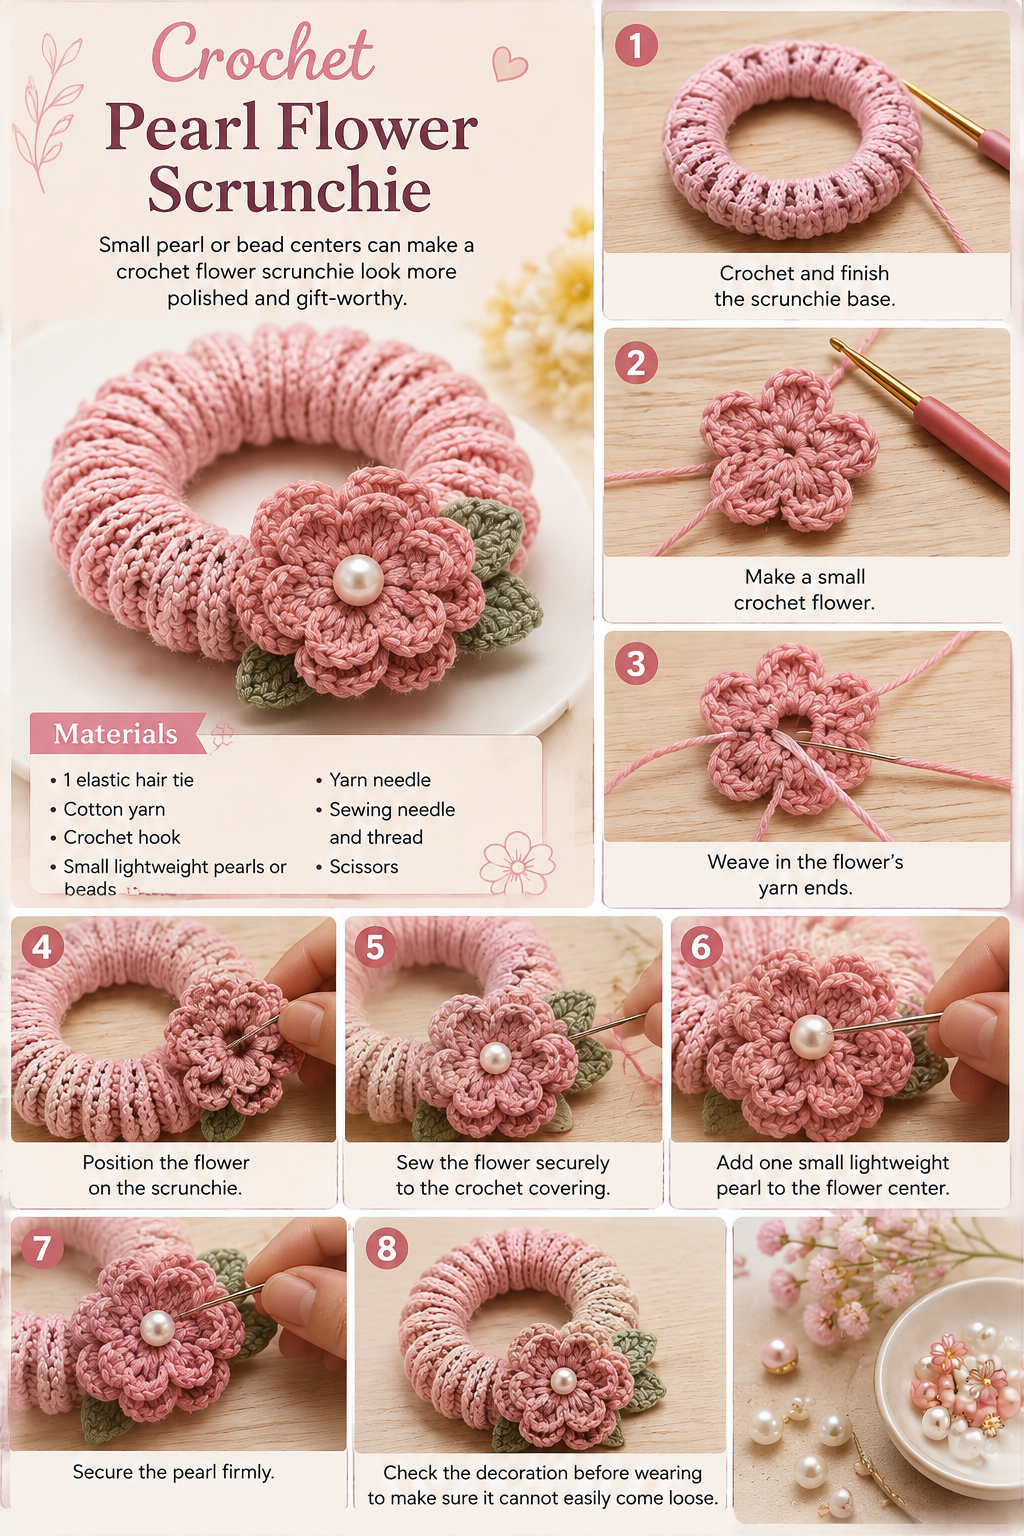
Small pearl or bead centers can make a crochet flower scrunchie look more polished and gift-worthy.
Materials
- 1 elastic hair tie
- Cotton yarn
- Crochet hook
- Small lightweight pearls or beads
- Yarn needle
- Sewing needle and thread
- Scissors
Step-by-Step Instructions
Step 1: Crochet and finish the scrunchie base.
Step 2: Make a small crochet flower.
Step 3: Weave in the flower’s yarn ends.
Step 4: Position the flower on the scrunchie.
Step 5: Sew the flower securely to the crochet covering.
Step 6: Add one small lightweight pearl to the flower center.
Step 7: Secure the pearl firmly.
Step 8: Check the decoration before wearing to make sure it cannot easily come loose.
9. Two-Tone Crochet Scrunchie
Two contrasting colors can create a modern and eye-catching accessory without complicated stitches.
Materials
- 1 elastic hair tie
- Two coordinating yarn colors
- Crochet hook
- Yarn needle
- Scissors
Step-by-Step Instructions
Step 1: Attach the first color to the elastic.
Step 2: Crochet around half of the elastic.
Step 3: Join the second color.
Step 4: Continue crocheting around the remaining section.
Step 5: Add another round using alternating colors if desired.
Step 6: Make sure there are no uncovered areas of elastic.
Step 7: Finish with a slip stitch.
Step 8: Weave in both yarn ends securely.
10. Colorful Crochet Scrunchie
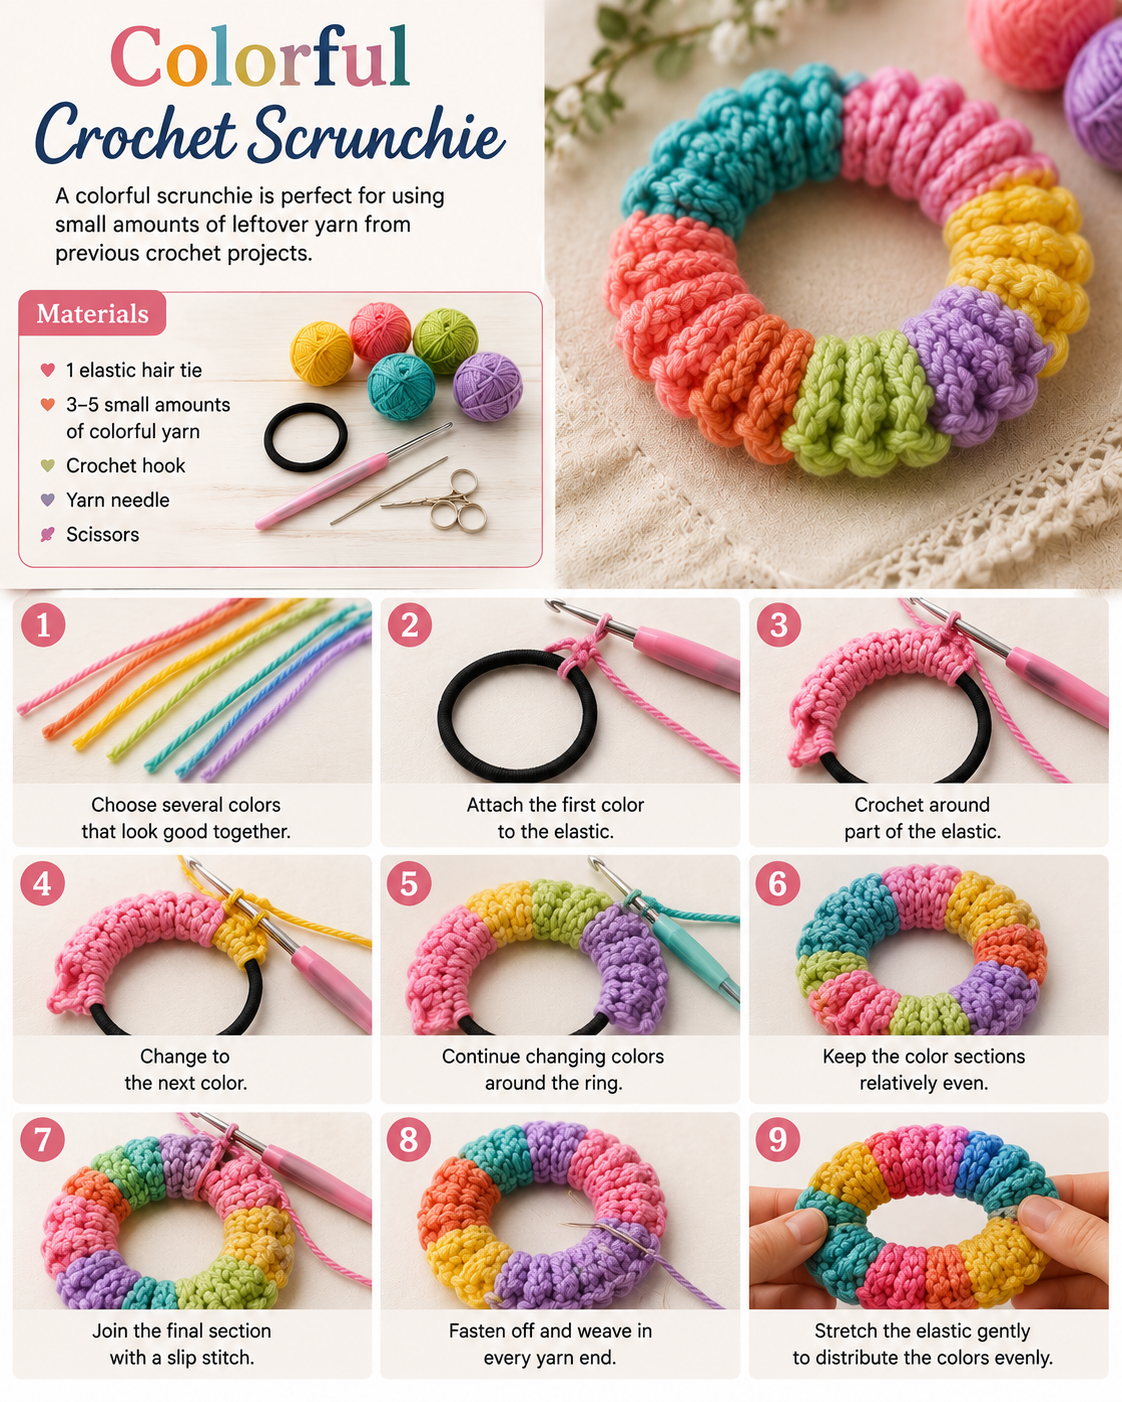
A colorful scrunchie is perfect for using small amounts of leftover yarn from previous crochet projects.
Materials
- 1 elastic hair tie
- 3–5 small amounts of colorful yarn
- Crochet hook
- Yarn needle
- Scissors
Step-by-Step Instructions
Step 1: Choose several colors that look good together.
Step 2: Attach the first color to the elastic.
Step 3: Crochet around part of the elastic.
Step 4: Change to the next color.
Step 5: Continue changing colors around the ring.
Step 6: Keep the color sections relatively even.
Step 7: Join the final section with a slip stitch.
Step 8: Fasten off and weave in every yarn end.
Step 9: Stretch the elastic gently to distribute the colors evenly.
How to Make Your Crochet Scrunchie Fuller
If your scrunchie looks too flat, you can add fullness by increasing the number of stitches in the decorative round.
Try:
- Adding extra double crochet stitches.
- Working several stitches into the same stitch.
- Using a slightly larger crochet hook.
- Adding a second ruffle round.
- Using a slightly thicker yarn.
Avoid adding too much yarn because a very heavy scrunchie may become uncomfortable in the hair.
How to Make a Neat Crochet Scrunchie
For a polished finished result, pay attention to your tension.
Keep your stitches consistent around the elastic and make sure the elastic remains flexible. If the crochet covering is too tight, the scrunchie may not stretch comfortably.
Before finishing, stretch the scrunchie several times and check for gaps.
Best Yarn for Crochet Scrunchies
Cotton Yarn
Cotton is an excellent option because it creates defined stitches and is available in many colors.
Acrylic Yarn
Acrylic yarn is soft, colorful, and budget-friendly. It can be especially useful for playful scrunchie designs.
Cotton Blend
A cotton blend can give you a combination of softness and stitch definition.
For a first project, choose a smooth yarn that is easy to work with rather than a very fuzzy or textured yarn.
Crochet Scrunchie Color Ideas
Soft Pastels: Pink, lavender, cream, and mint.
Floral: White, yellow, sage, and blush pink.
Earthy: Terracotta, olive, beige, and brown.
Summer: Coral, turquoise, yellow, and pink.
Classic: Black, cream, burgundy, and dusty rose.
Rainbow: Pink, orange, yellow, green, blue, and purple.
Tips for Making Crochet Scrunchies as Gifts
Crochet scrunchies make simple handmade gifts because they are small, useful, and easy to personalize.
You can make a matching set of three or four scrunchies using different colors. Place them inside a small fabric pouch or gift box for a cute presentation.
For a special handmade set, combine:
- One floral scrunchie
- One pastel scrunchie
- One two-tone scrunchie
- One simple everyday scrunchie
Frequently Asked Questions
Are crochet scrunchies easy for beginners?
Yes. A basic crochet-covered elastic is one of the easiest crochet accessories to make. Once you understand how to crochet around the elastic, you can experiment with ruffles, flowers, and color changes.
What yarn is best for crochet scrunchies?
Cotton and smooth acrylic yarn are both good choices. Cotton gives a crisp handmade appearance, while acrylic provides softness and many color options.
Can I use leftover yarn?
Absolutely. Scrunchies use relatively small amounts of yarn, making them a great project for leftover yarn.
How many crochet stitches should I use?
The exact number depends on your yarn, hook, tension, and the size of your elastic. Rather than following one fixed stitch count, focus on completely covering the elastic while keeping it flexible.
Can I add flowers to a crochet scrunchie?
Yes. Small crochet flowers, leaves, bows, and other lightweight decorations can be sewn onto the finished scrunchie.
How do I keep my scrunchie from becoming too stiff?
Avoid crocheting too tightly around the elastic. Your stitches should cover the elastic without restricting its ability to stretch.
Final Thoughts
Making crochet scrunchies is a quick and creative way to turn a simple elastic hair tie into a stylish handmade accessory. From classic ruffles and soft pastel colors to floral decorations, leaves, pearls, and colorful designs, there are plenty of ways to create a scrunchie that matches your personal style.
Start with the classic crochet scrunchie if you’re a beginner, then try the ruffled or flower designs once you’re comfortable working around the elastic.
Grab your favorite yarn, choose a color combination you love, and make a few DIY crochet scrunchies for everyday hair styling, handmade gifts, or your own crochet accessory collection. 🧶🌸
