

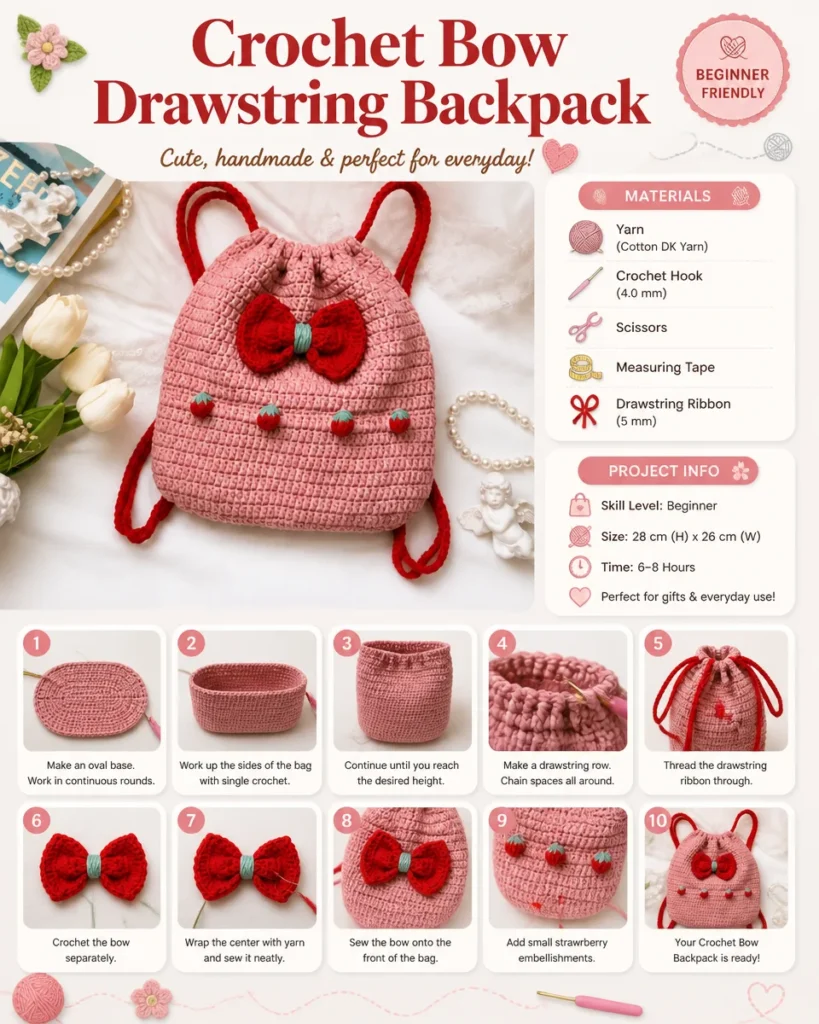
Crochet Your Own Bow Drawstring Backpack
If you’re looking for a fun and creative project that results in an adorable accessory, look no further! This Crochet Bow Drawstring Backpack is the perfect combination of charm and practicality. Whether you’re heading to the park, going to class, or just running errands, this handmade treasure is sure to turn heads everywhere you go.
Why Crochet a Backpack?
Crocheting your own backpack offers several benefits:
- Customization: You can select colors and patterns that reflect your personal style.
- Skill Development: Crocheting helps improve your fine motor skills and enhances your creativity.
- Sustainability: A handmade bag reduces reliance on mass-produced items and promotes eco-friendly practices.
Materials Needed
Before you embark on this delightful project, gather the following materials:
- 2 skeins of your favorite yarn (choose cotton or acrylic for durability)
- A crochet hook (recommended size varies depending on the yarn)
- Scissors
- Tapestry needle for weaving in ends
- Optional: decorative button or embellishments
Basic Crochet Stitches to Know
If you’re new to crocheting, familiarize yourself with these basic stitches:
- Chain Stitch (ch): The foundation for most crochet projects.
- Single Crochet (sc): A fundamental stitch that creates a tight fabric.
- Double Crochet (dc): A taller stitch that adds height and texture.
Instructions for the Bow Drawstring Backpack
Step 1: Create the Body of the Backpack
- Begin with a foundation chain that matches your desired width.
- Work in rows using the single crochet stitch until the piece reaches your desired height.
- To create the rounded bottom, increase the size by adding additional stitches on every few rows.
Step 2: Add the Drawstring Casing
- Once you have the desired height, create a drawstring casing by working a double crochet row around the top edge.
- This will allow for easy insertion of the drawstring later on.
Step 3: Make the Bow
- Crochet a rectangular piece for the bow, using a combination of single and double crochet stitches to create a textured look.
- Fold the rectangle into a bow shape and secure it by wrapping a small piece of yarn around the center.
Step 4: Assemble the Backpack
- Attach the bow to the front of your backpack for an adorable touch.
- Insert a sturdy drawstring through the casing at the top of the bag, ensuring it’s long enough for easy pulling.
Finishing Touches
- Weave in any loose ends with your tapestry needle for a neat finish.
- Consider adding a lining or extra pockets for added functionality.
Show Off Your Creation!
Now that you’ve crafted your very own Crochet Bow Drawstring Backpack, it’s time to show it off! Take it out on the town, use it for school, or even gift it to a friend. The compliments and admiration will surely follow.
Get Inspired!
Need more ideas? Explore various Ravelry patterns for different styles and embellishments to make your backpack uniquely yours. The possibilities are endless when it comes to crochet!
Conclusion
Crocheting a Bow Drawstring Backpack is not only a rewarding activity, but it also results in a beautiful accessory that’s useful and fun. With just a few materials and some basic crochet skills, you can create a delightful piece that’s bound to make a statement wherever you go. Happy crocheting!
